Why are we using Git/GitHub?
Git and GitHub allow us to do a few important things in data science:
- keep track of different versions of our work (so that old work is never lost forever)
- store our work remotely (so that if our computers die, we still have access to our stuff)
- reuse other people’s work (so that we can reproduce their work and also repurpose for our own needs)
- collaborate with others (so that you’re not emailing, texting, etc. code back and forth)
See Horst and Lowndes, “GitHub for supporting, reusing, contributing, and failing safely.” for a broad overview of how Git/GitHub work together, and Jenny Brian’s “Excuse me, do you have a moment to talk about version control? for more.
What is the difference between Git and GitHub?
Git is what tracks your changes (and allows you to have version control), while GitHub is a cloud hosting service for those changes. We use both together.
Operations
If you’re having trouble seeing any screenshots, click the image to make it bigger.
- repo: short for “repository”, think of this as a folder
- remote: your repository on GitHub (in the cloud)
- clone: essentially making a local copy (i.e. a copy on your computer) of a remote repo
- commit: track the changes you’ve made using Git (on your computer only)
- push: push the changes you’ve committed to GitHub (now in the cloud)
- pull: pull changes from GitHub to your computer
- fork: create a copy of someone else’s repo on GitHub
Creating a repository and using Git/GitHub
1. Create a repository.
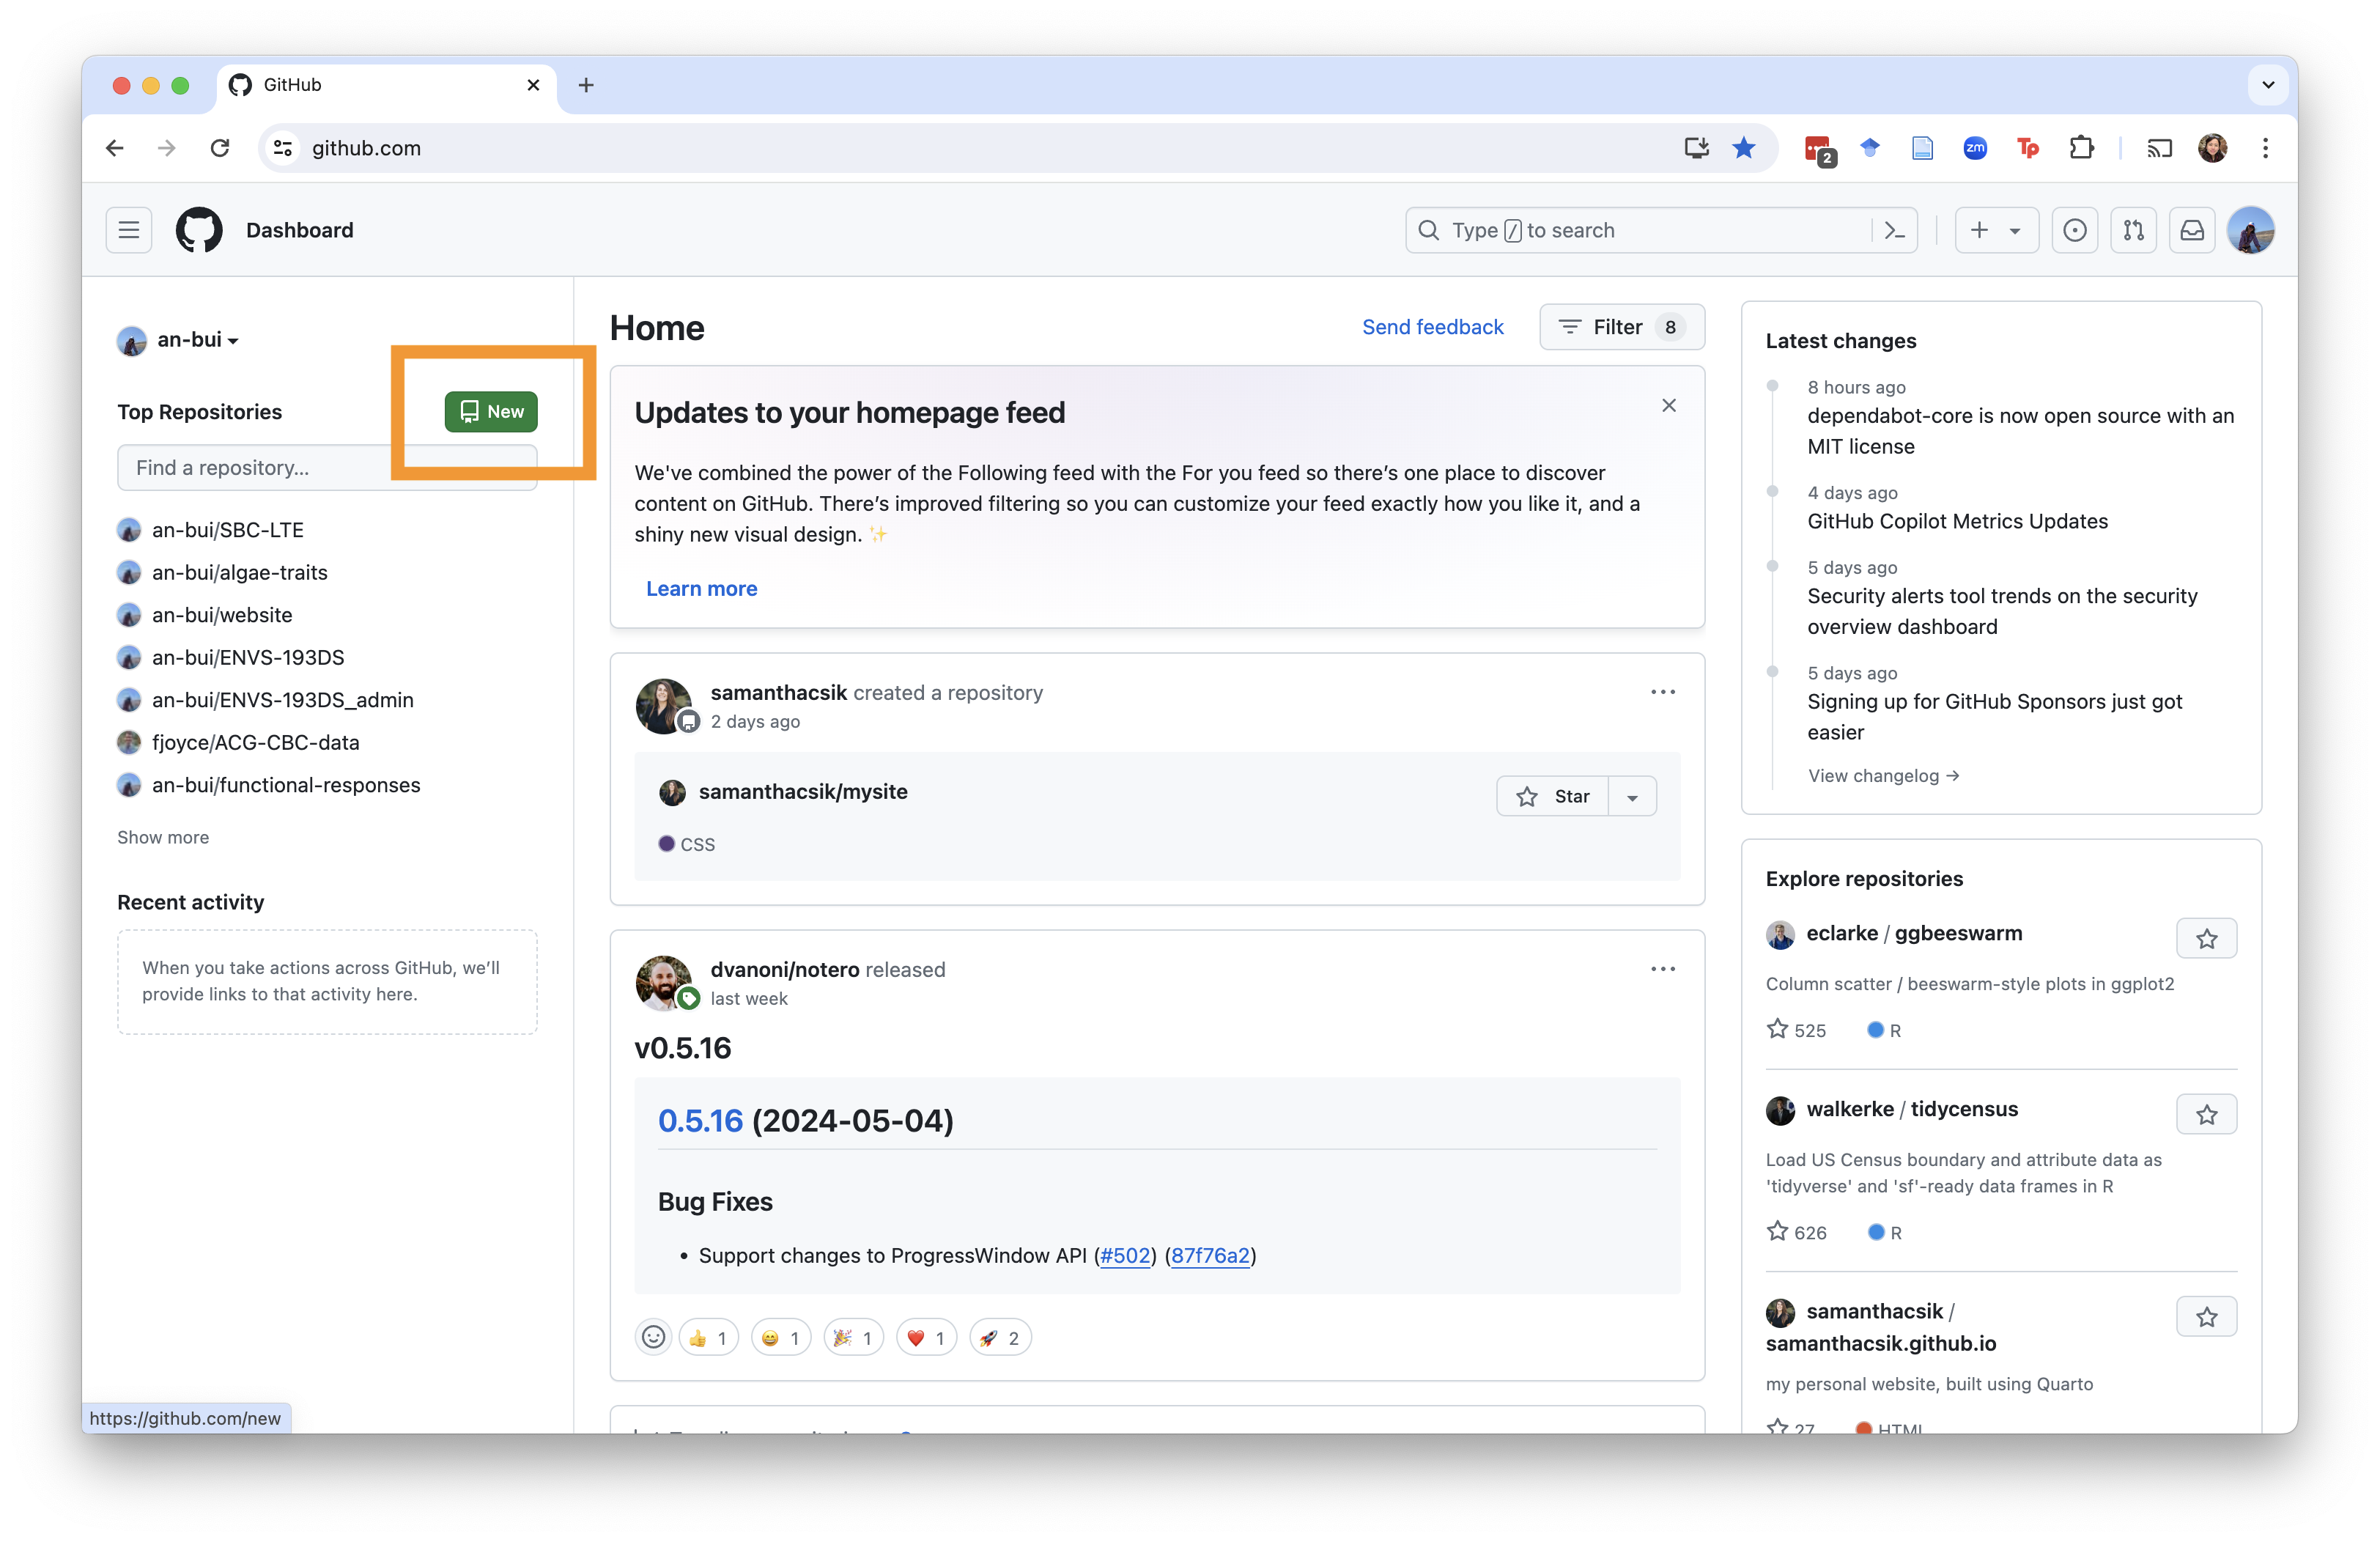
Go to the GitHub homepage.
Click the green “New” button.
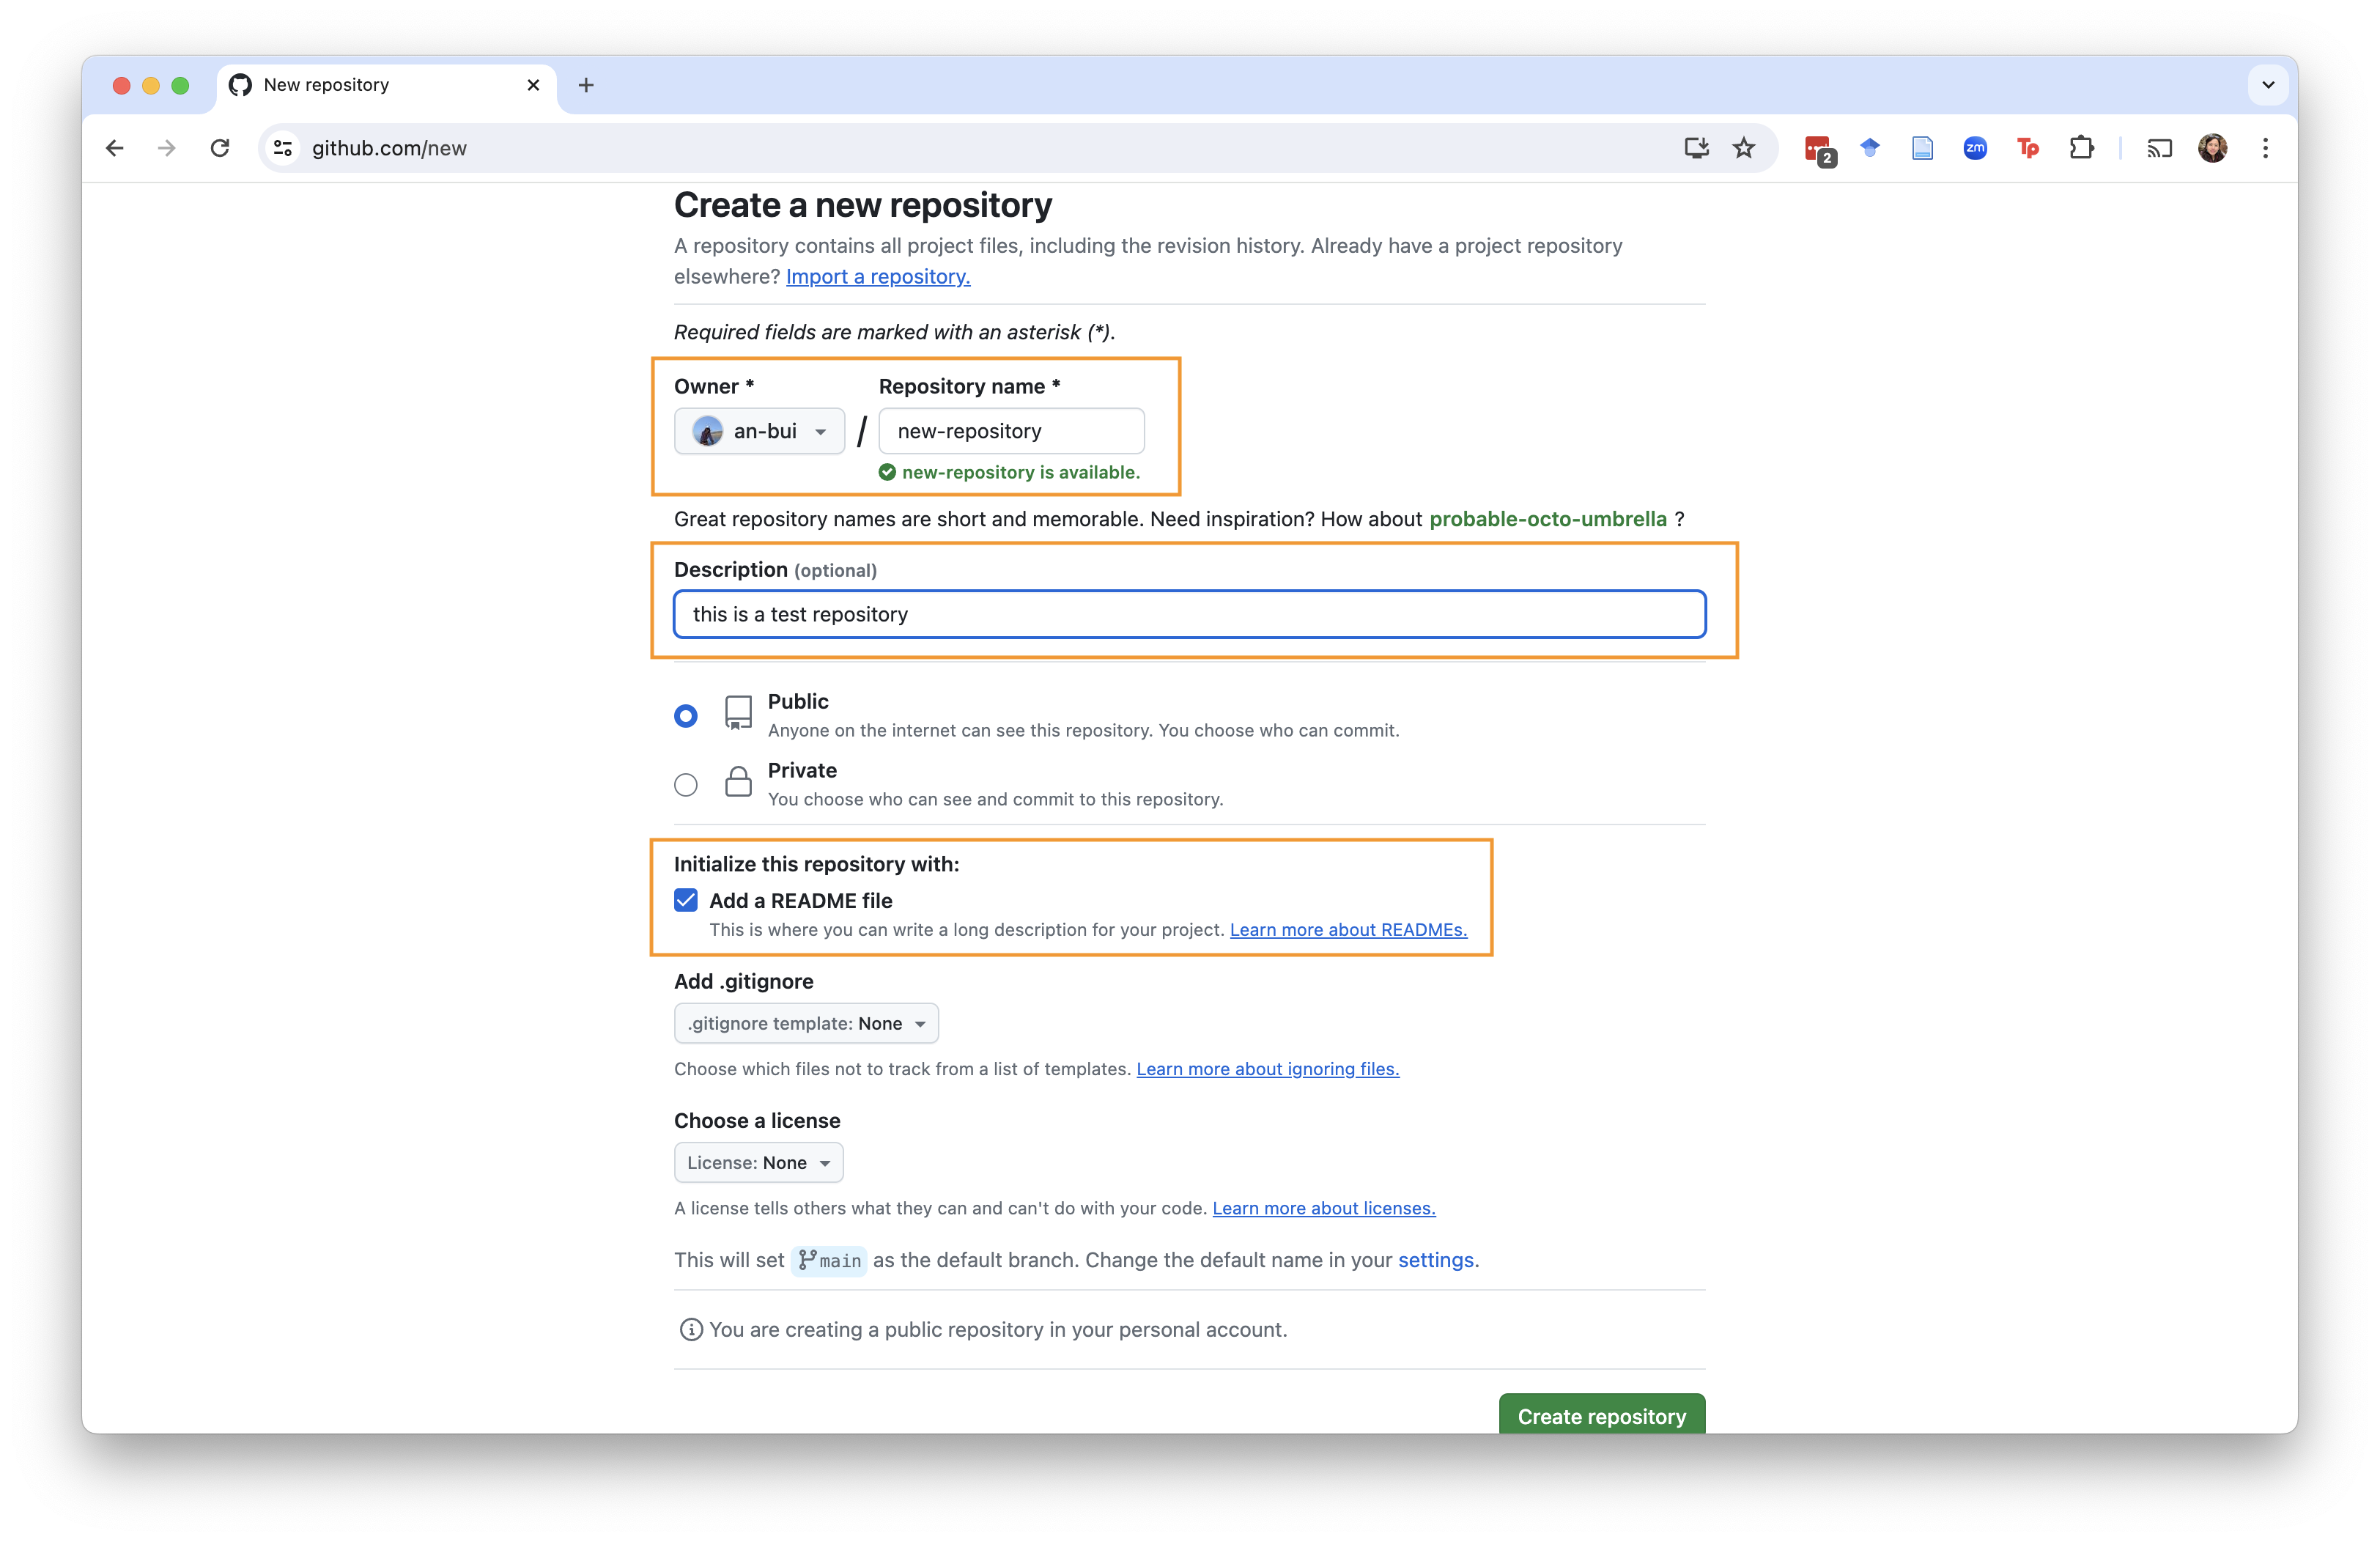
2. Fill information about your new repository.
This includes the name, a description, whether it is public or private (keep your repository public for now).
Additionally, initialize your repository with a README. It is very important to start your remote repository with a file, and GitHub does it for you by creating a file called README.md. See the README resource for more details about what it is, but for now remember to always initialize your repository with a README.
3. Clone your repo to your computer.
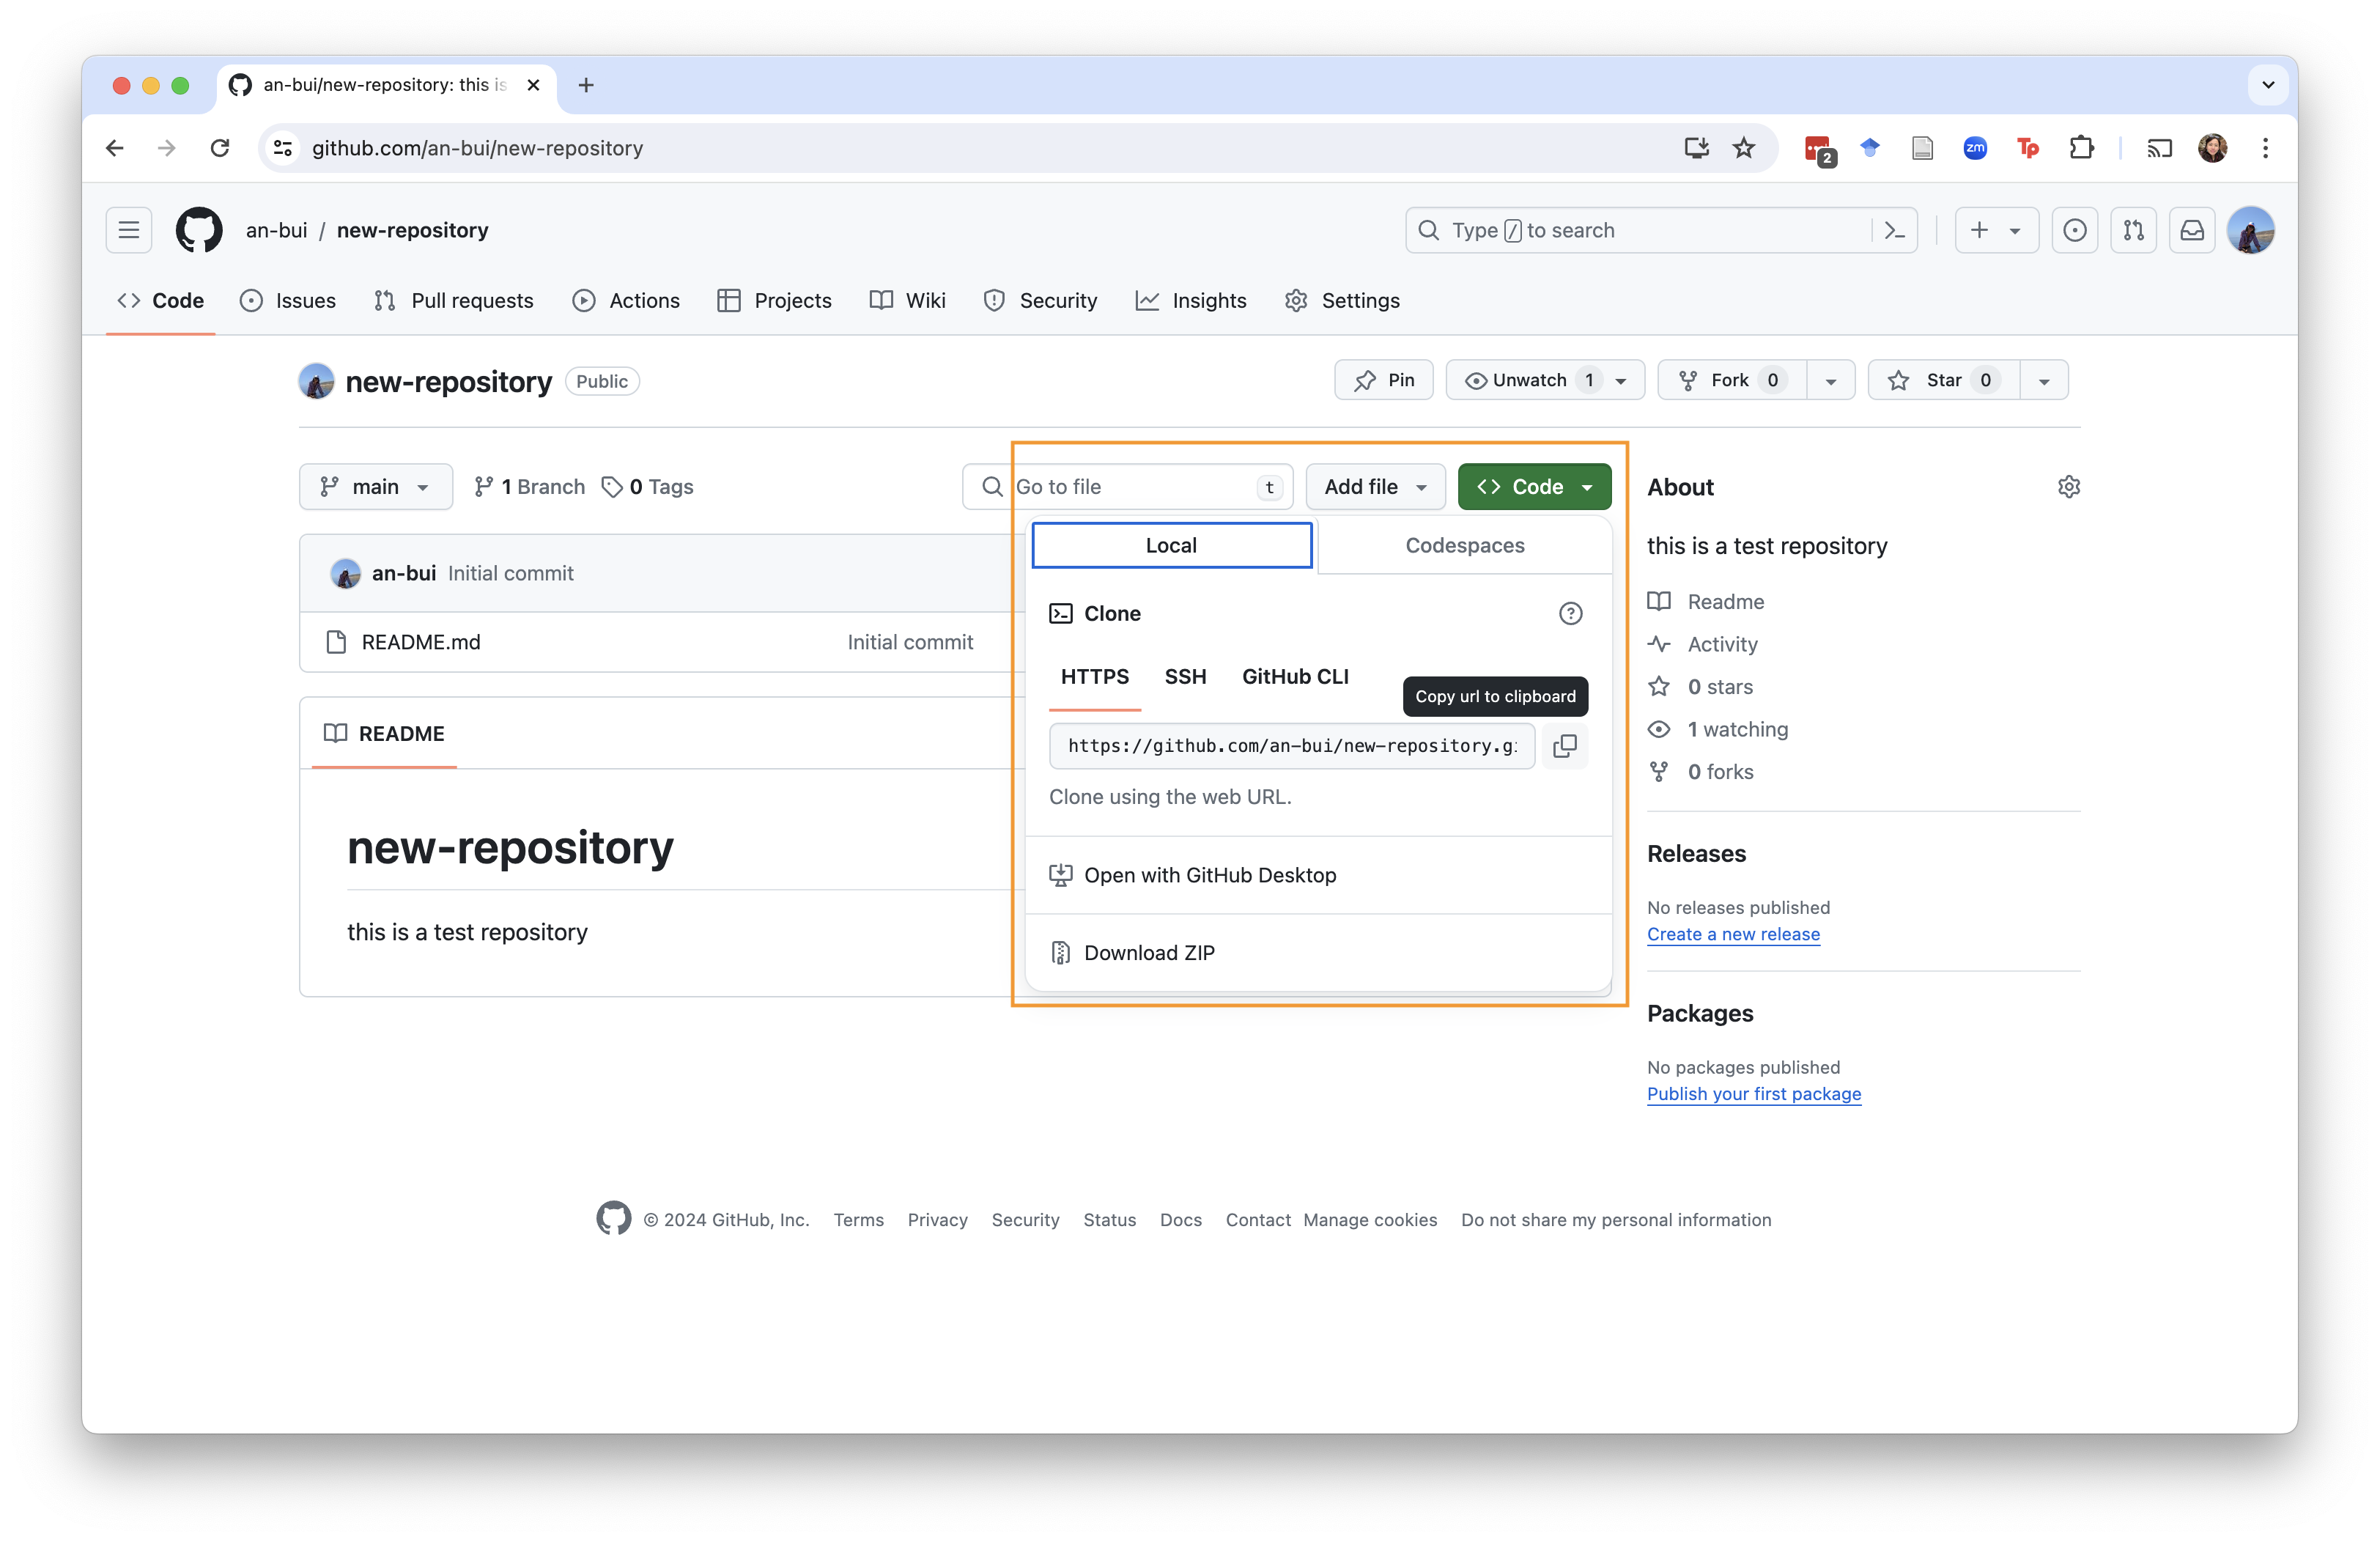
When you are “cloning”, you are essentially making a local copy (i.e. on your computer) of your remote.
Do this by clicking the green “Code” button and copying the url that shows up.
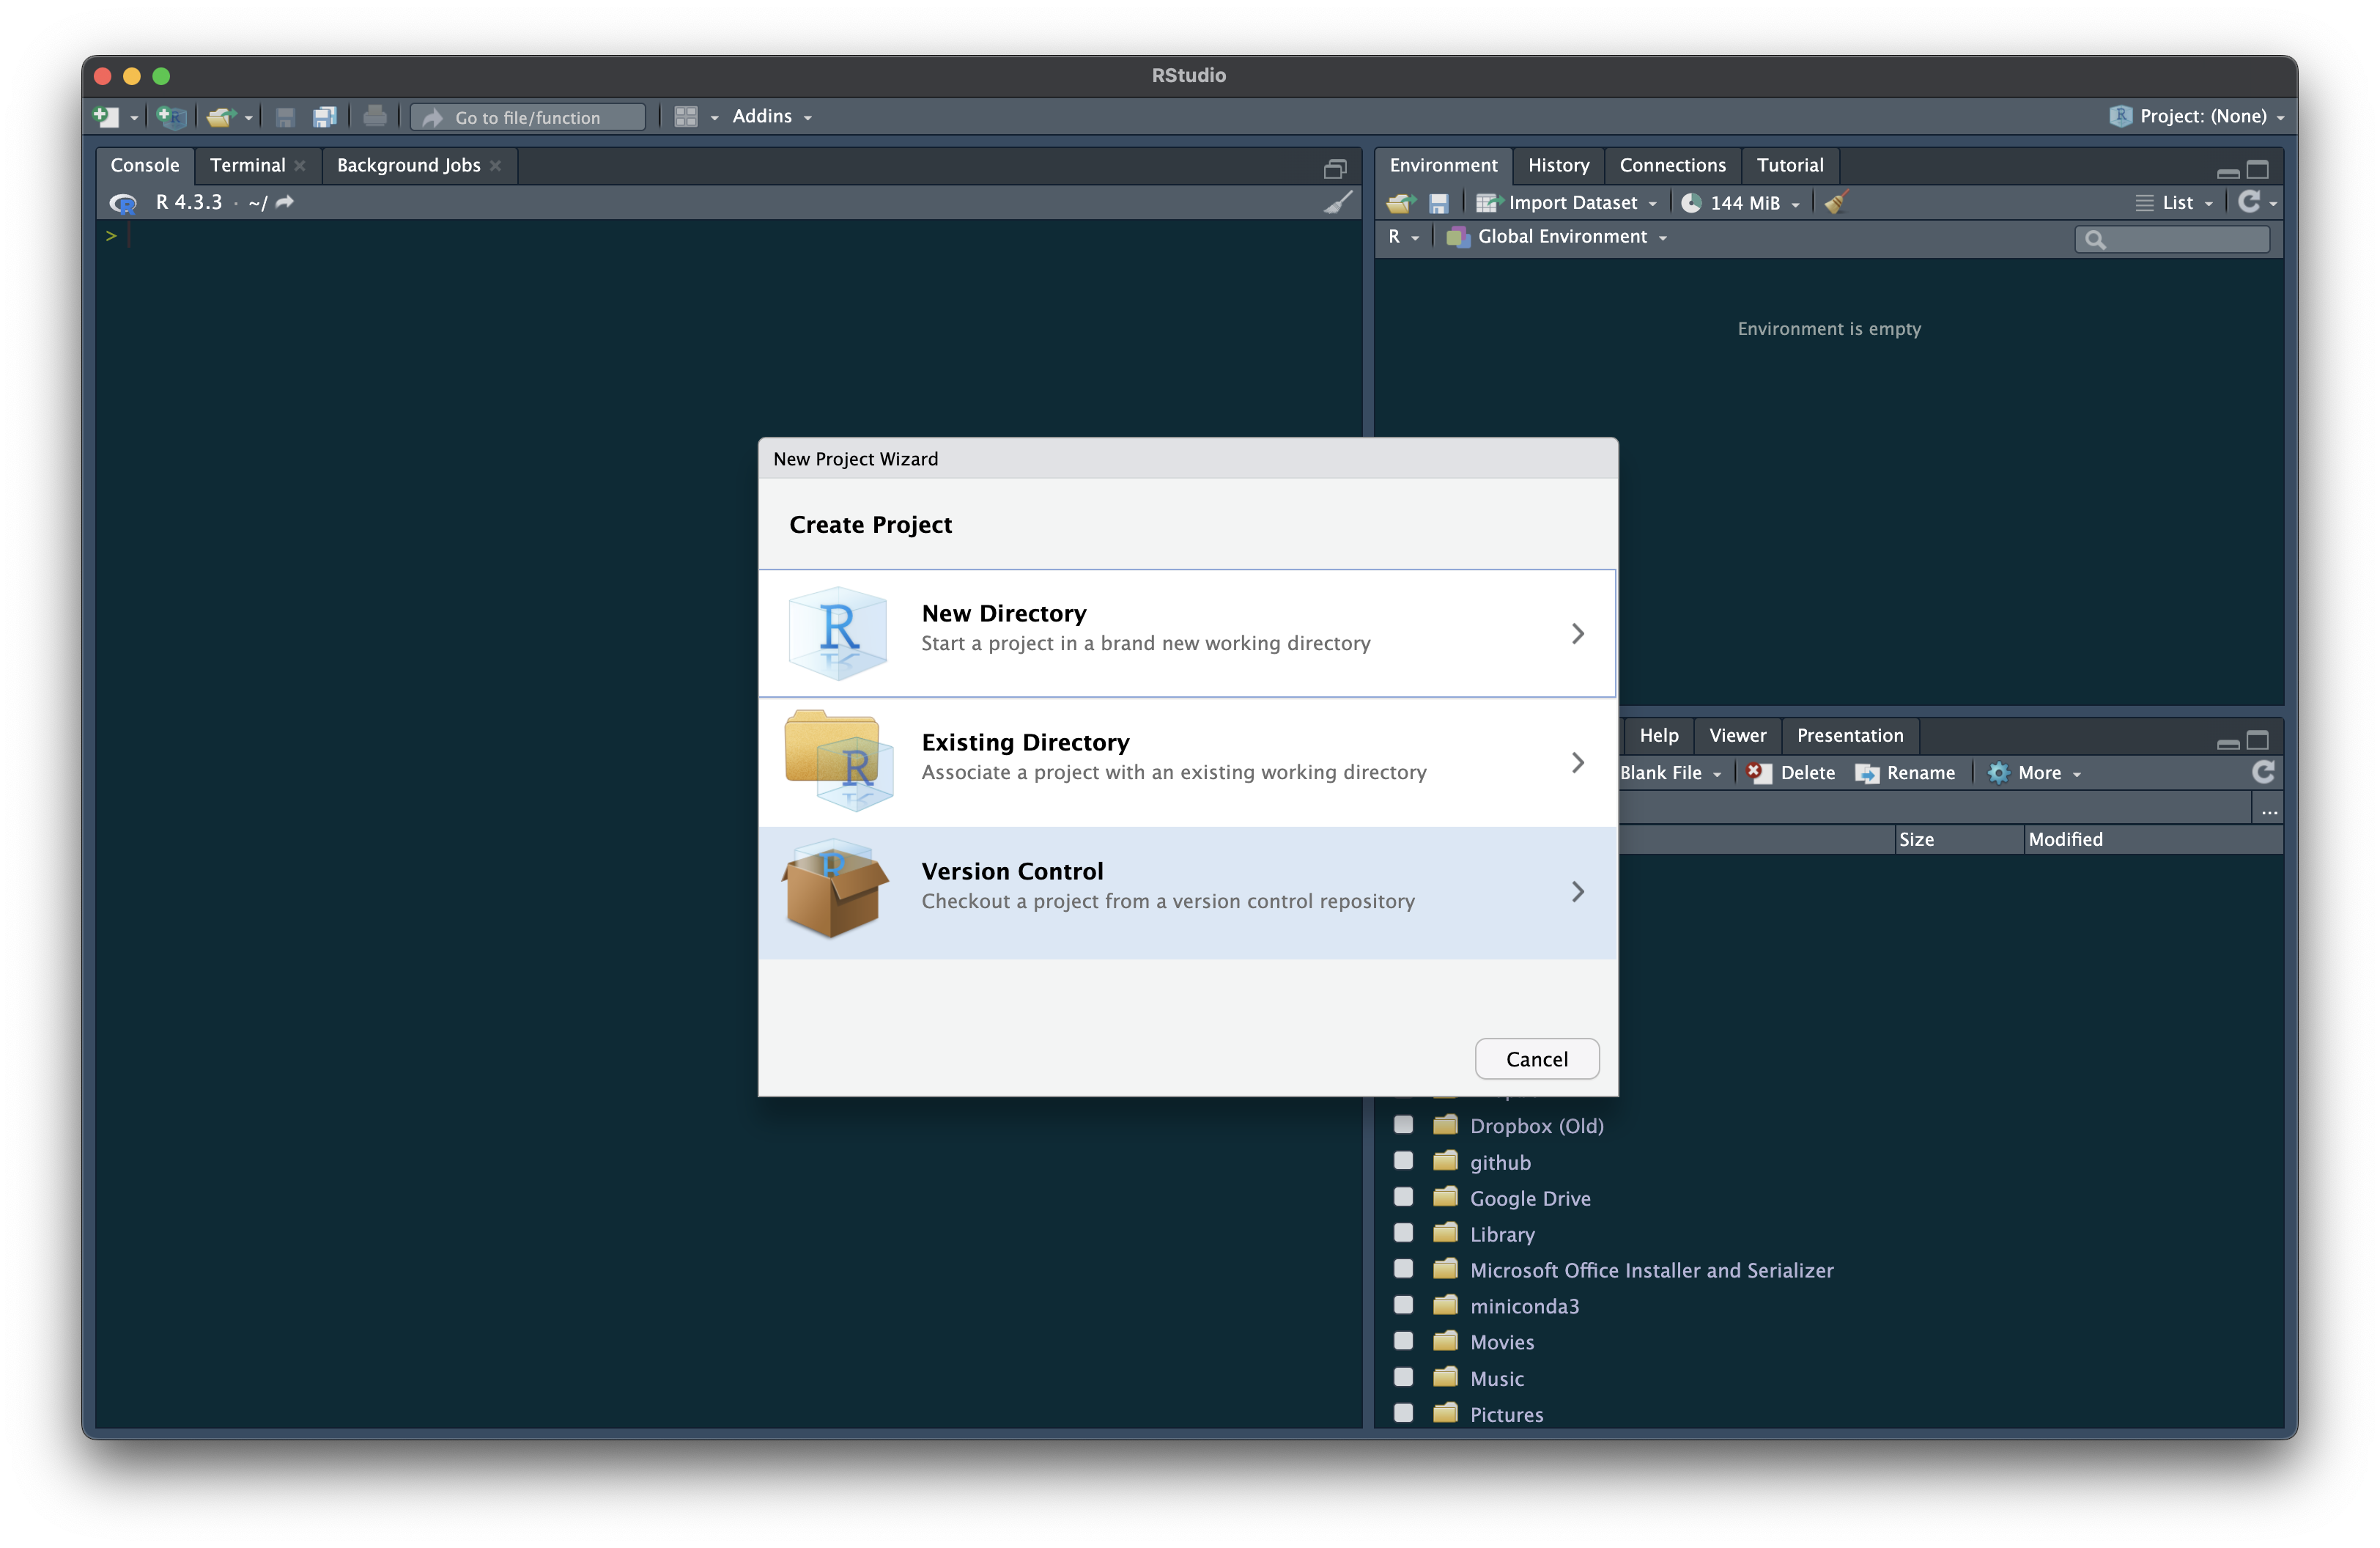
Then, create a new project in RStudio.
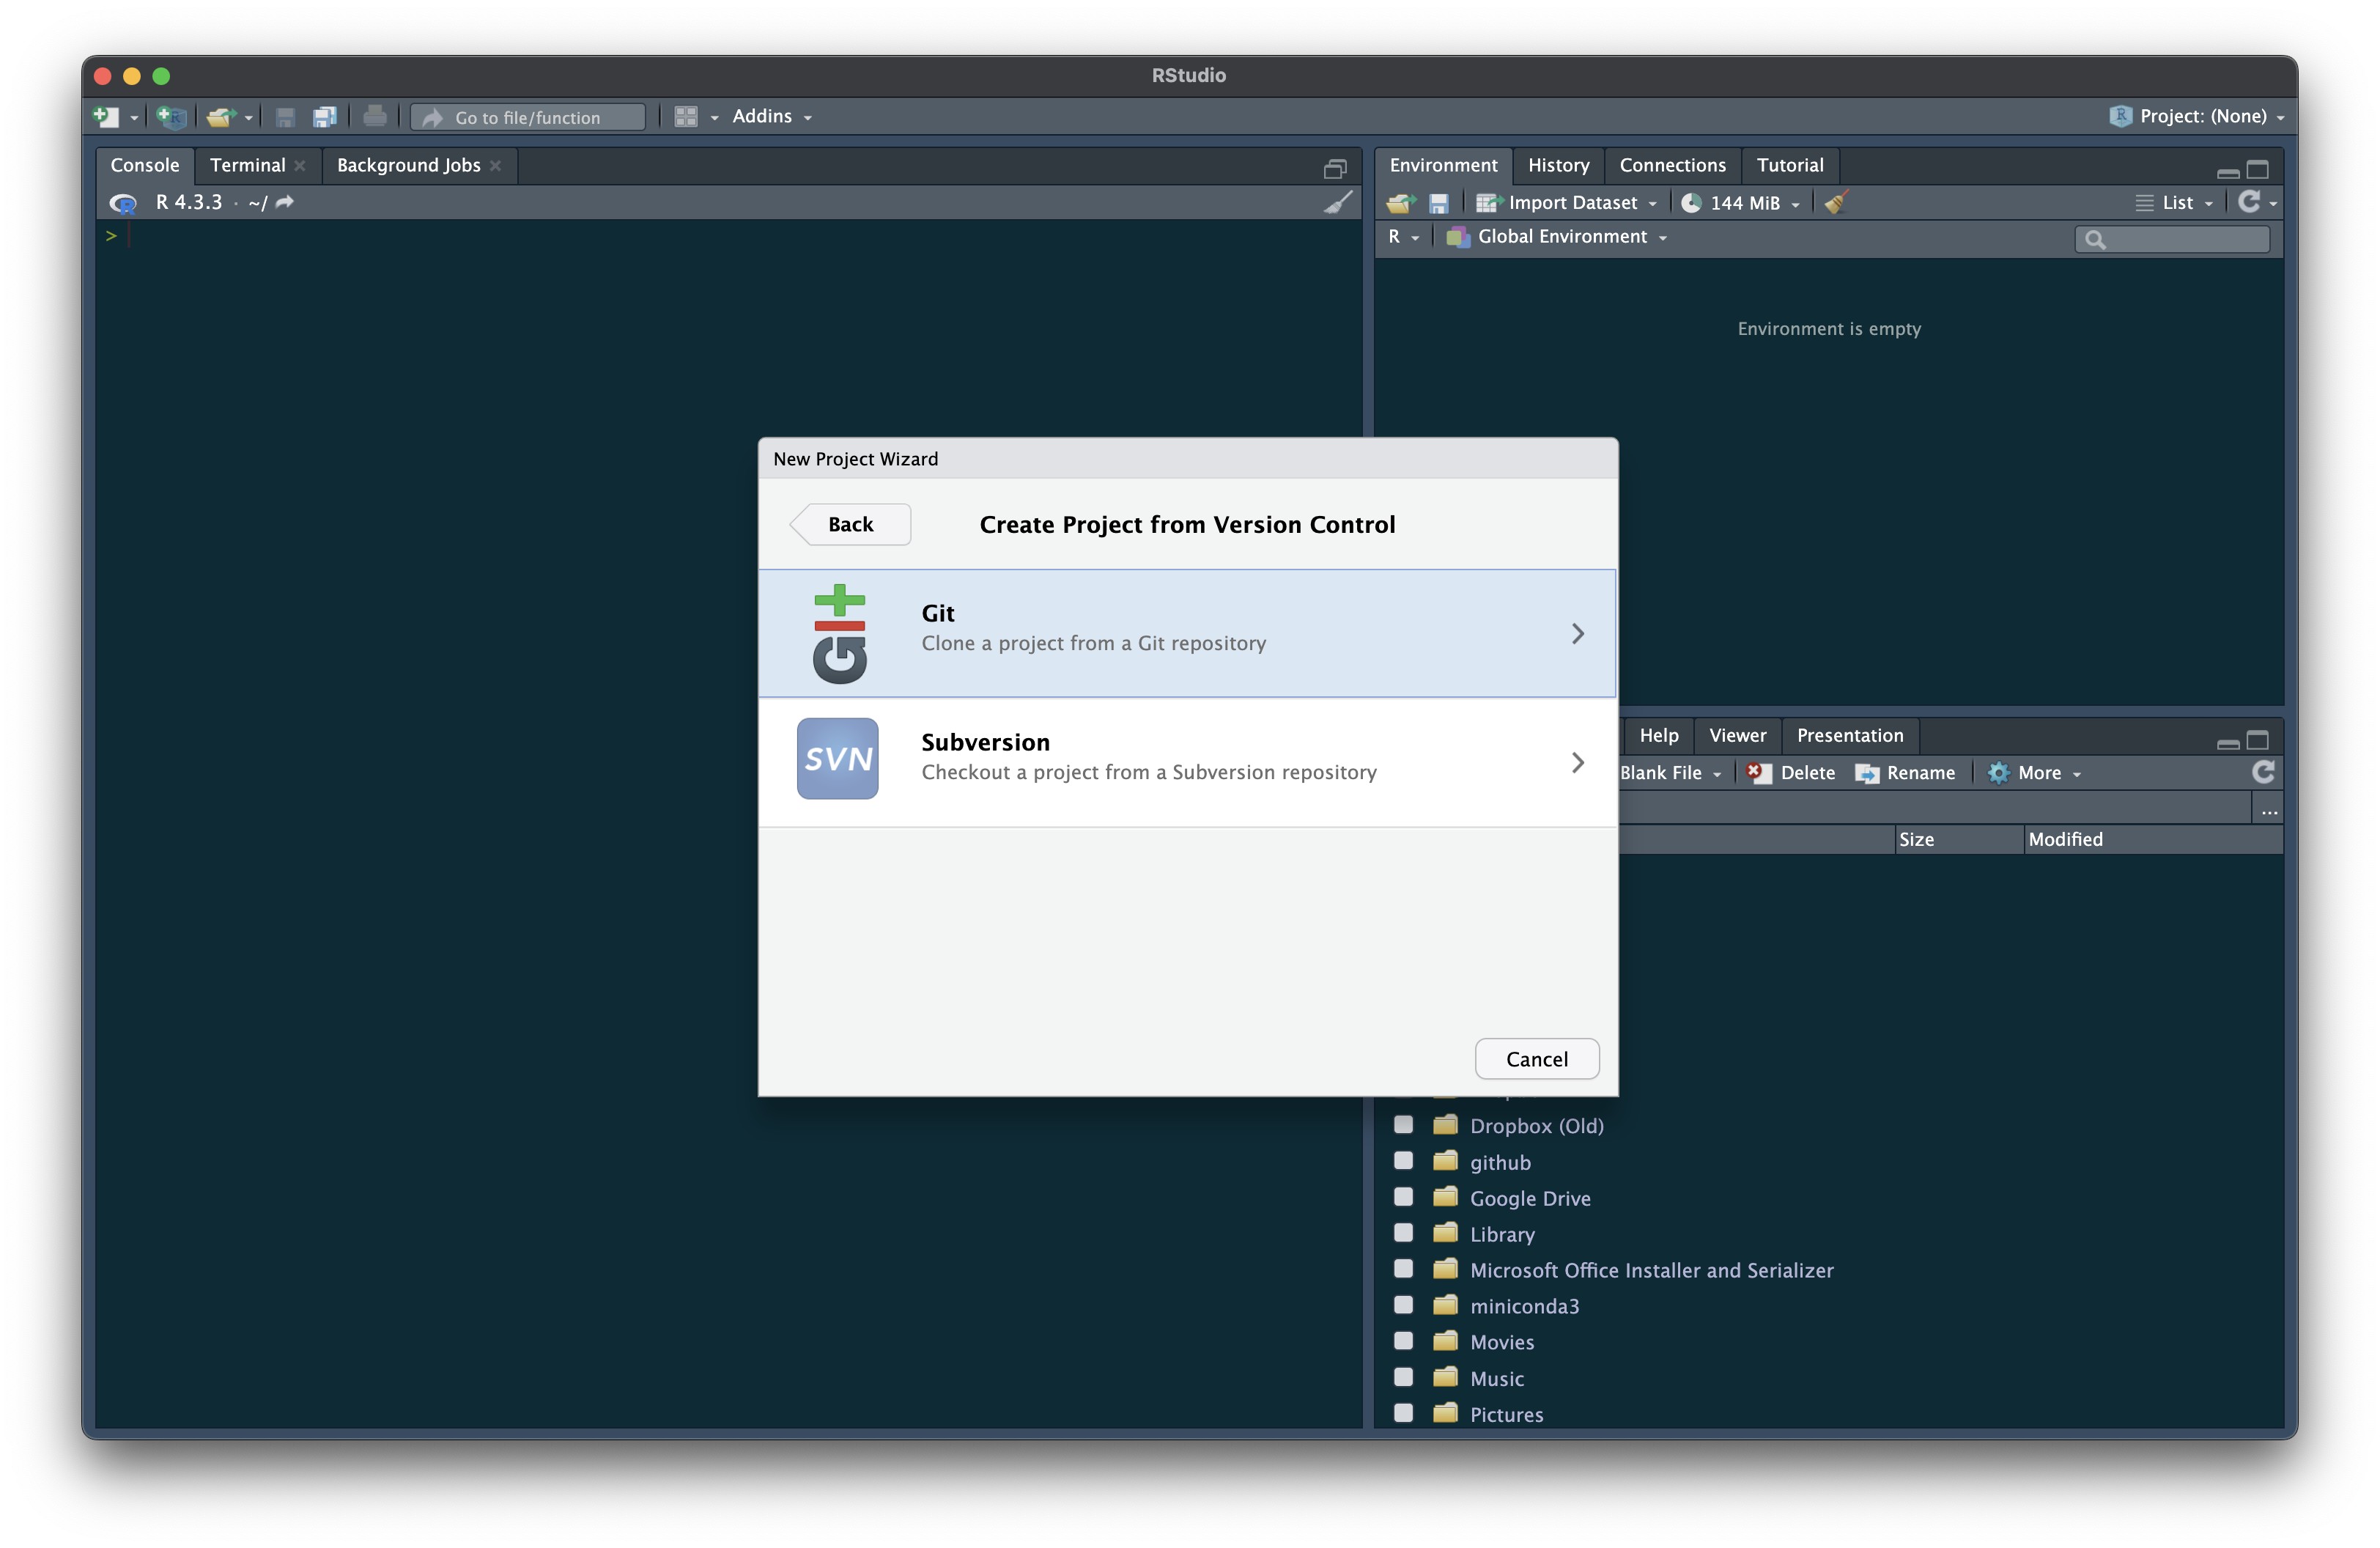
Select “Version Control”.
Then, select “Git”.
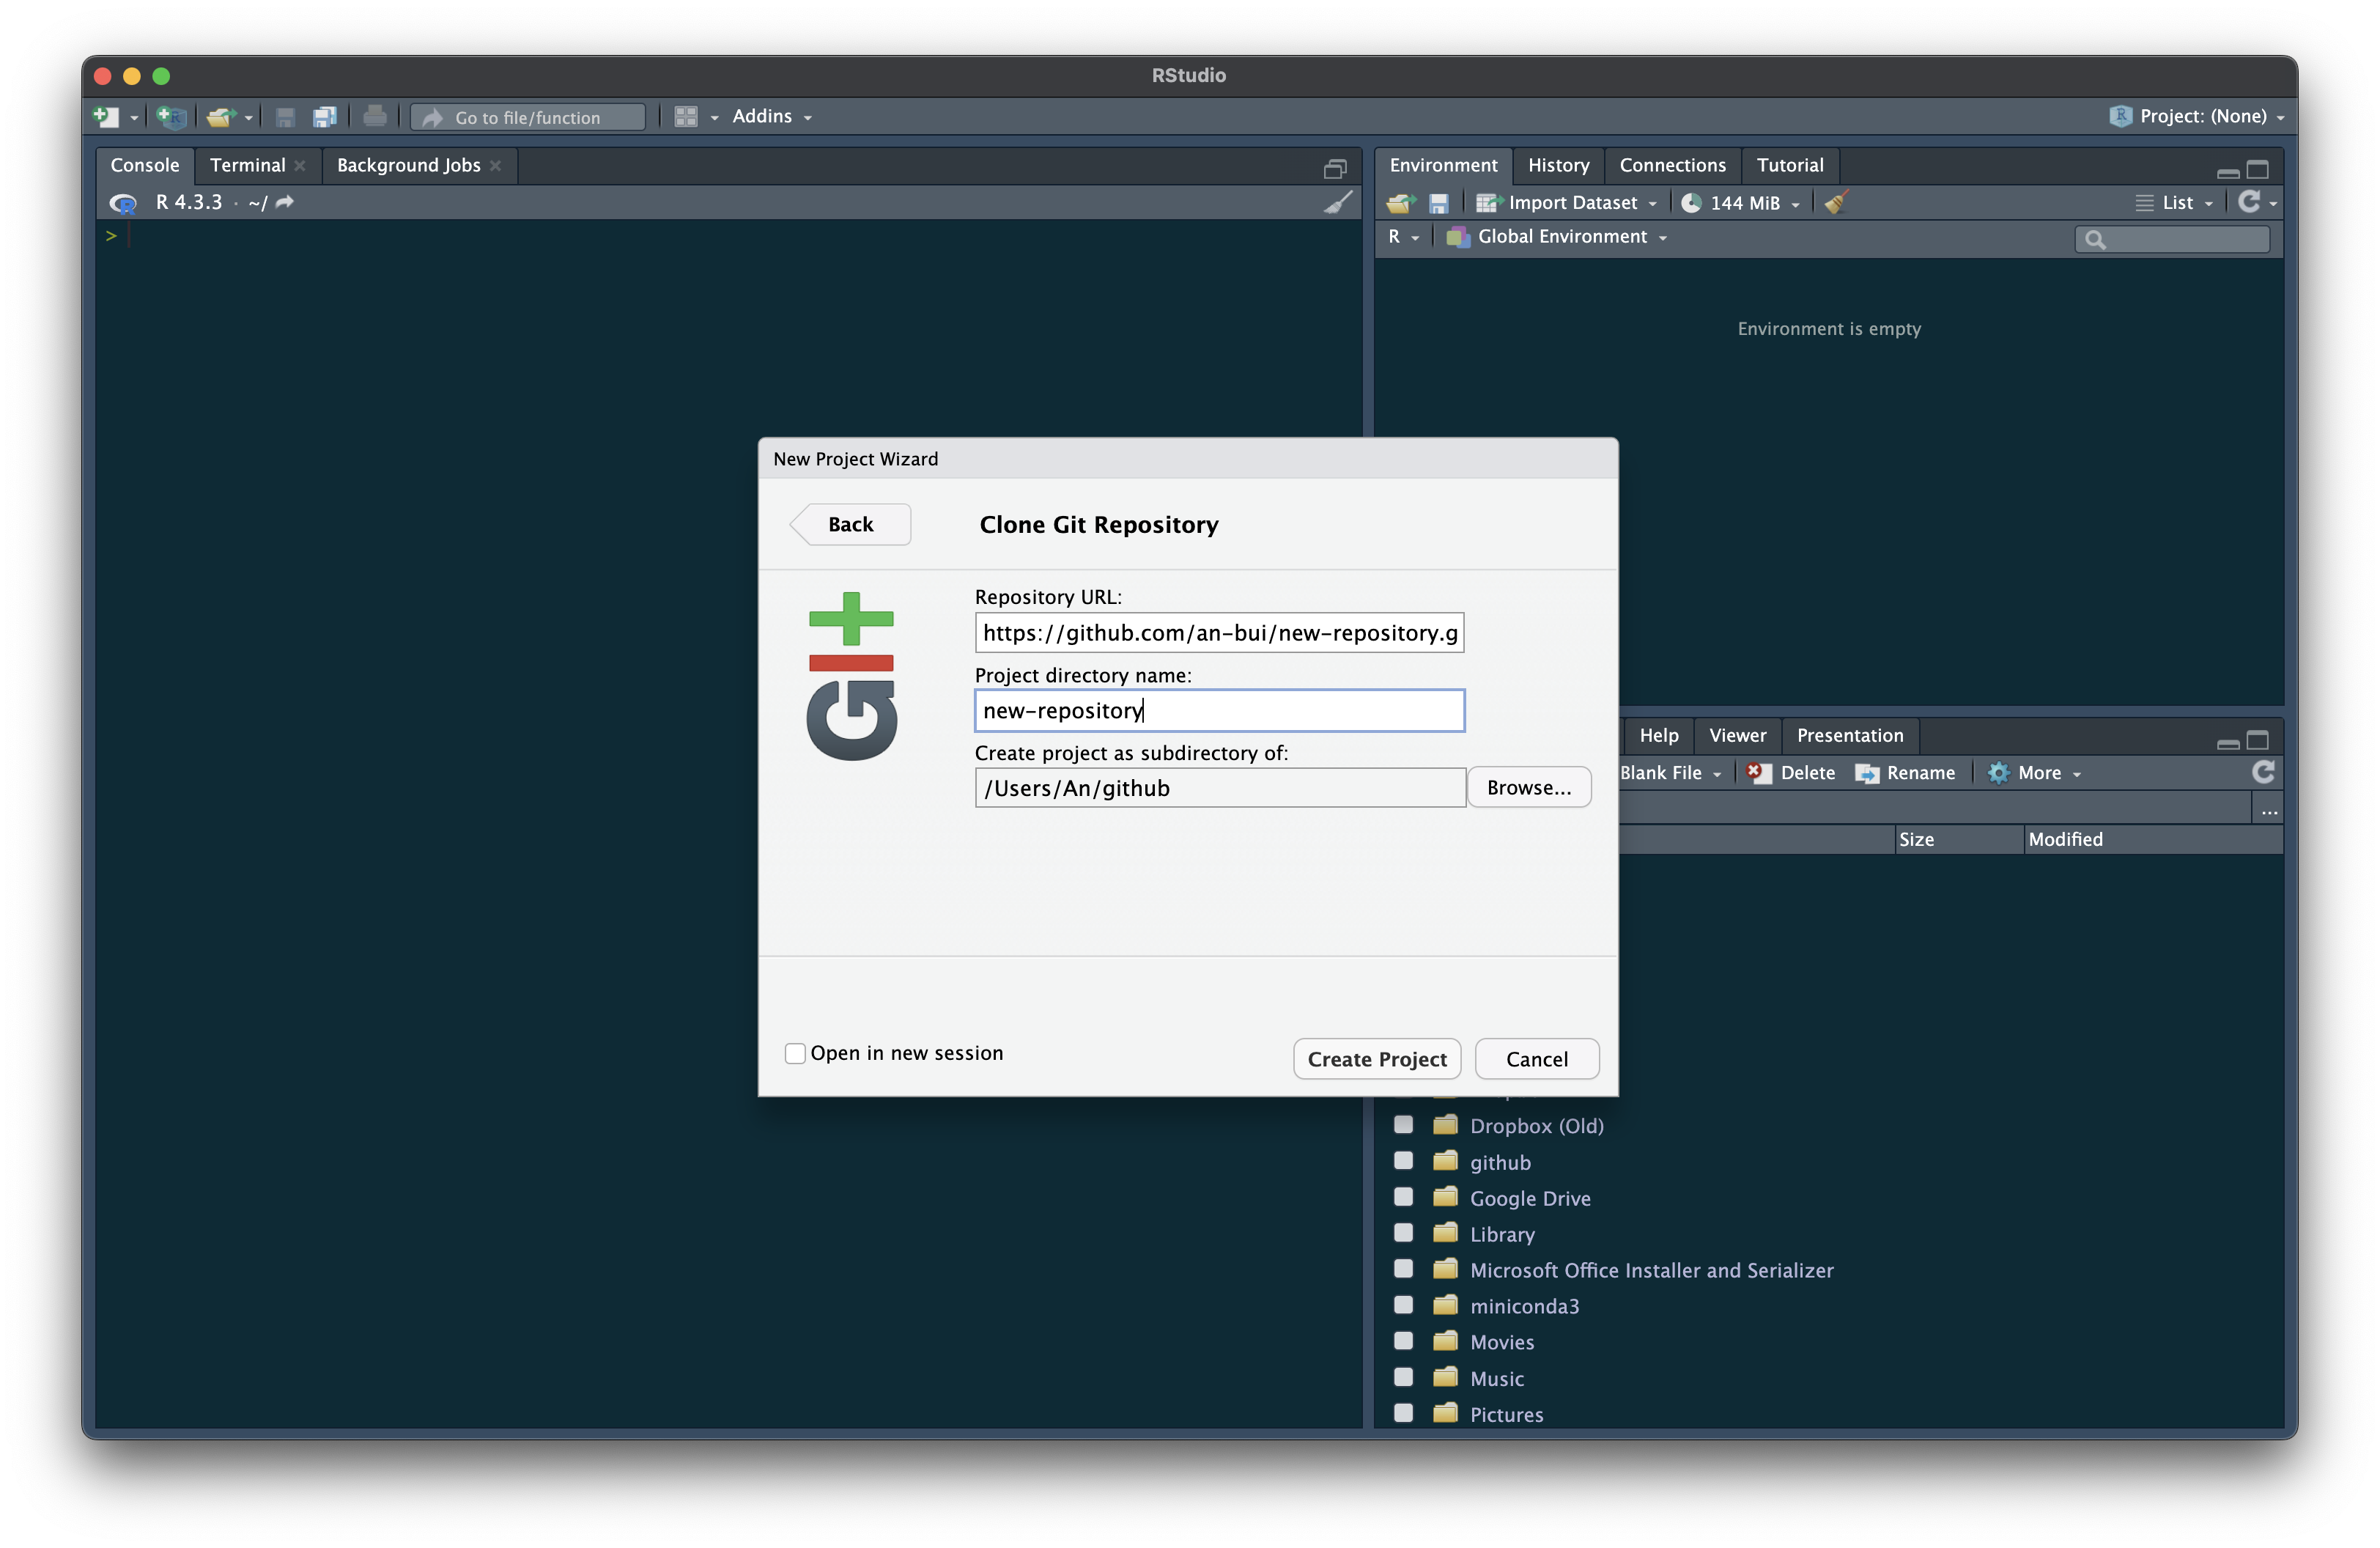
Paste the clone url into the first box.
Keep your cursor in that box, then hit the Tab key. The new project directory name should automatically fill in.
It is very important that your remote and local repositories have the same name. The easiest way to ensure this is by not typing anything into the second box. Paste the url into the first box, then hit Tab.
Then, select the folder on your computer where you are keeping all your repositories for Git/GitHub. If you created a folder called “Git” or “GitHub” in your root directory, use that folder. This is something that you only have to do once; for each subsequent repo you clone from GitHub, the file path will be automatically filled in.
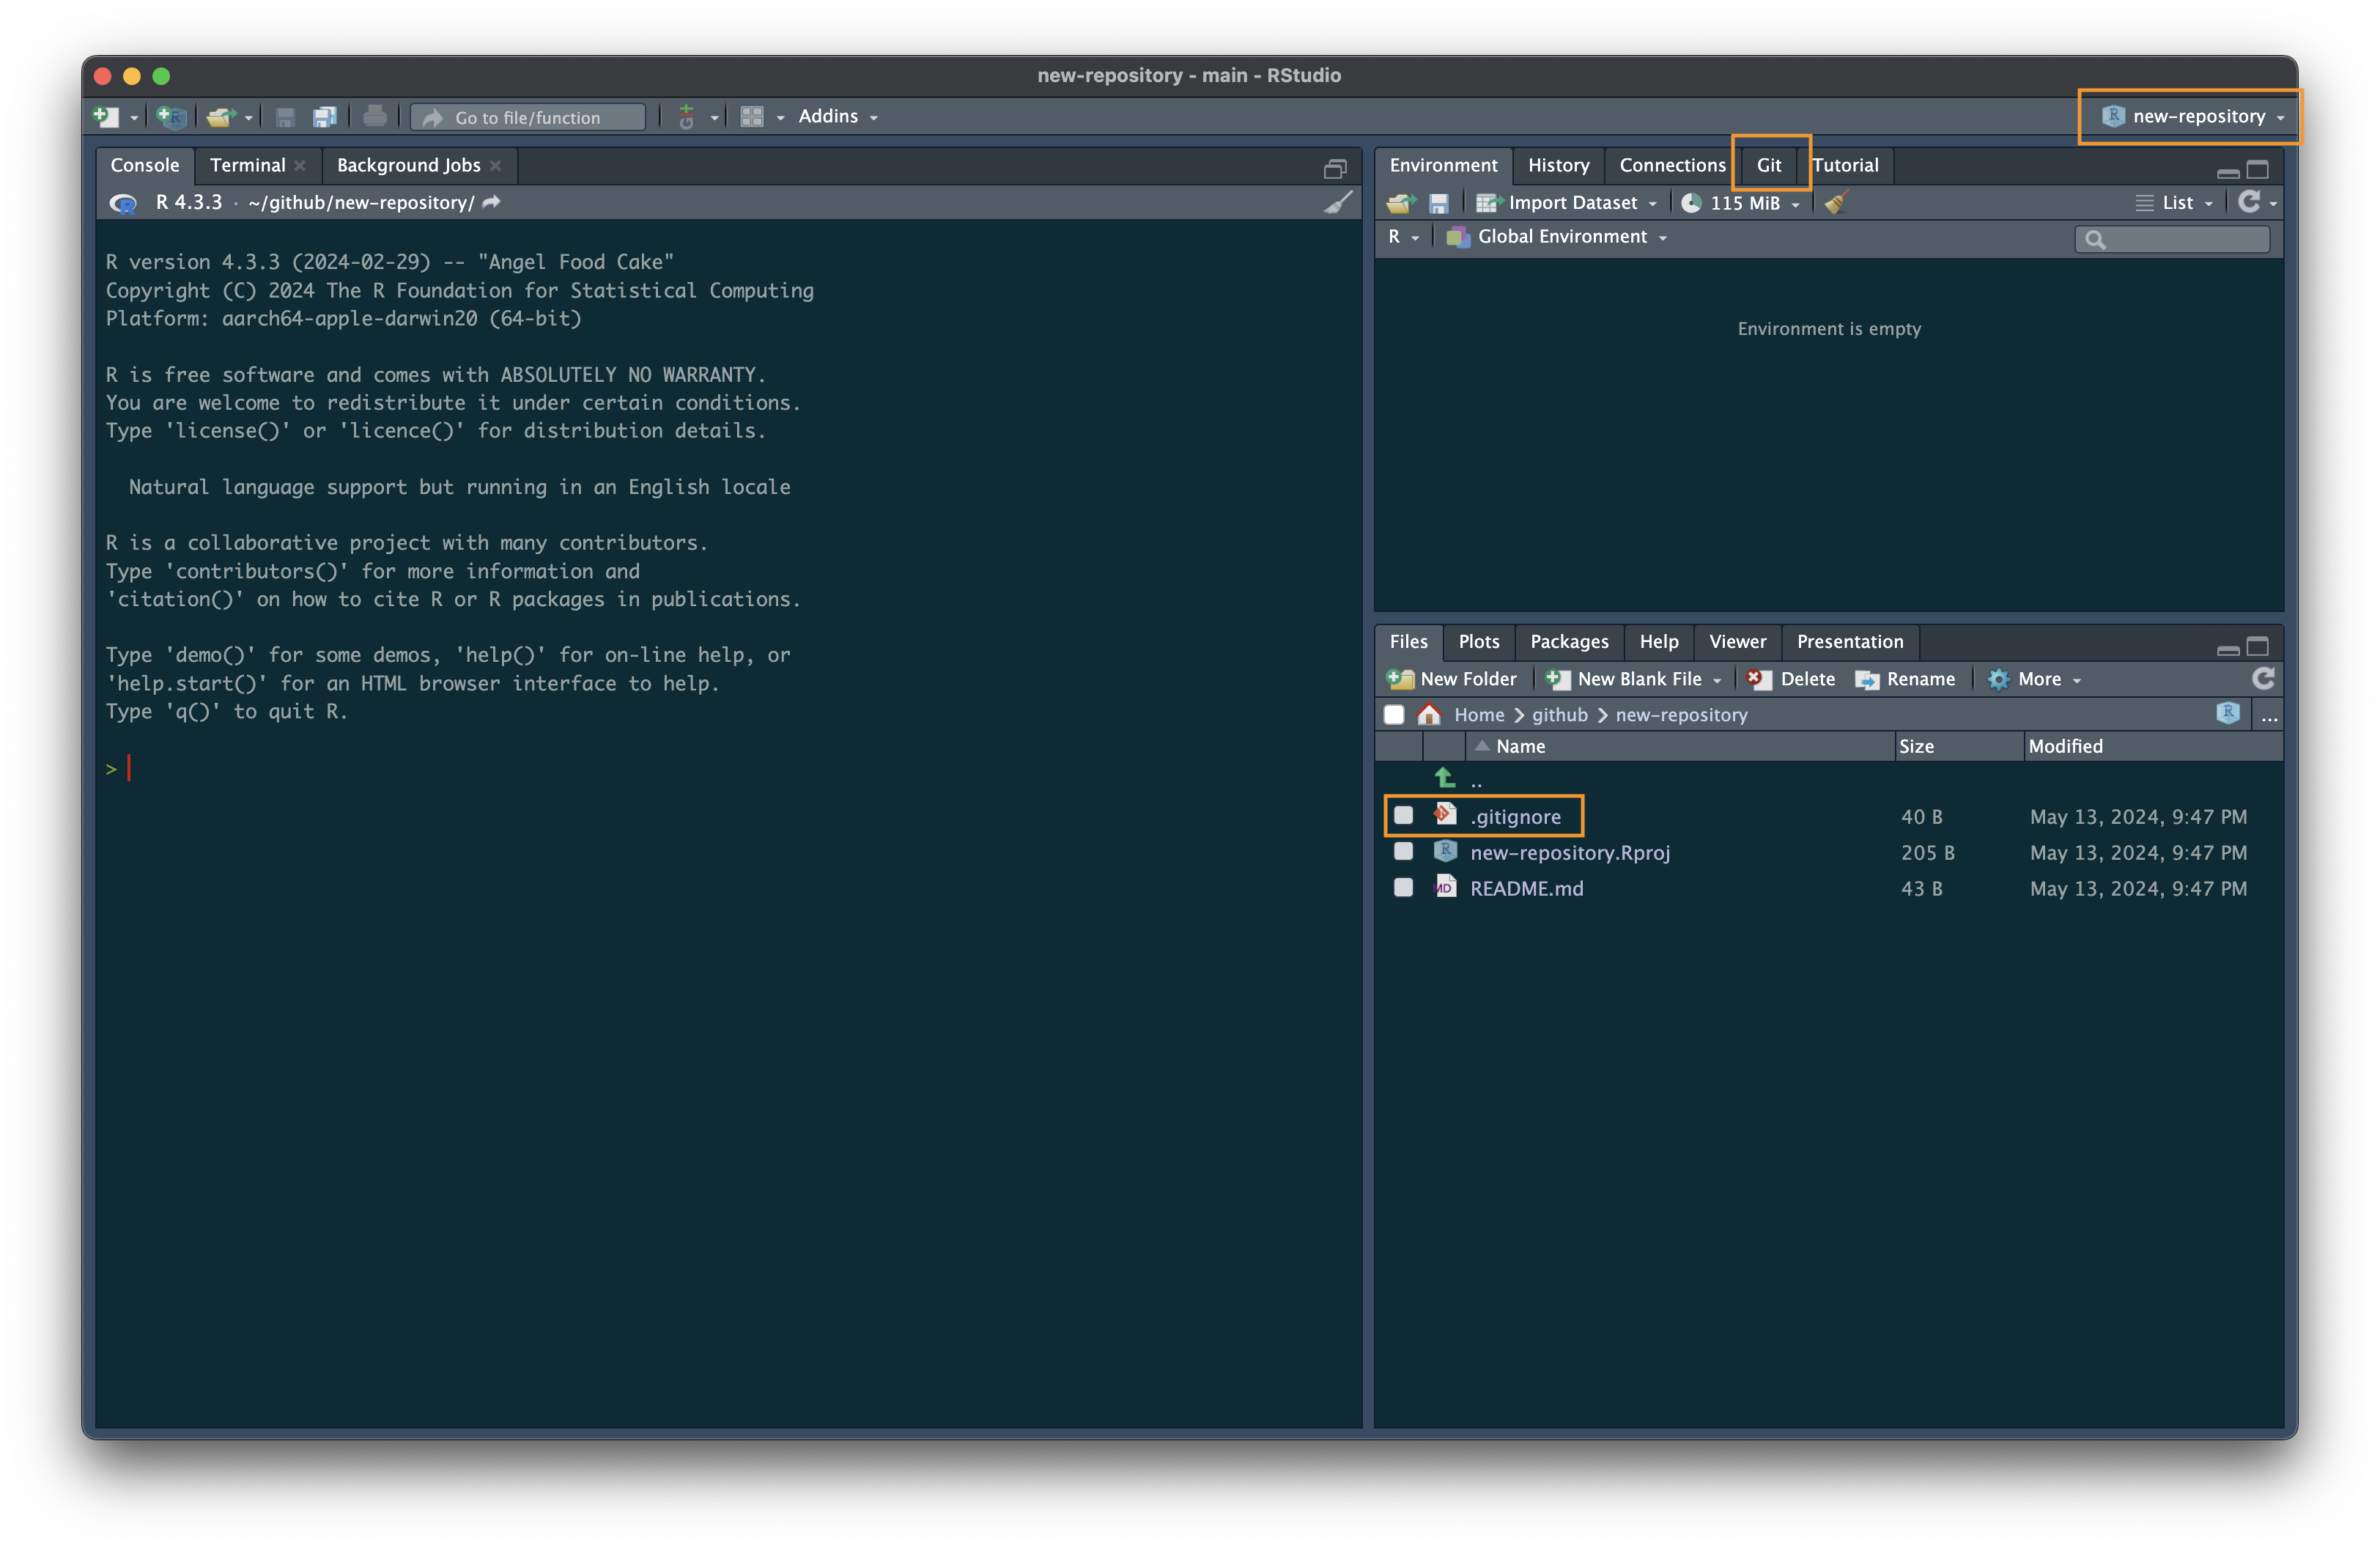
After you have created your repository, a new RStudio window will open.
Verify that the clone has worked by seeing that you have:
- a project (should be the same as the directory name)
- the “Git” tab
- a
.gitignorefile (a file that tells git which files to ignore when tracking changes)
4. Make changes to your repository.
Create a new Quarto document.
Type in some code.
Save your document.
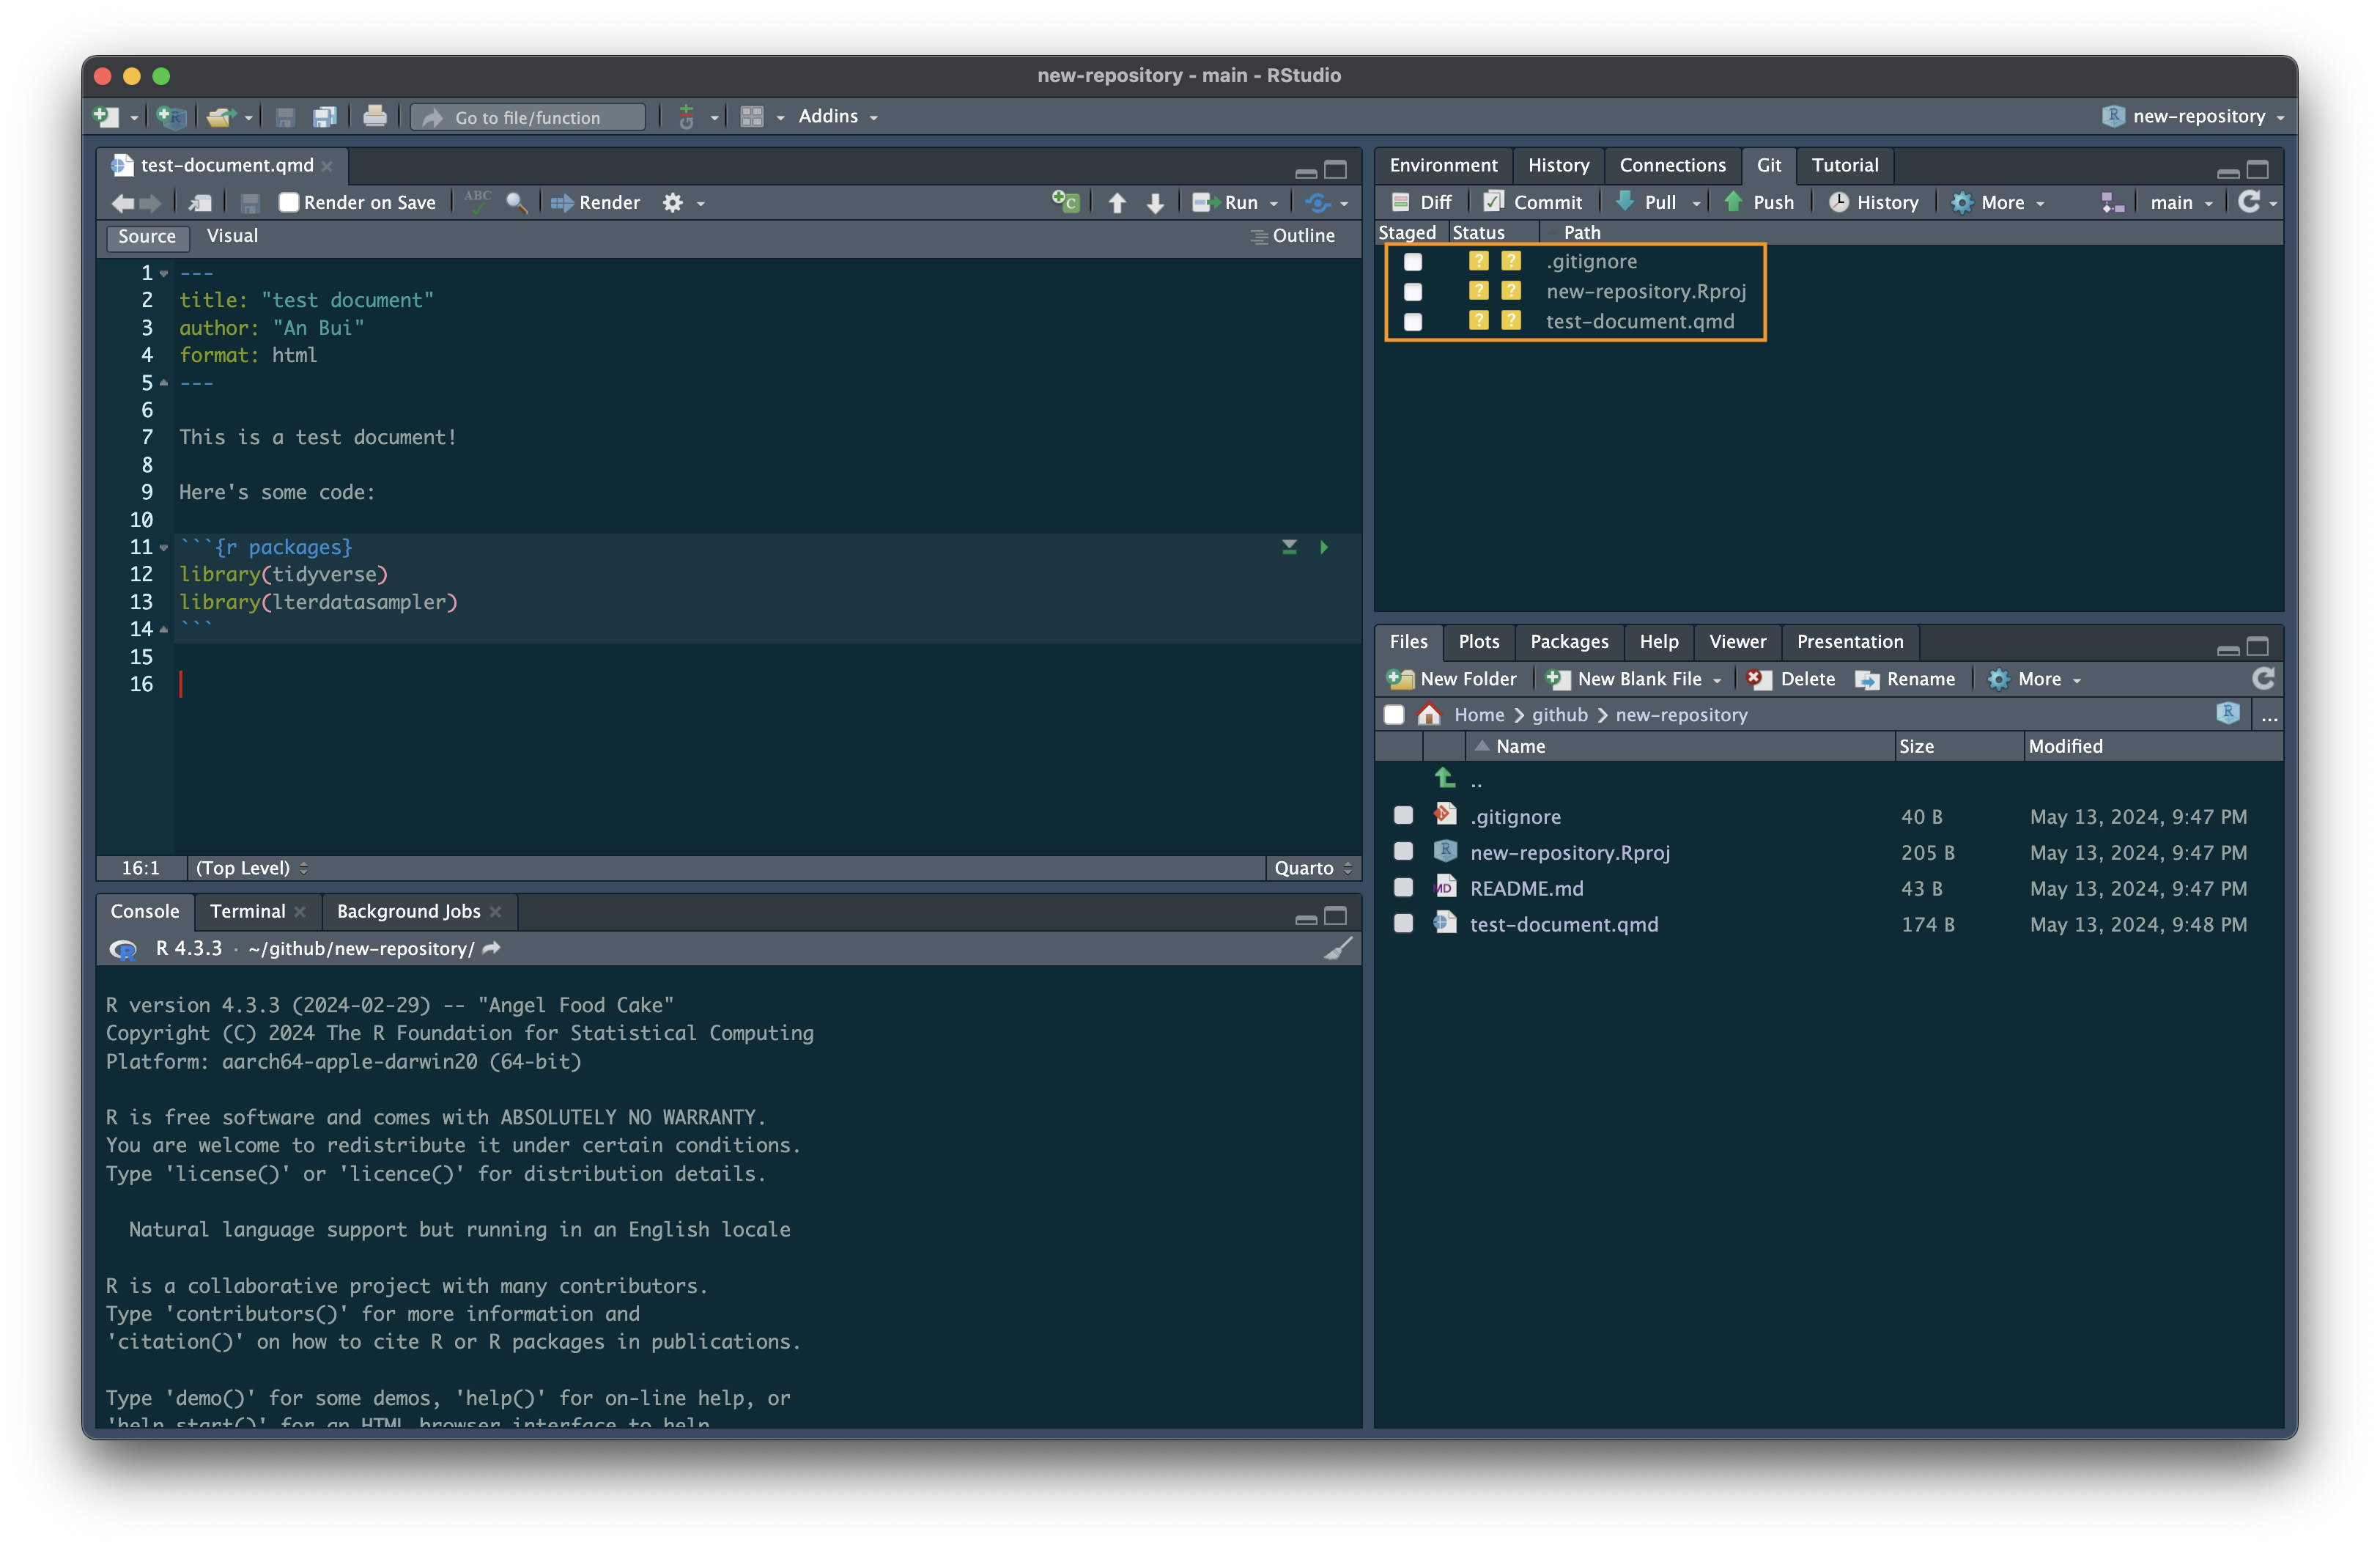
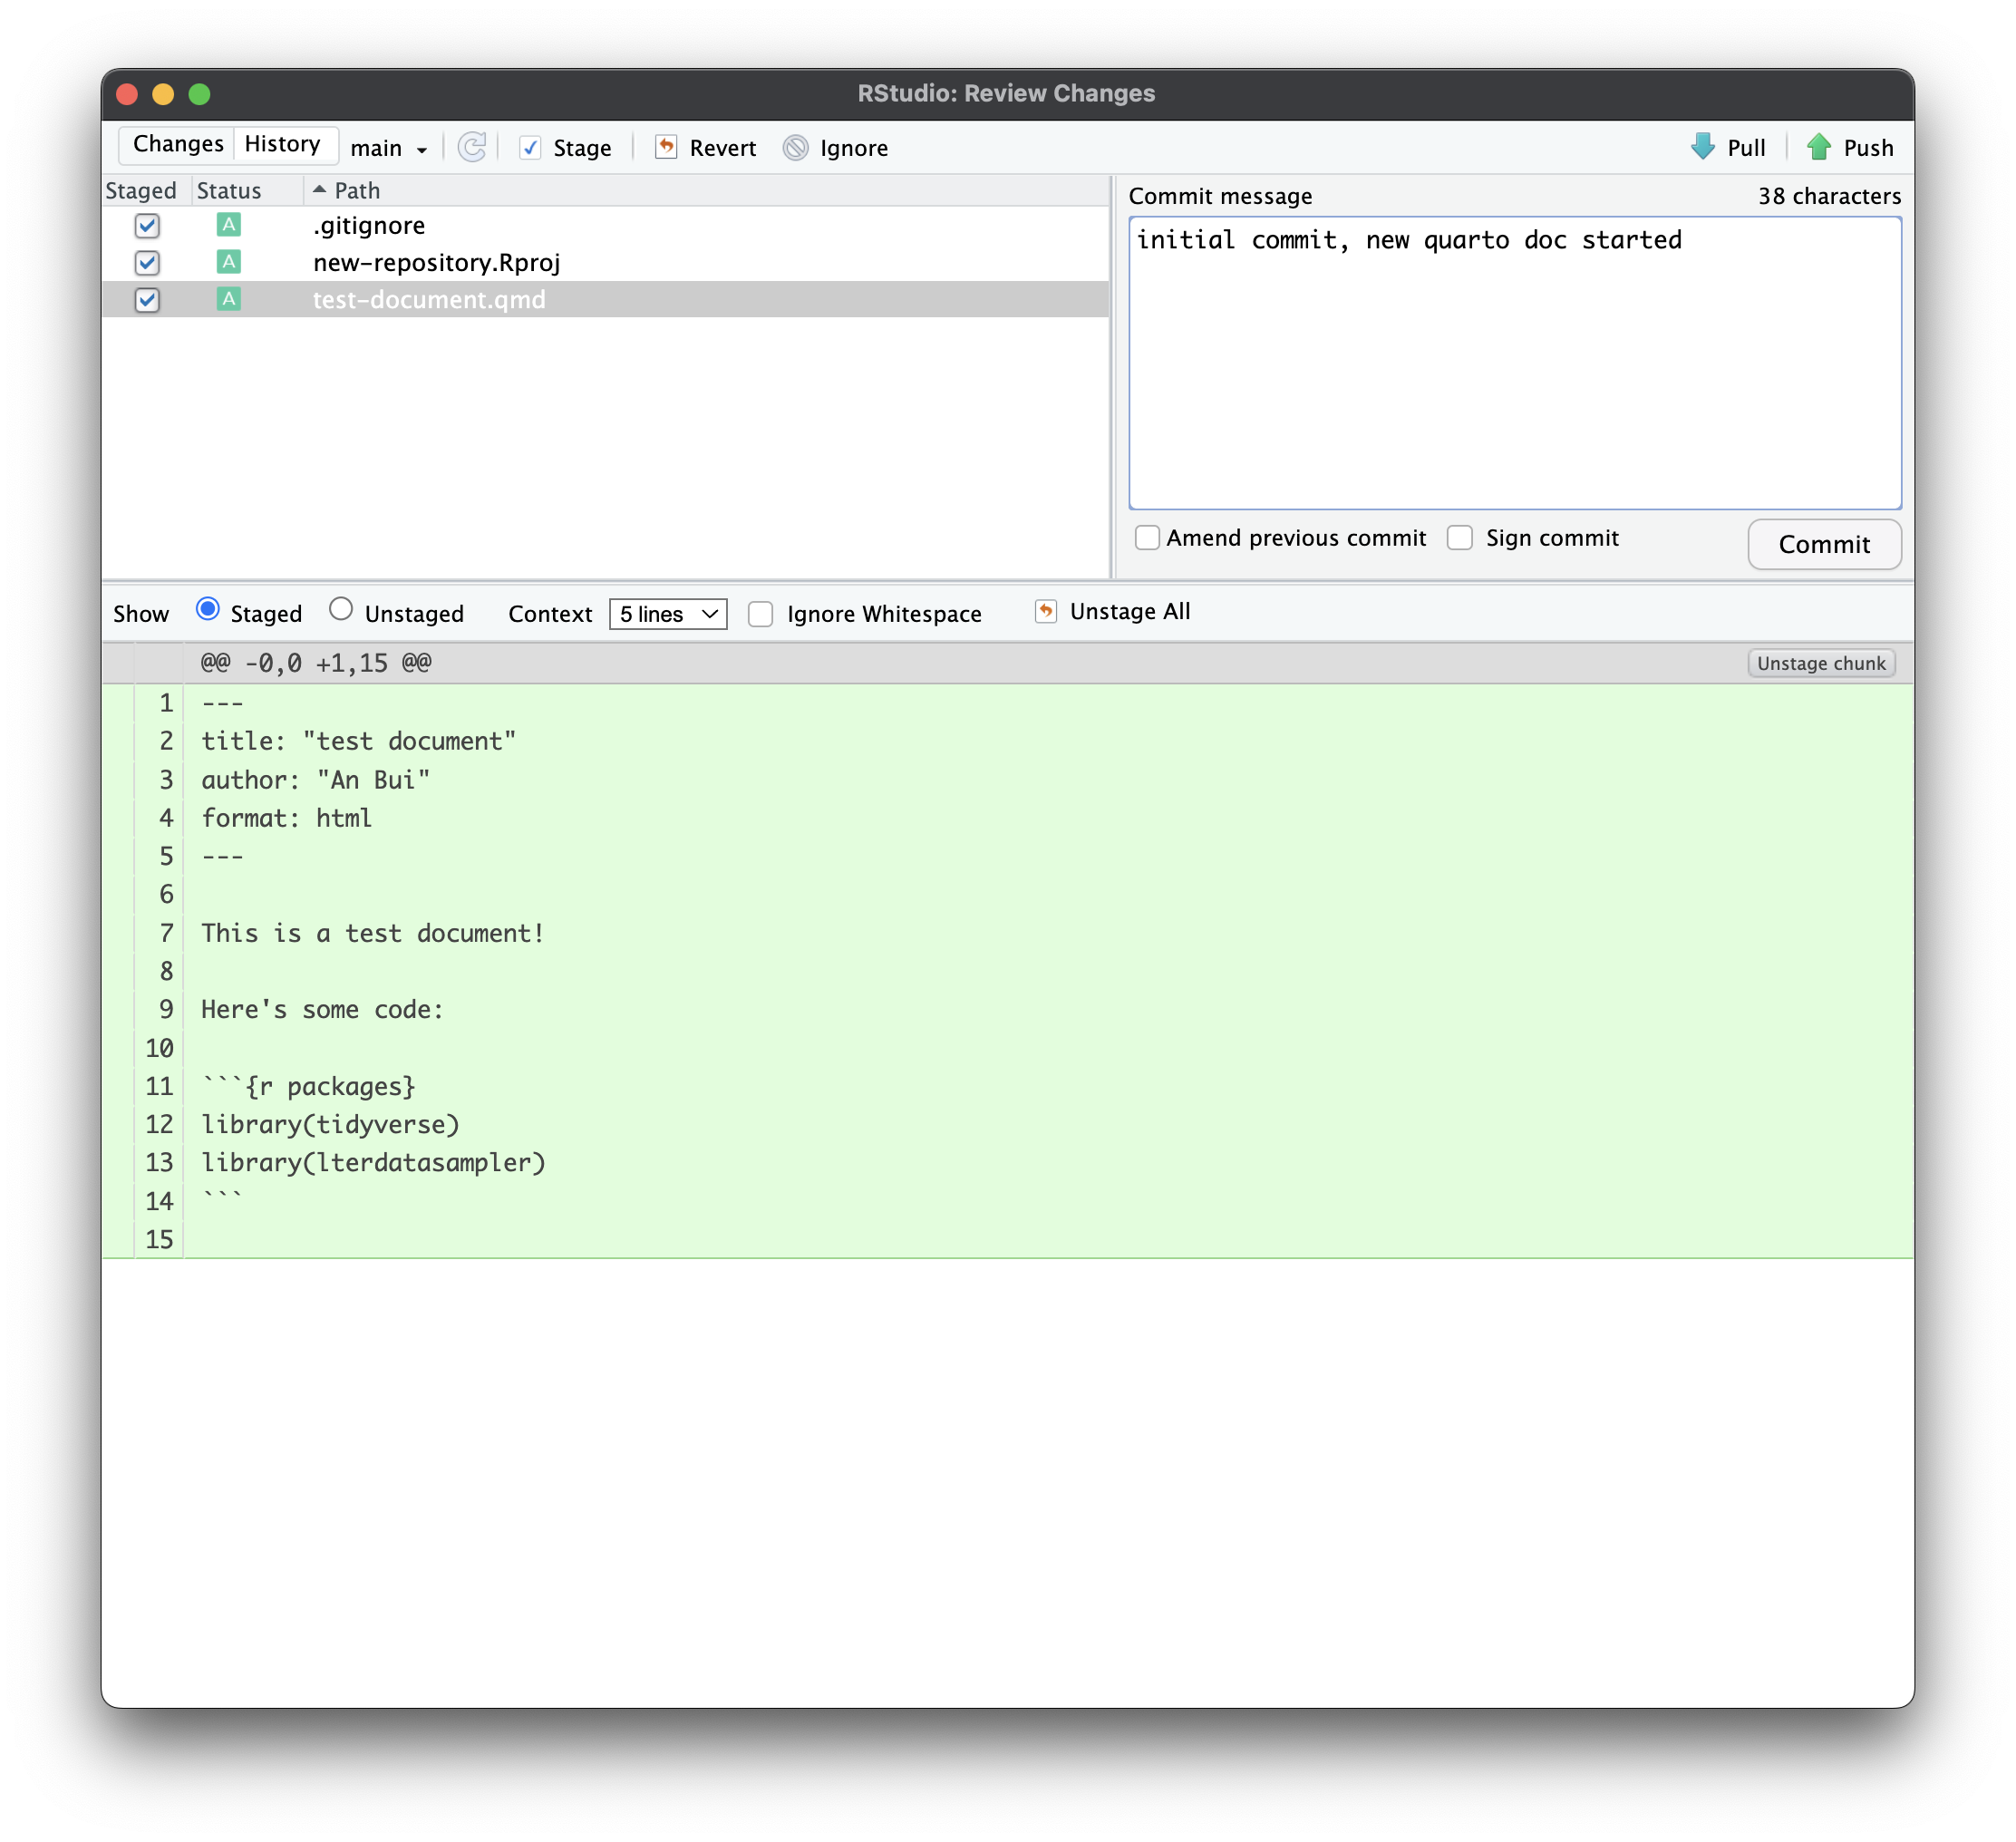
Open up the Git tab in the top right. You should see your new .qmd file along with any other new files (the .gitignore and the .Rproj file.).
5. Commit your changes.
In the Status column, you will see two yellow question marks. This means that the files are new, and git isn’t tracking them yet.
Check the boxes next to each file, which turns the two yellow question marks to a green “A” for “added”.
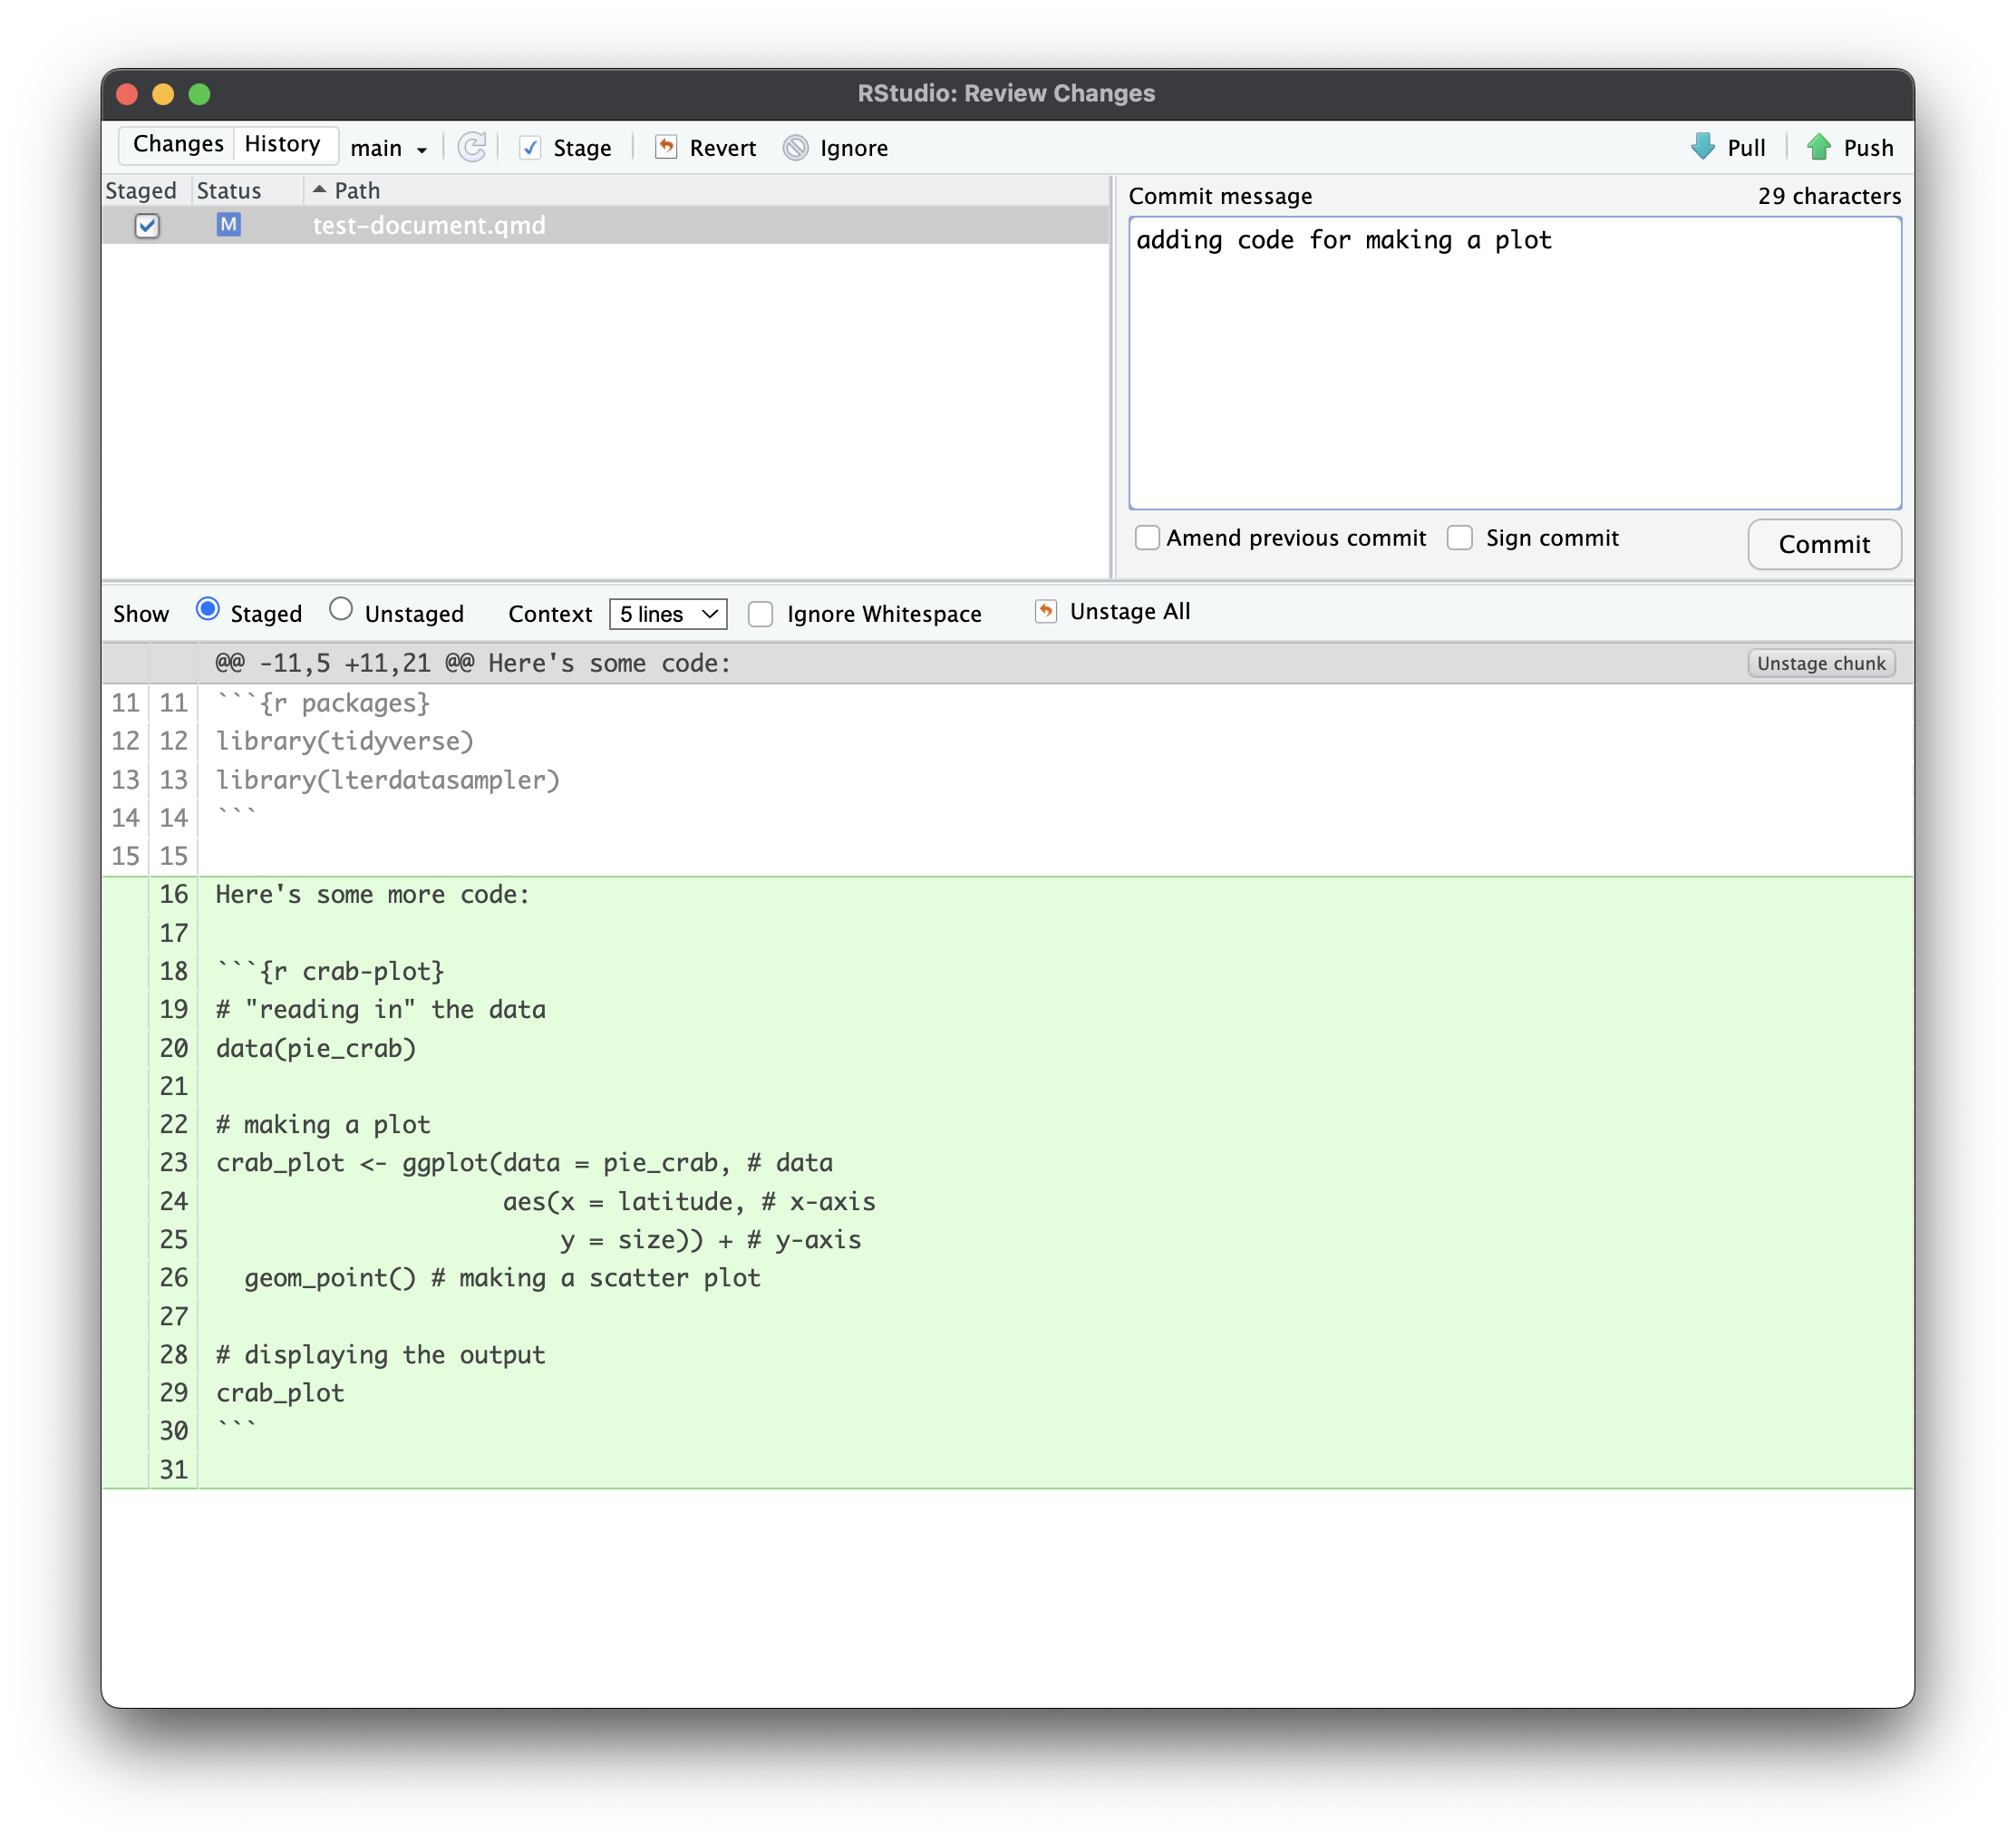
Click “Commit”. A new screen will pop up that looks like this:
If you click through each file in the top left pane, you will see the changes to the file in the lower pane.
The top right pane is where your commit message goes.
Write a commit message, then hit “Commit”.
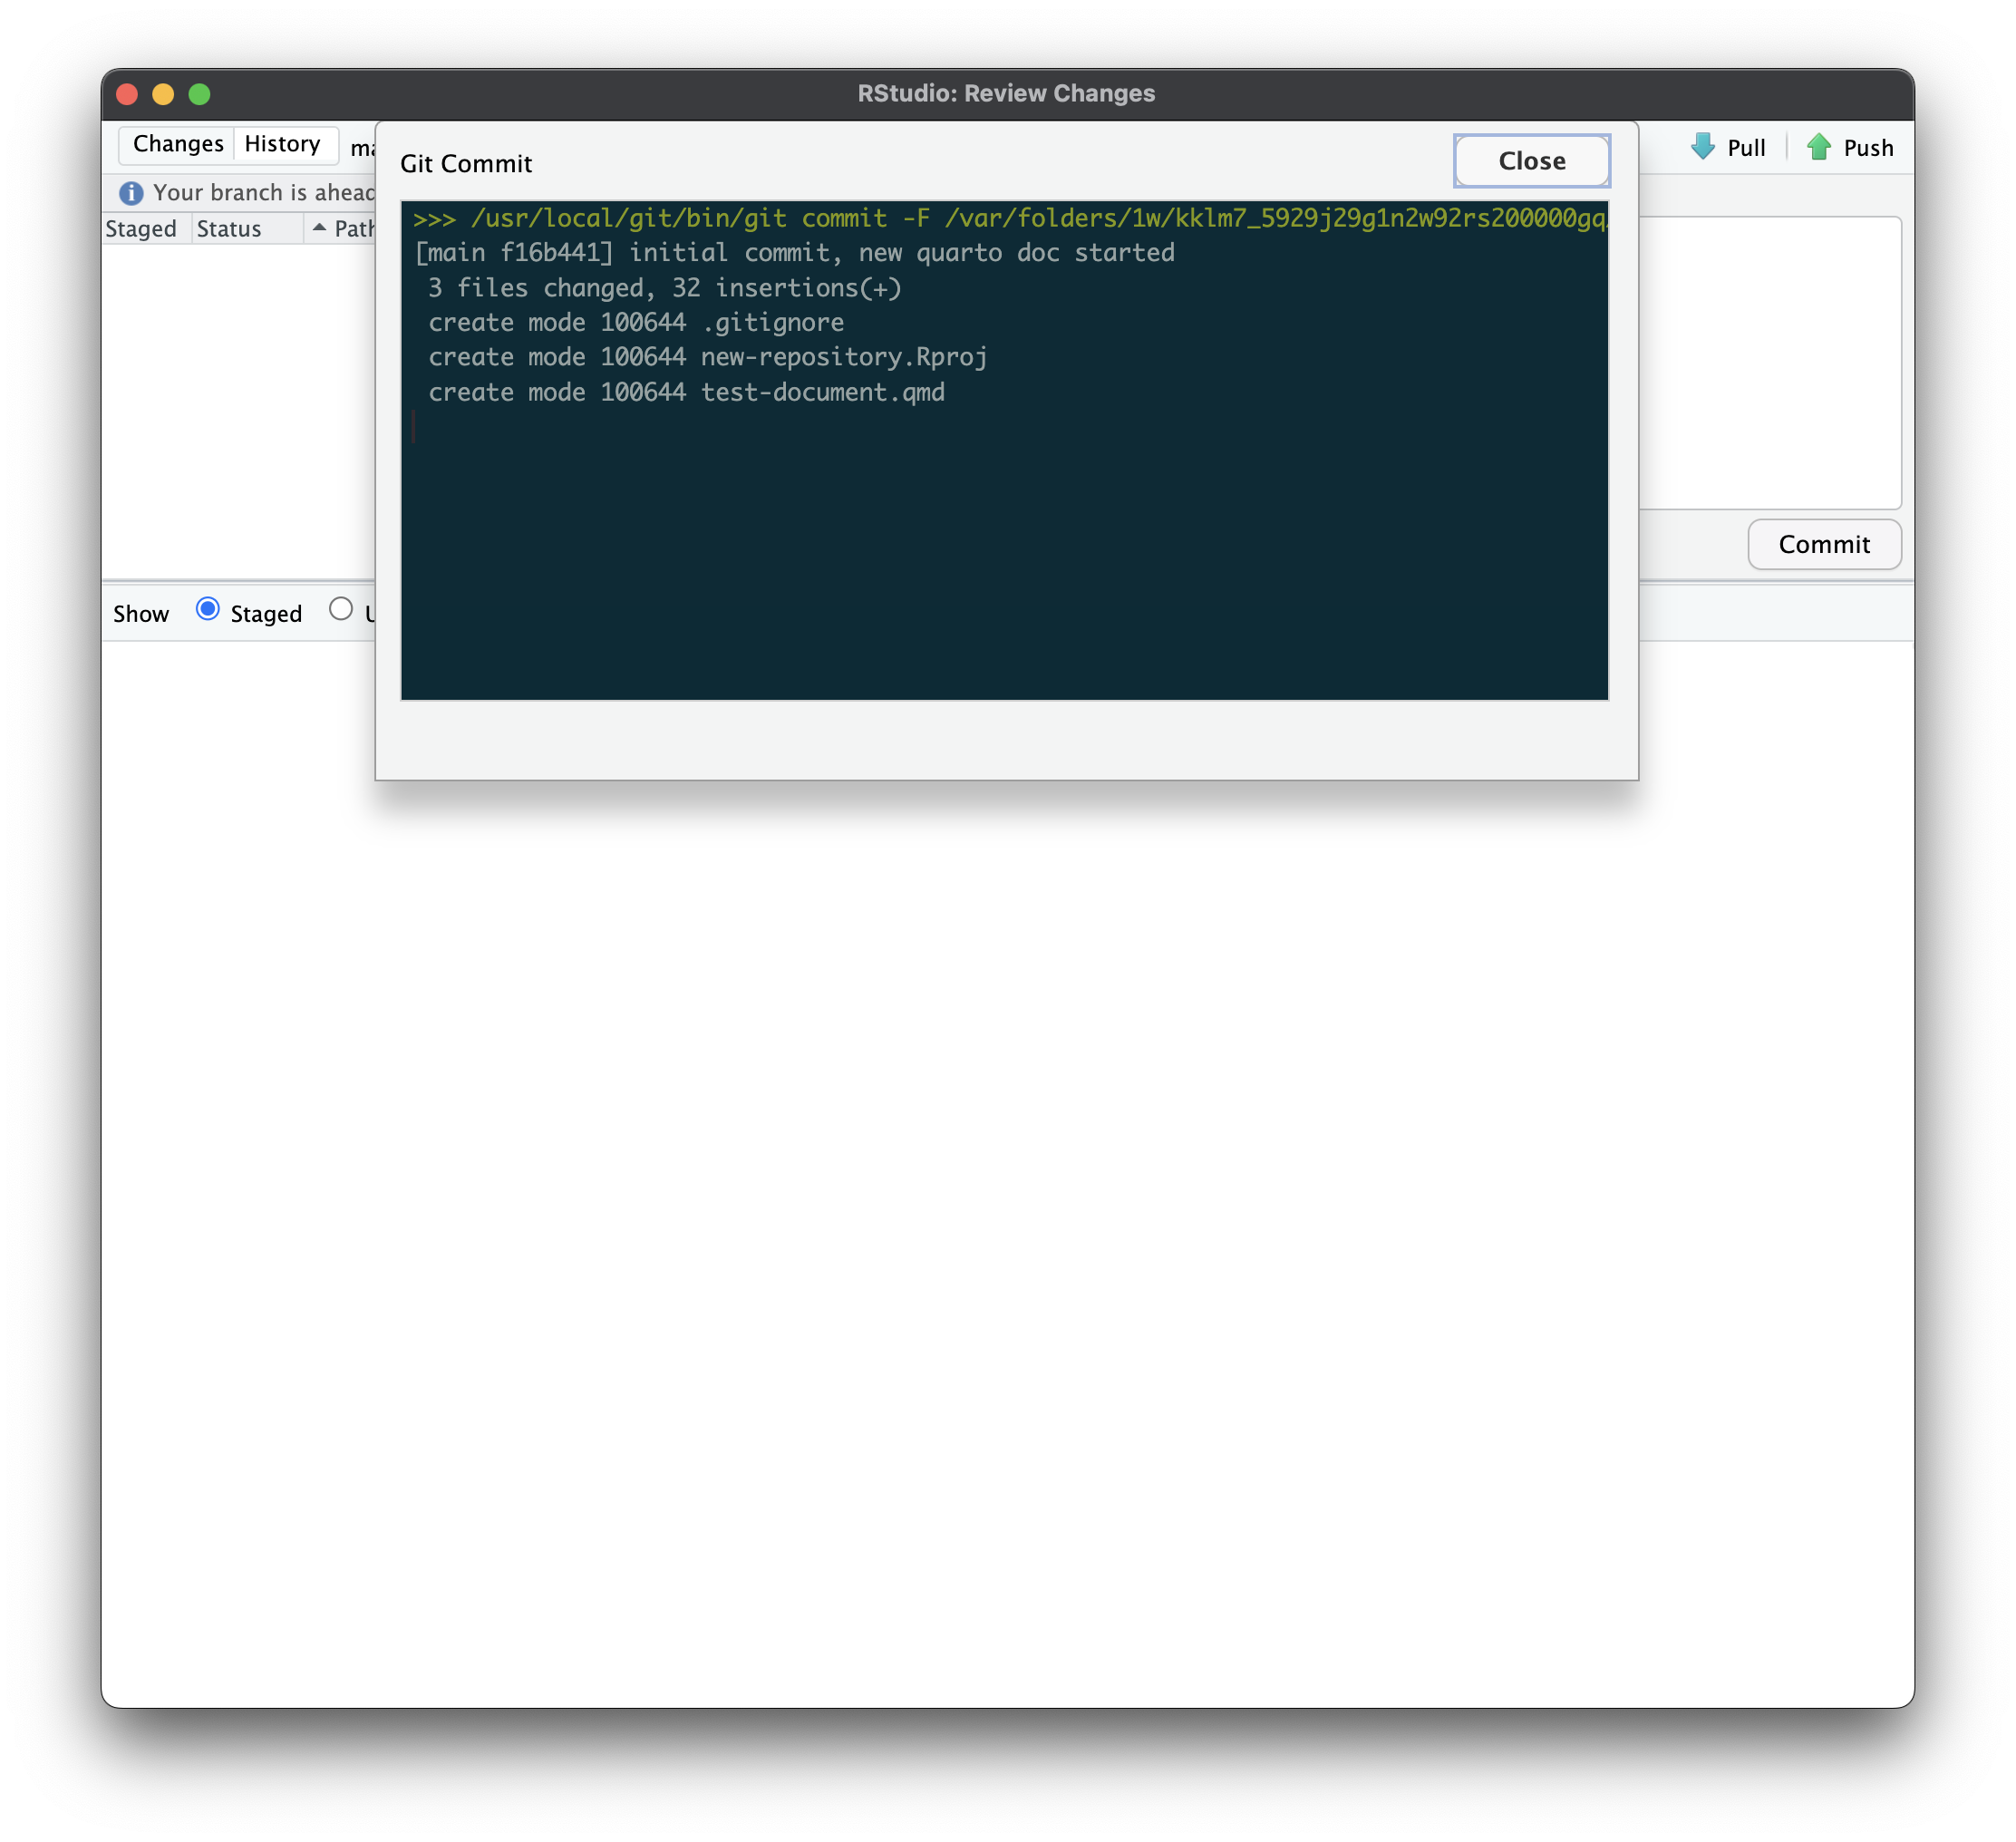
You should see a window that shows your commit message and a summary of the file changes.
Congratulations! Your files are now being tracked by git.
6. Push your changes.
Your file is now being tracked, but it’s not on GitHub yet.
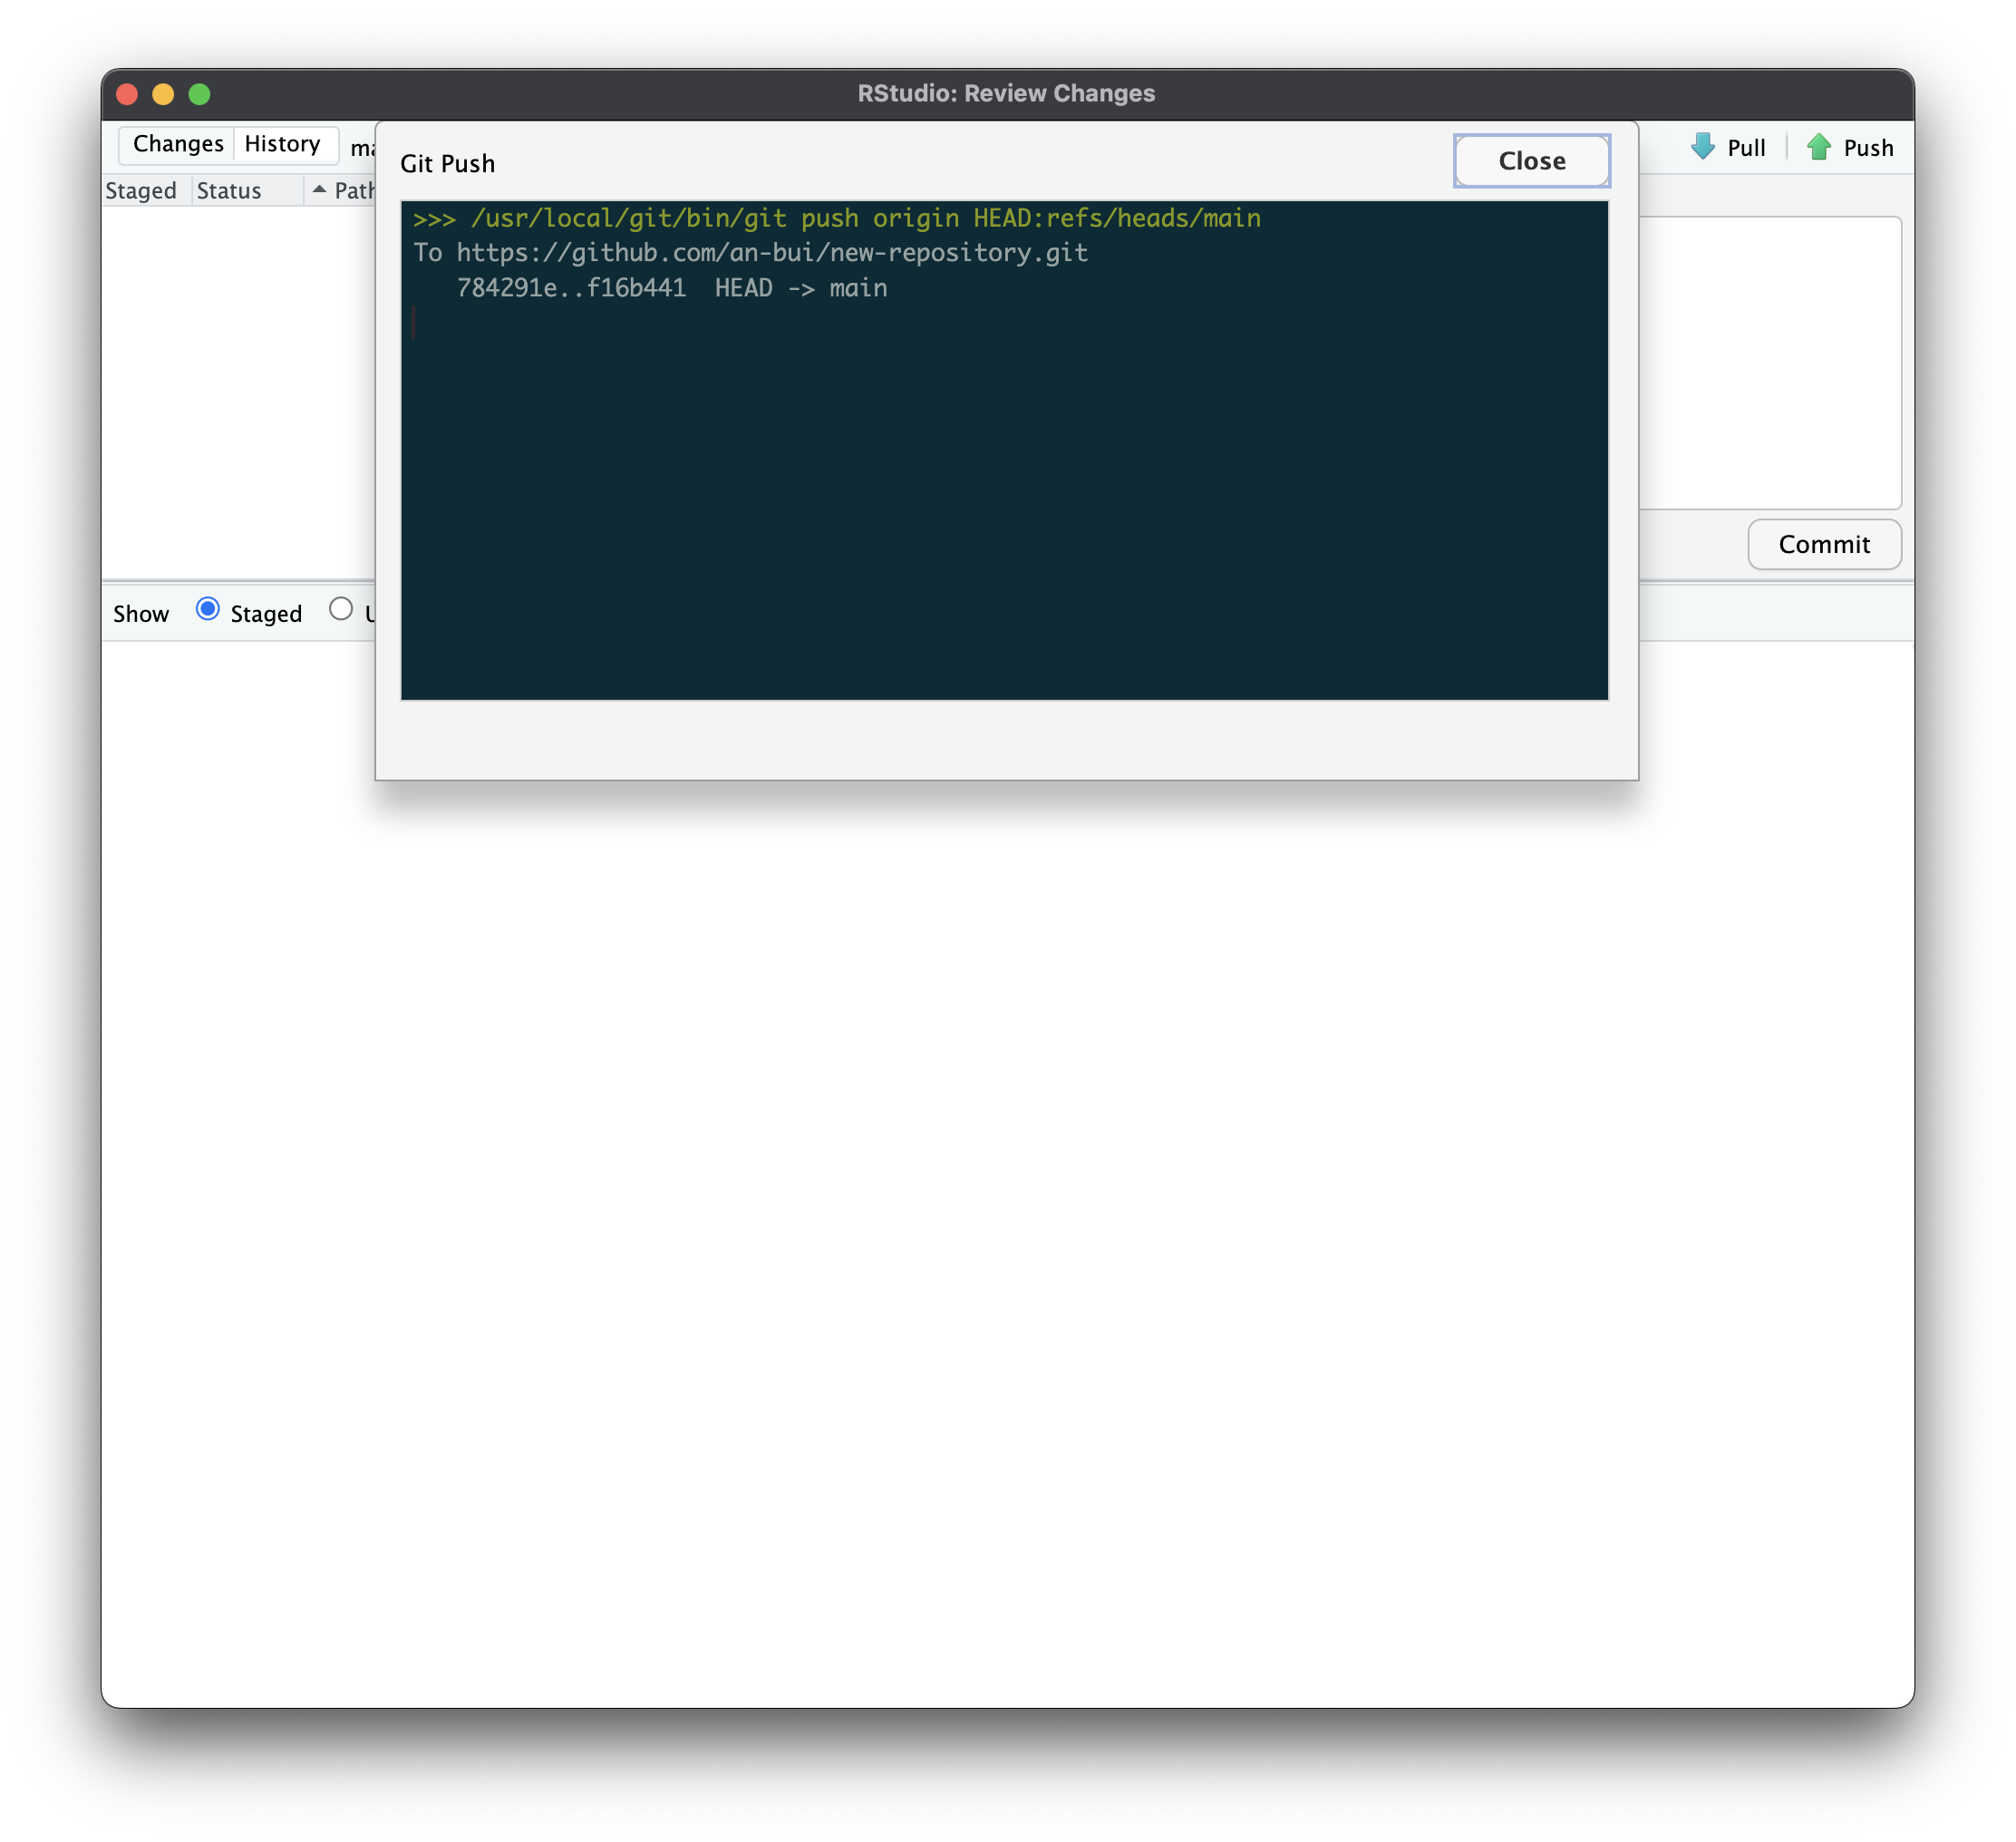
To get your files on GitHub, push the commit. To do this, click the “Push” button. You should see a window that looks like this:
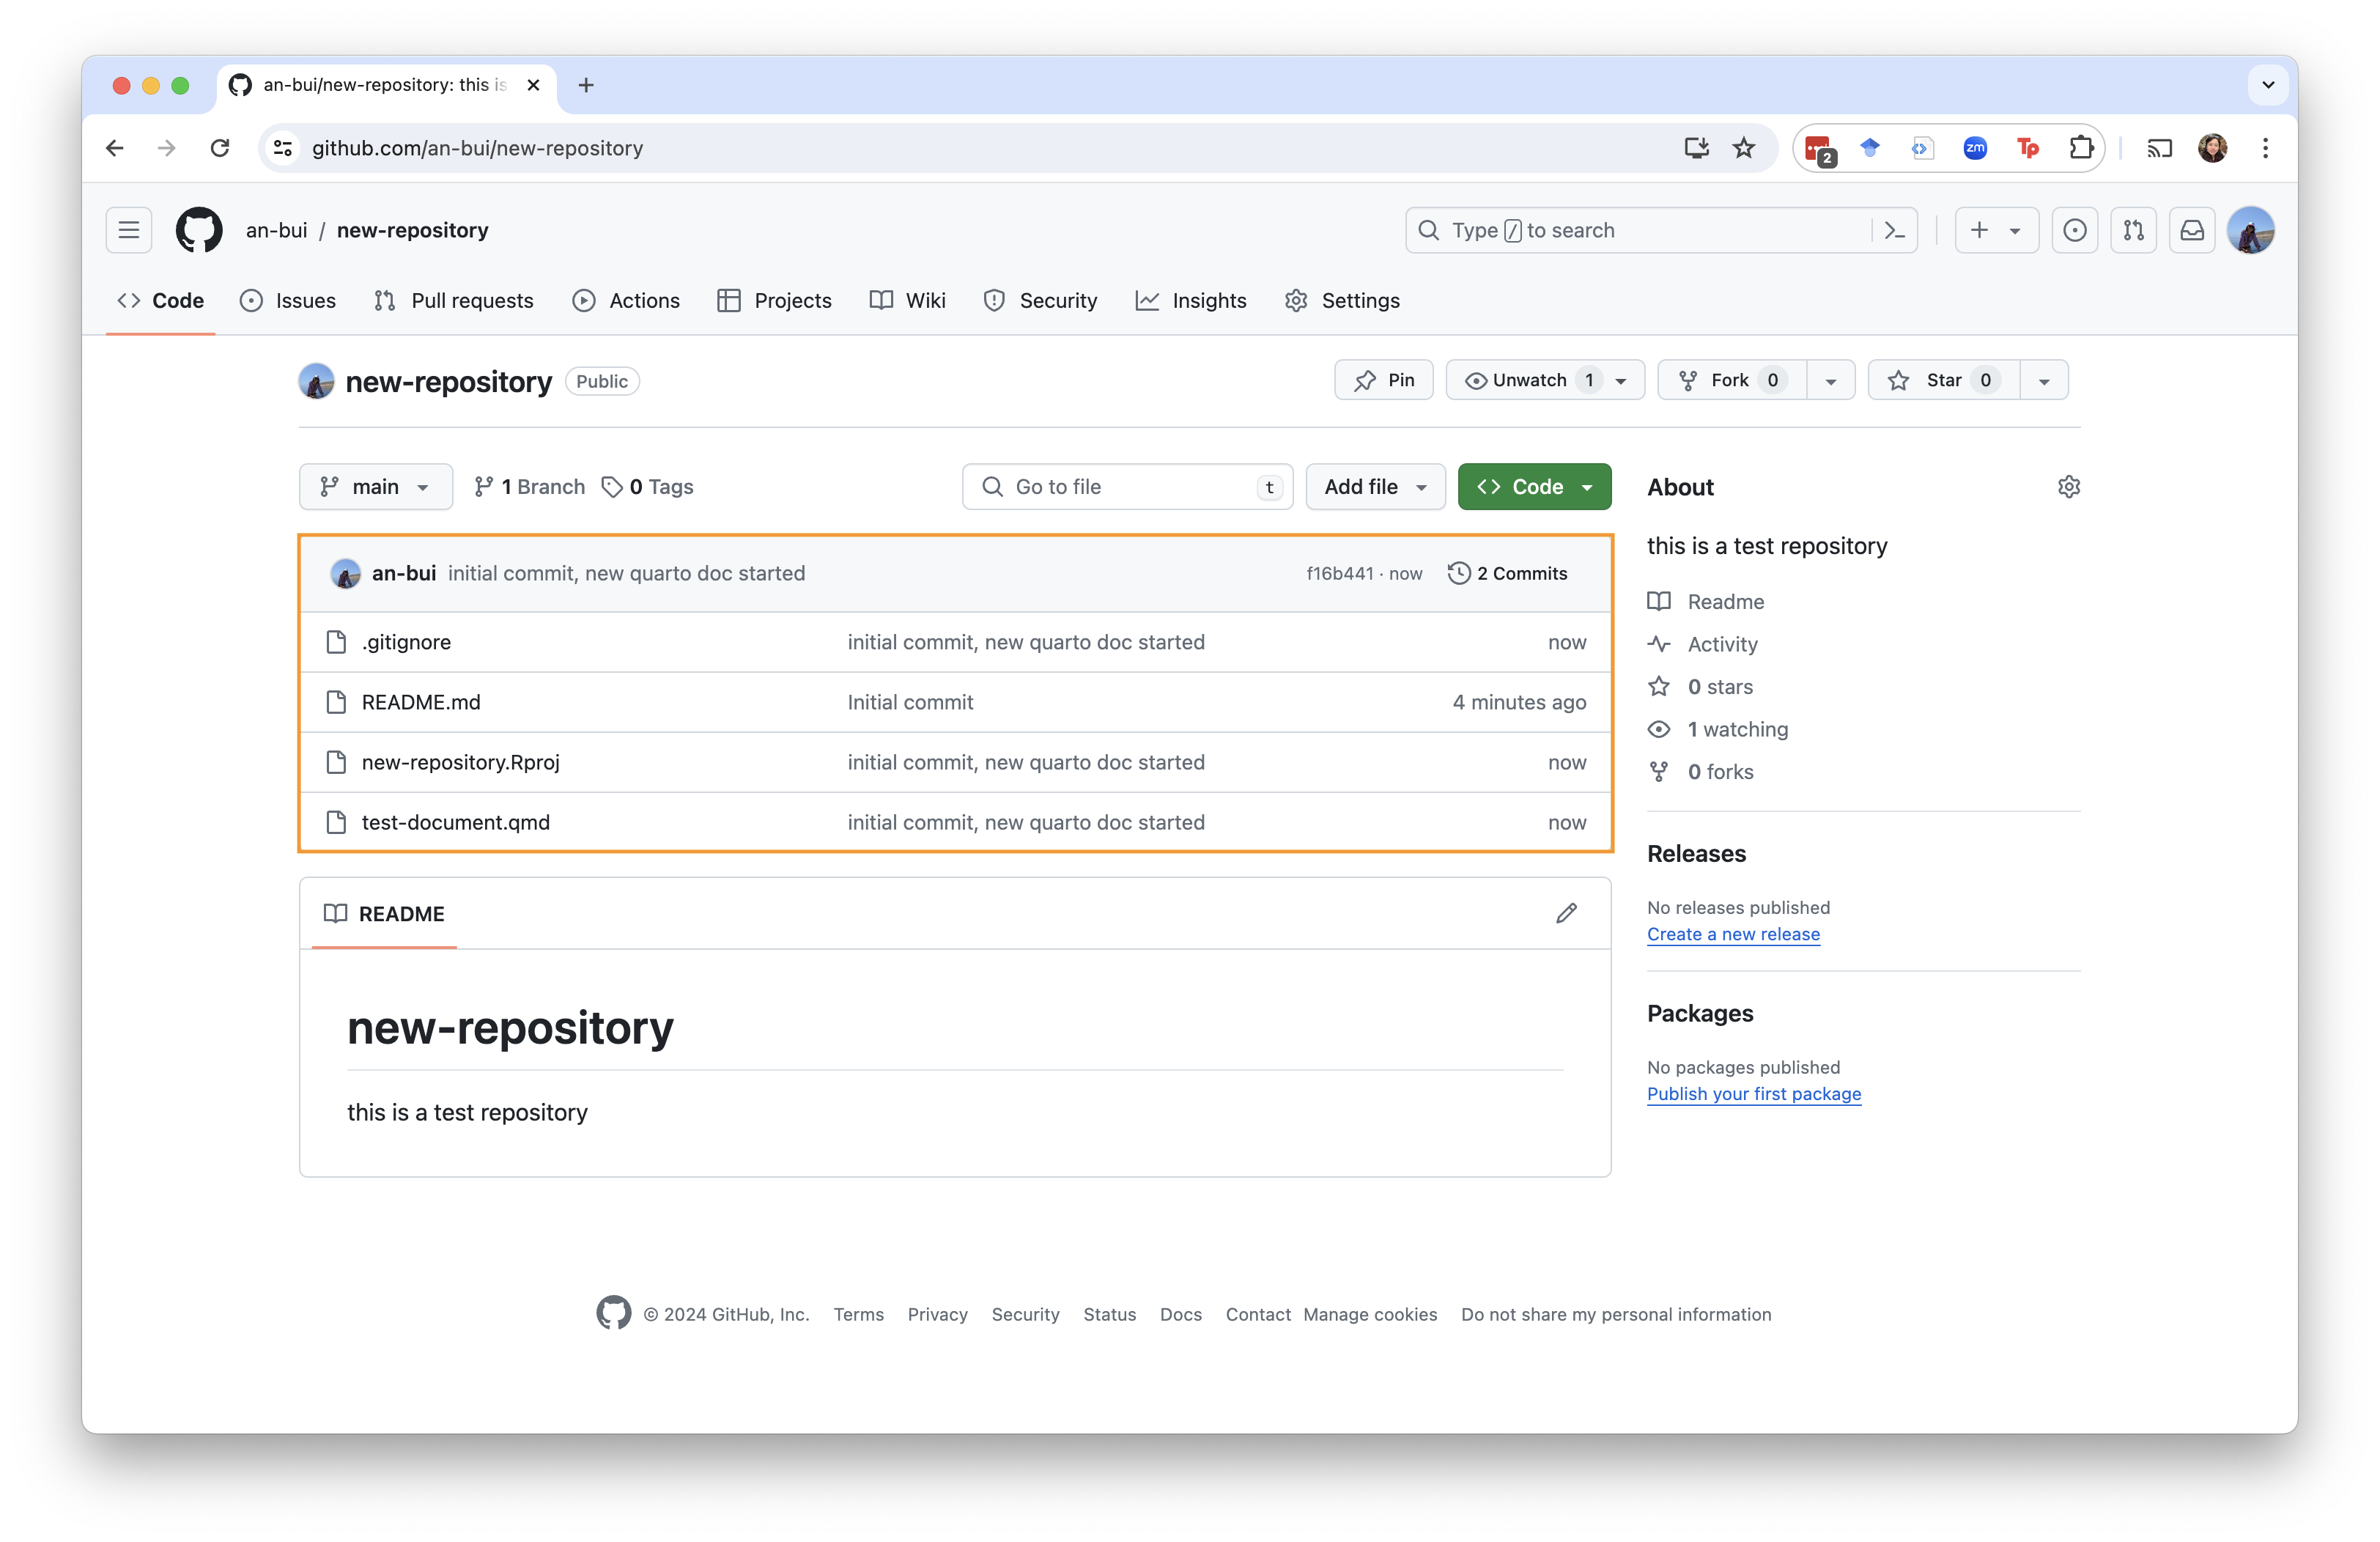
Double check that your push to GitHub by looking back at your remote. Refresh the repository page.
You should see your new files in the repository, and your commit message showing up next to the files that you changed.
Congratulations! Your files are now on GitHub.
7. Make more changes.
Version control only works if you actually use it. That means you should commit and push with each change you make. The frequency of committing/pushing you do depends on you. Some people are totally commit-happy and commit/push with every chunk of code they write; you might find it more reasonable to commit/push after each coding session.
Every time you make a change, your modified file will show up in the “Git” tab with a blue M for “modified”. The process for changes is the same as for new files:
- Click the check box,
- hit “Commit”,
- fill in a commit message,
- commit,
- then push.
In the commit window, you’ll see any modified files with changes highlighted in green, as before.
Using GitHub Pages to display rendered .html output
For the rest of the assignments in this class (Homework 3, choose your own assignment (generative art and advanced data visualization), and final), you will submit a link to your rendered .html document on a GitHub repository.
Be sure you are comfortable with doing this! Please ask for help if you are not!
Set up
Make sure your Quarto document is set to render to .html.
You can change this in the YAML (the part of the document at the very beginning between two sets of three dashes ---). The YAML line is: format: html.
1. Render your document.
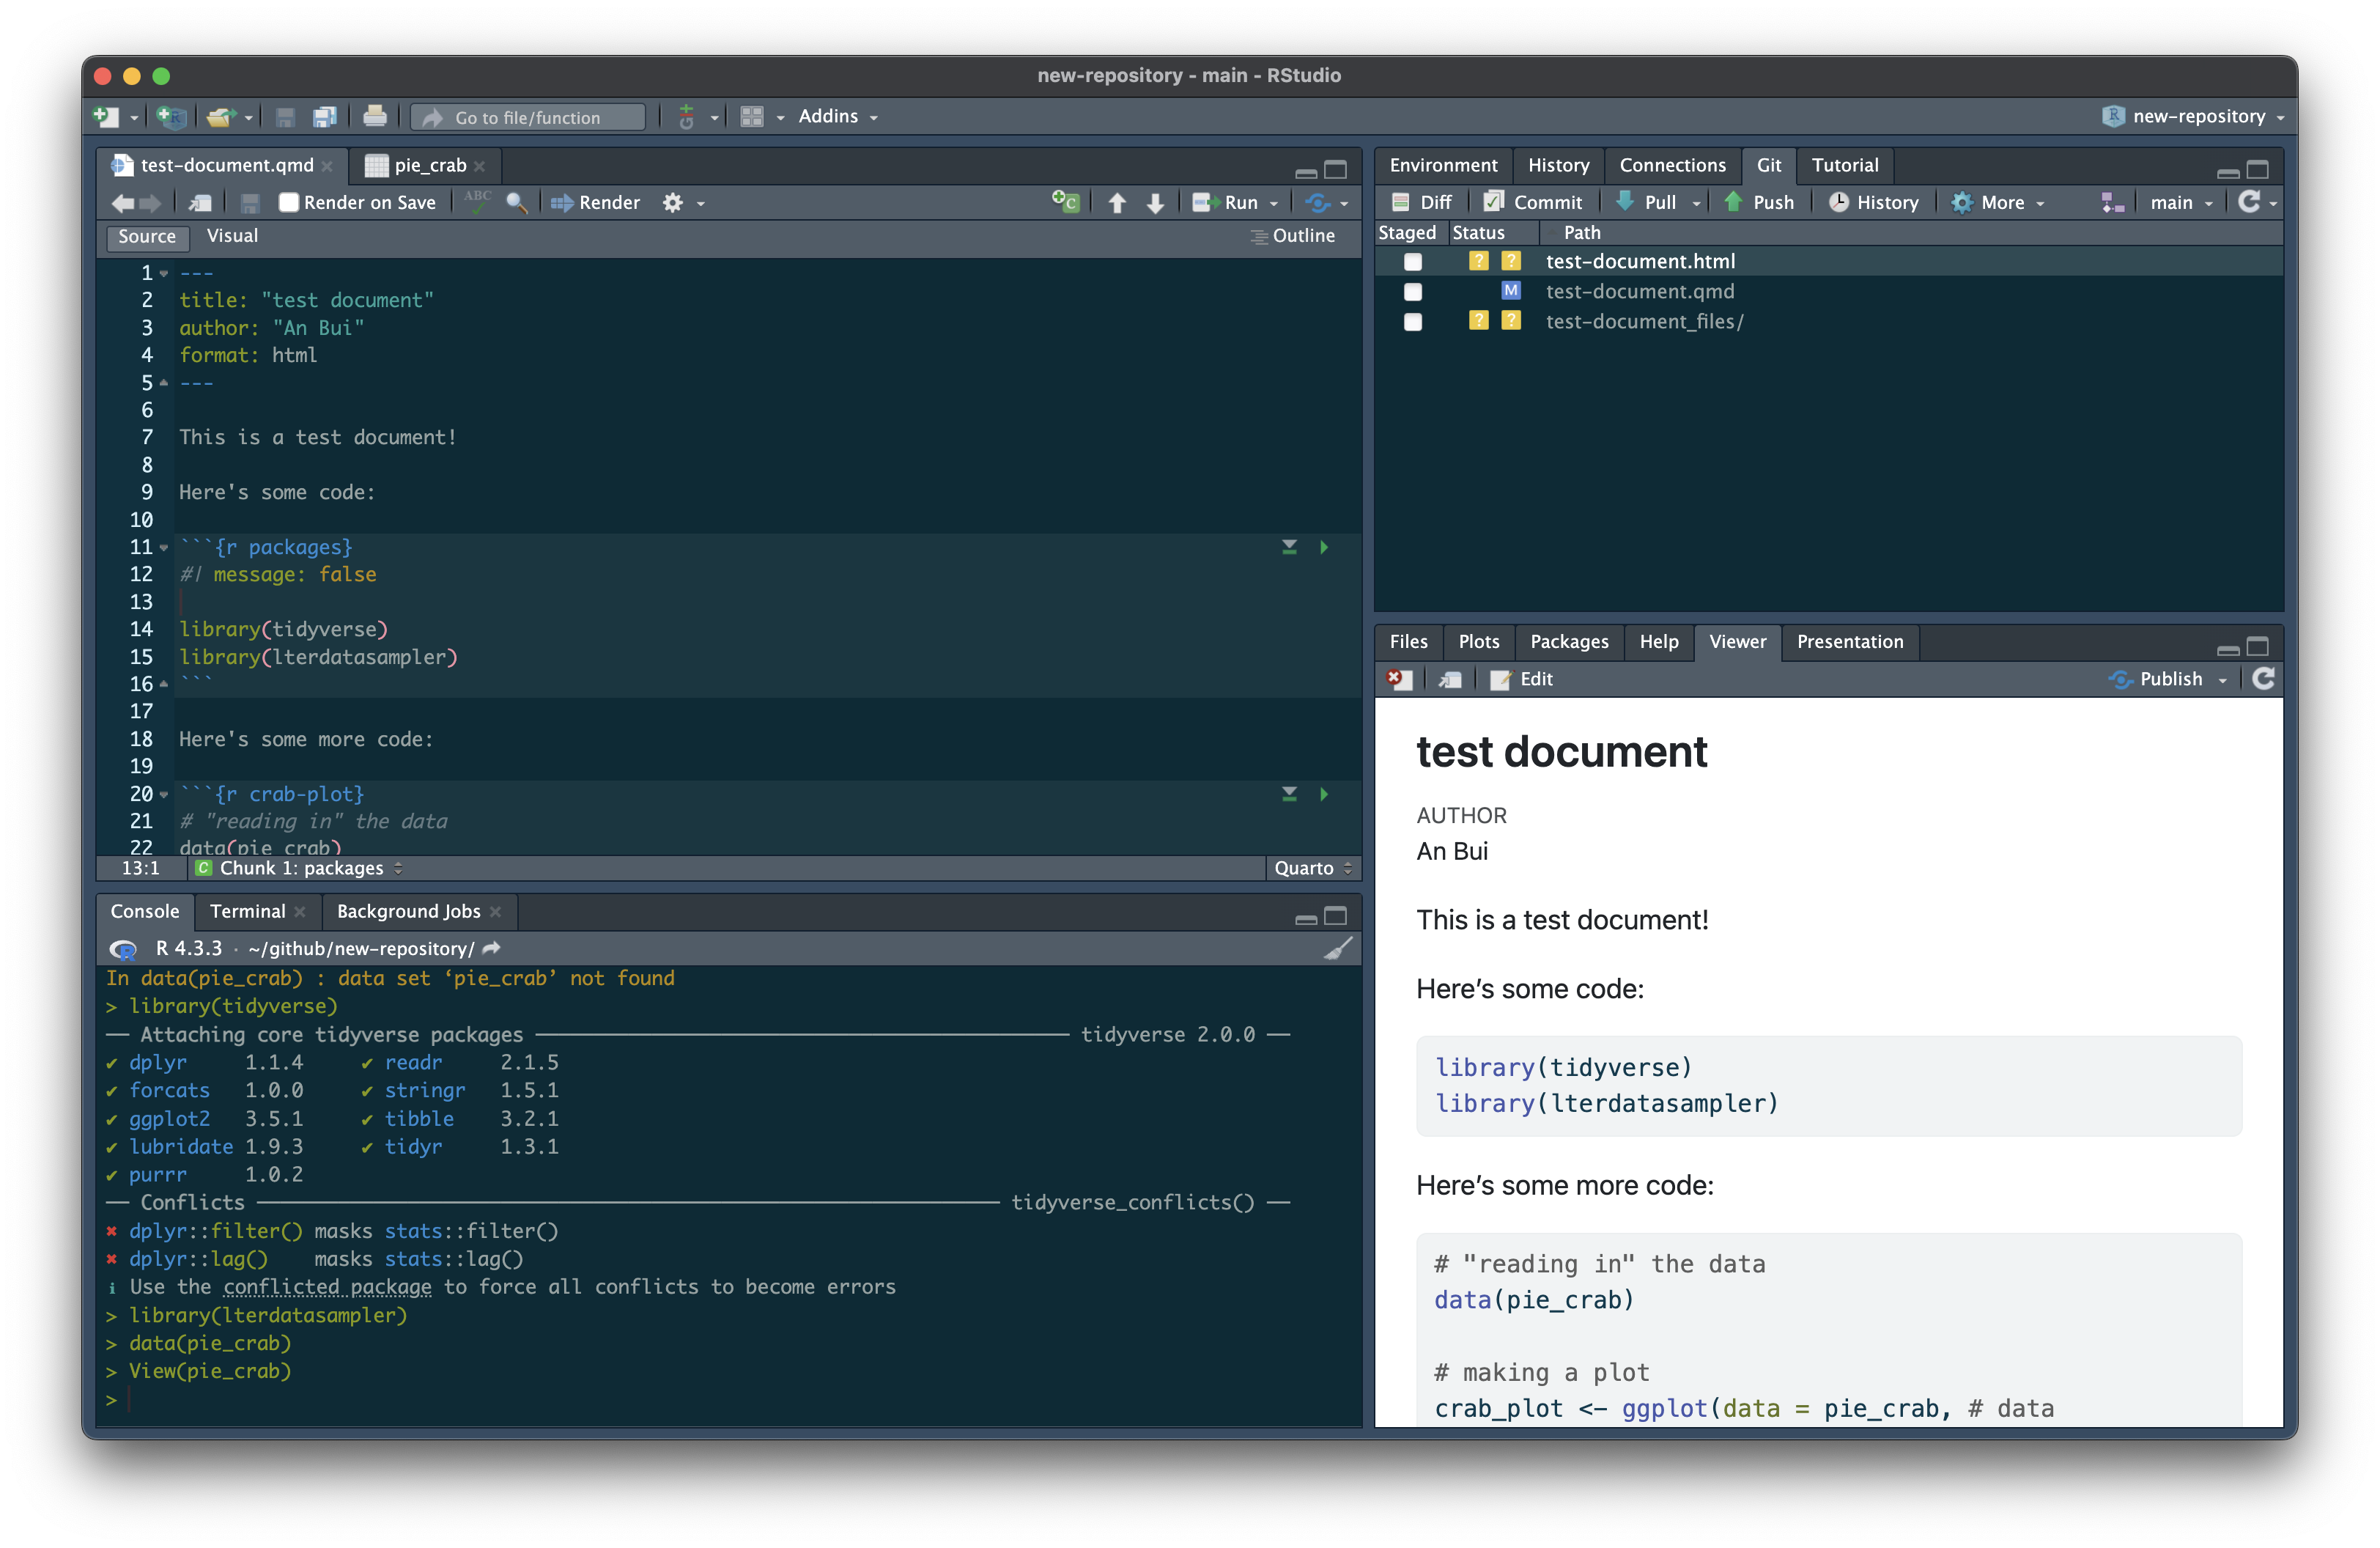
When you render your Quarto document, you should see the rendered output pop up in the viewer pane (the bottom right).
You should also see new files show up in the Git pane: the .html version of your Quarto document, and a folder ending in _files/ that has all the related code for the .html file.
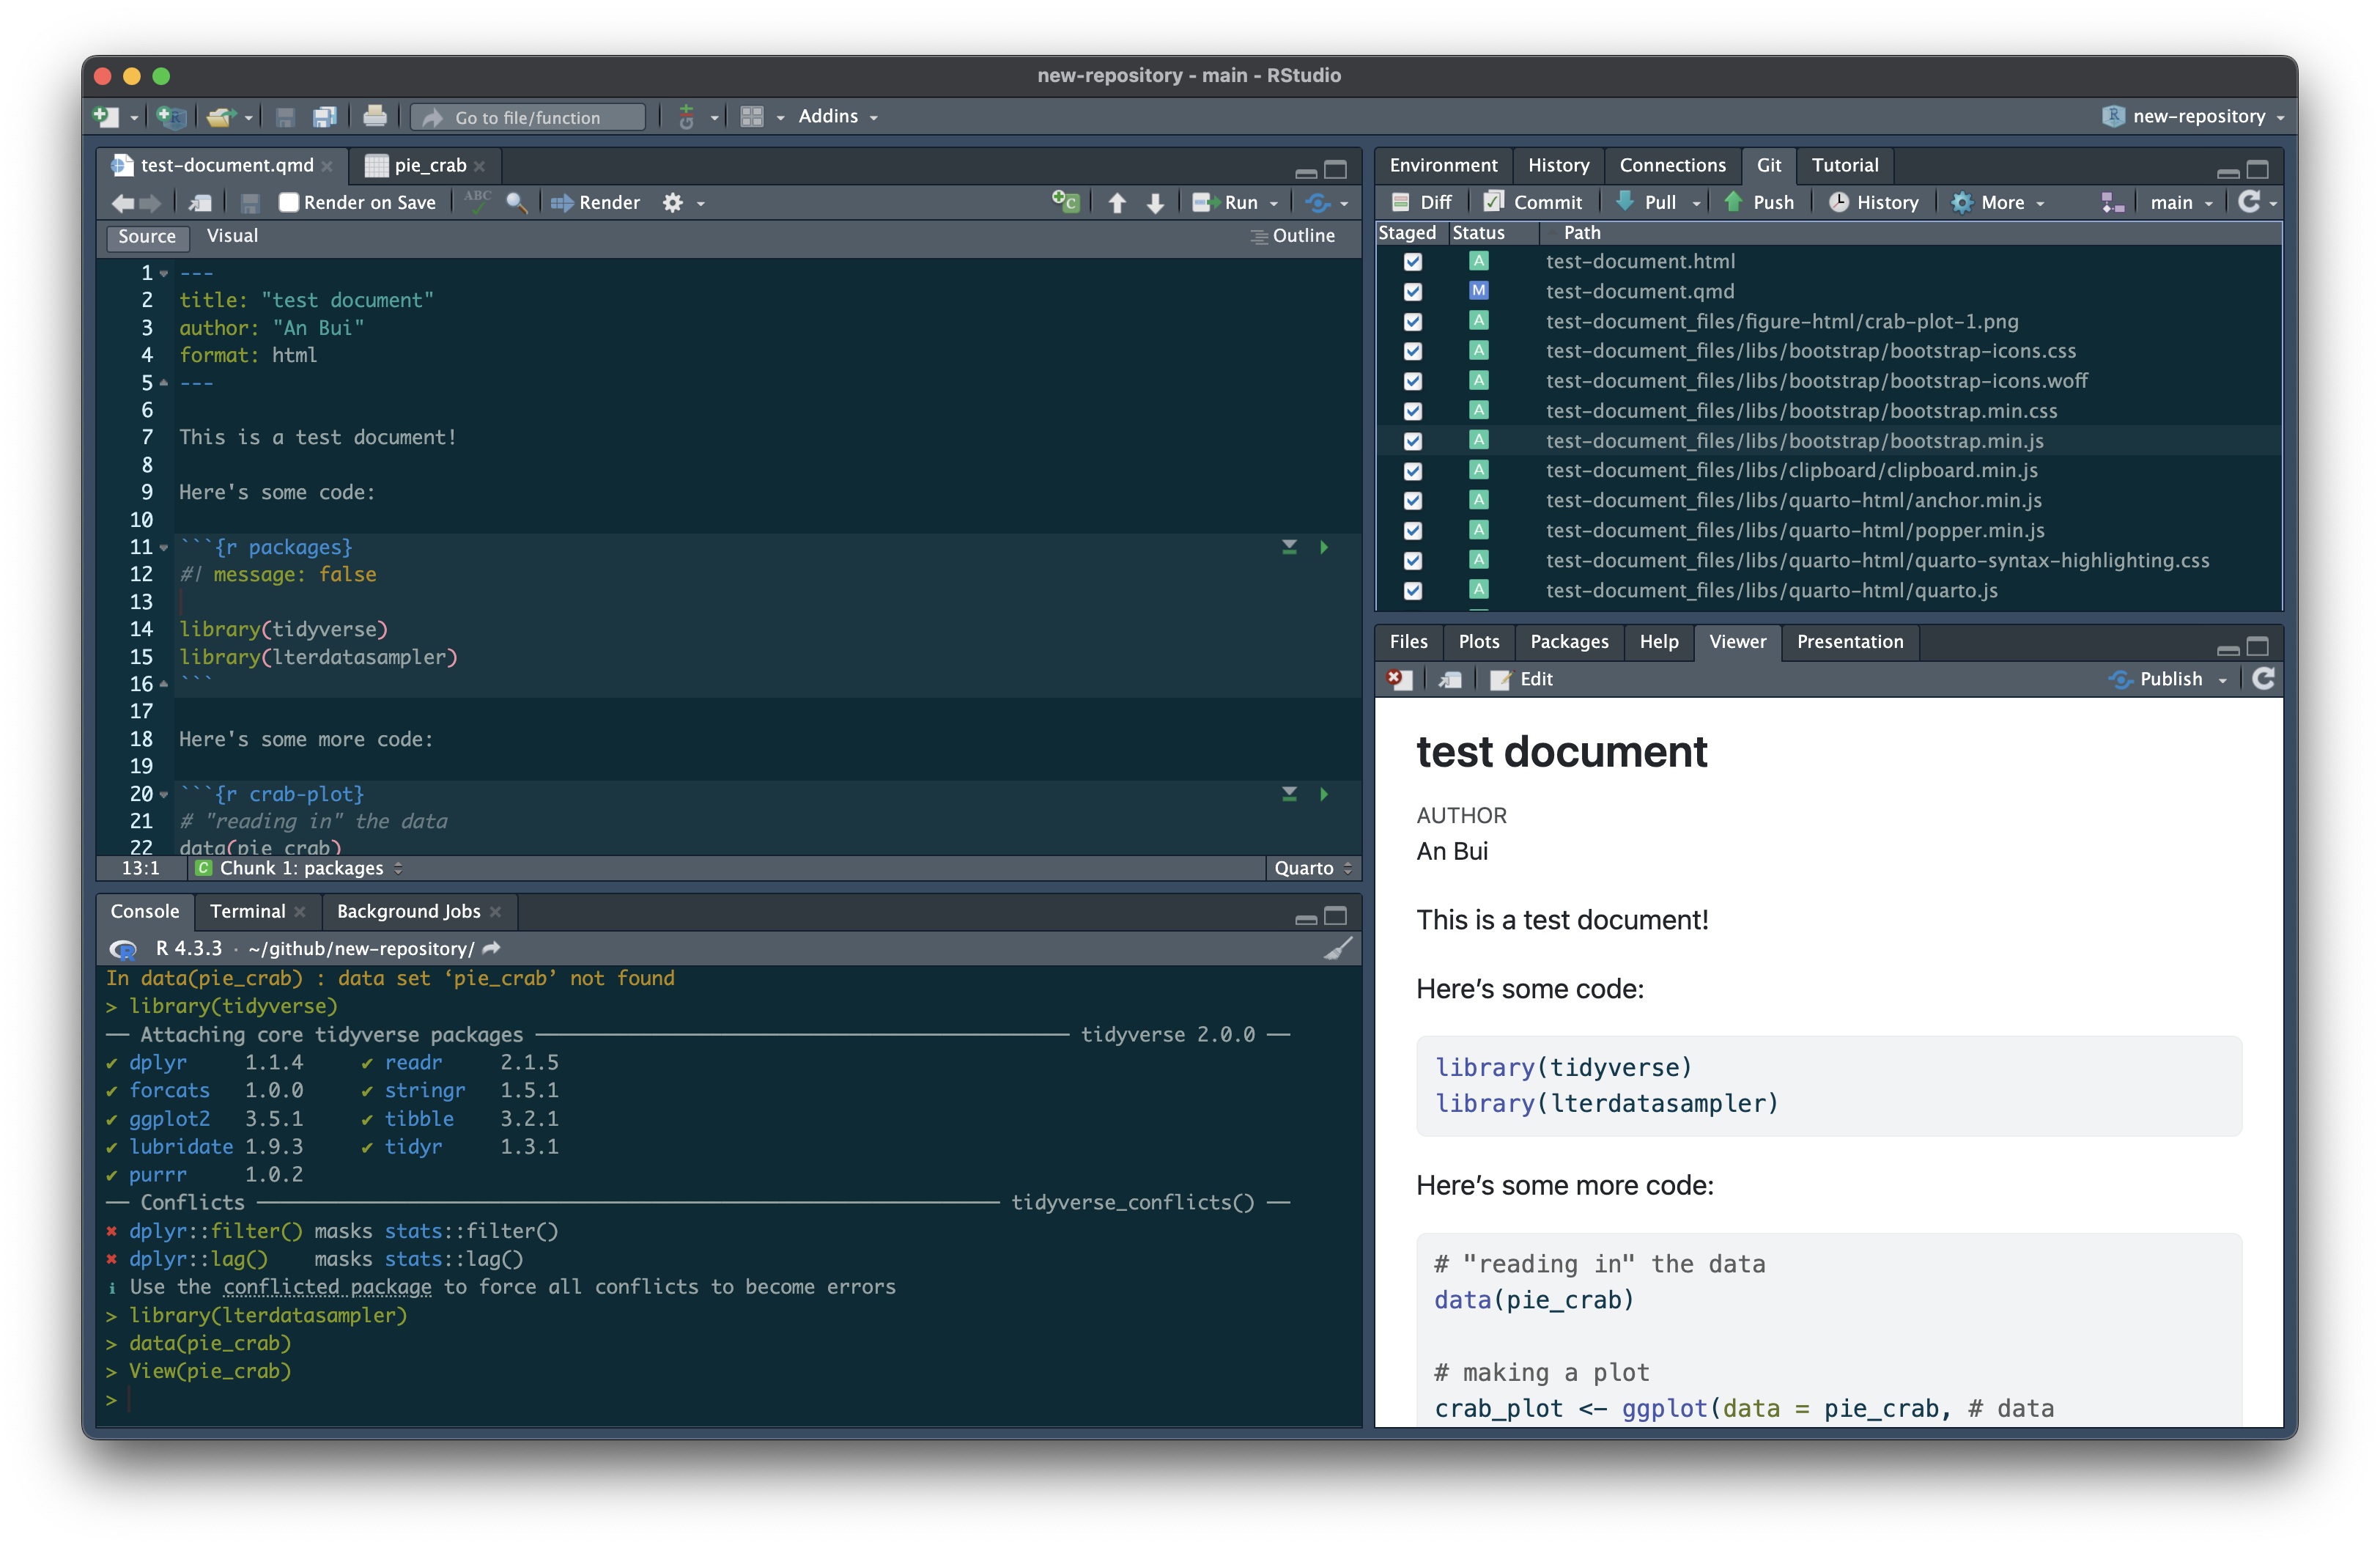
When you click the checkbox for the _files/ folder, you will see a bunch of new files being added. This is normal!
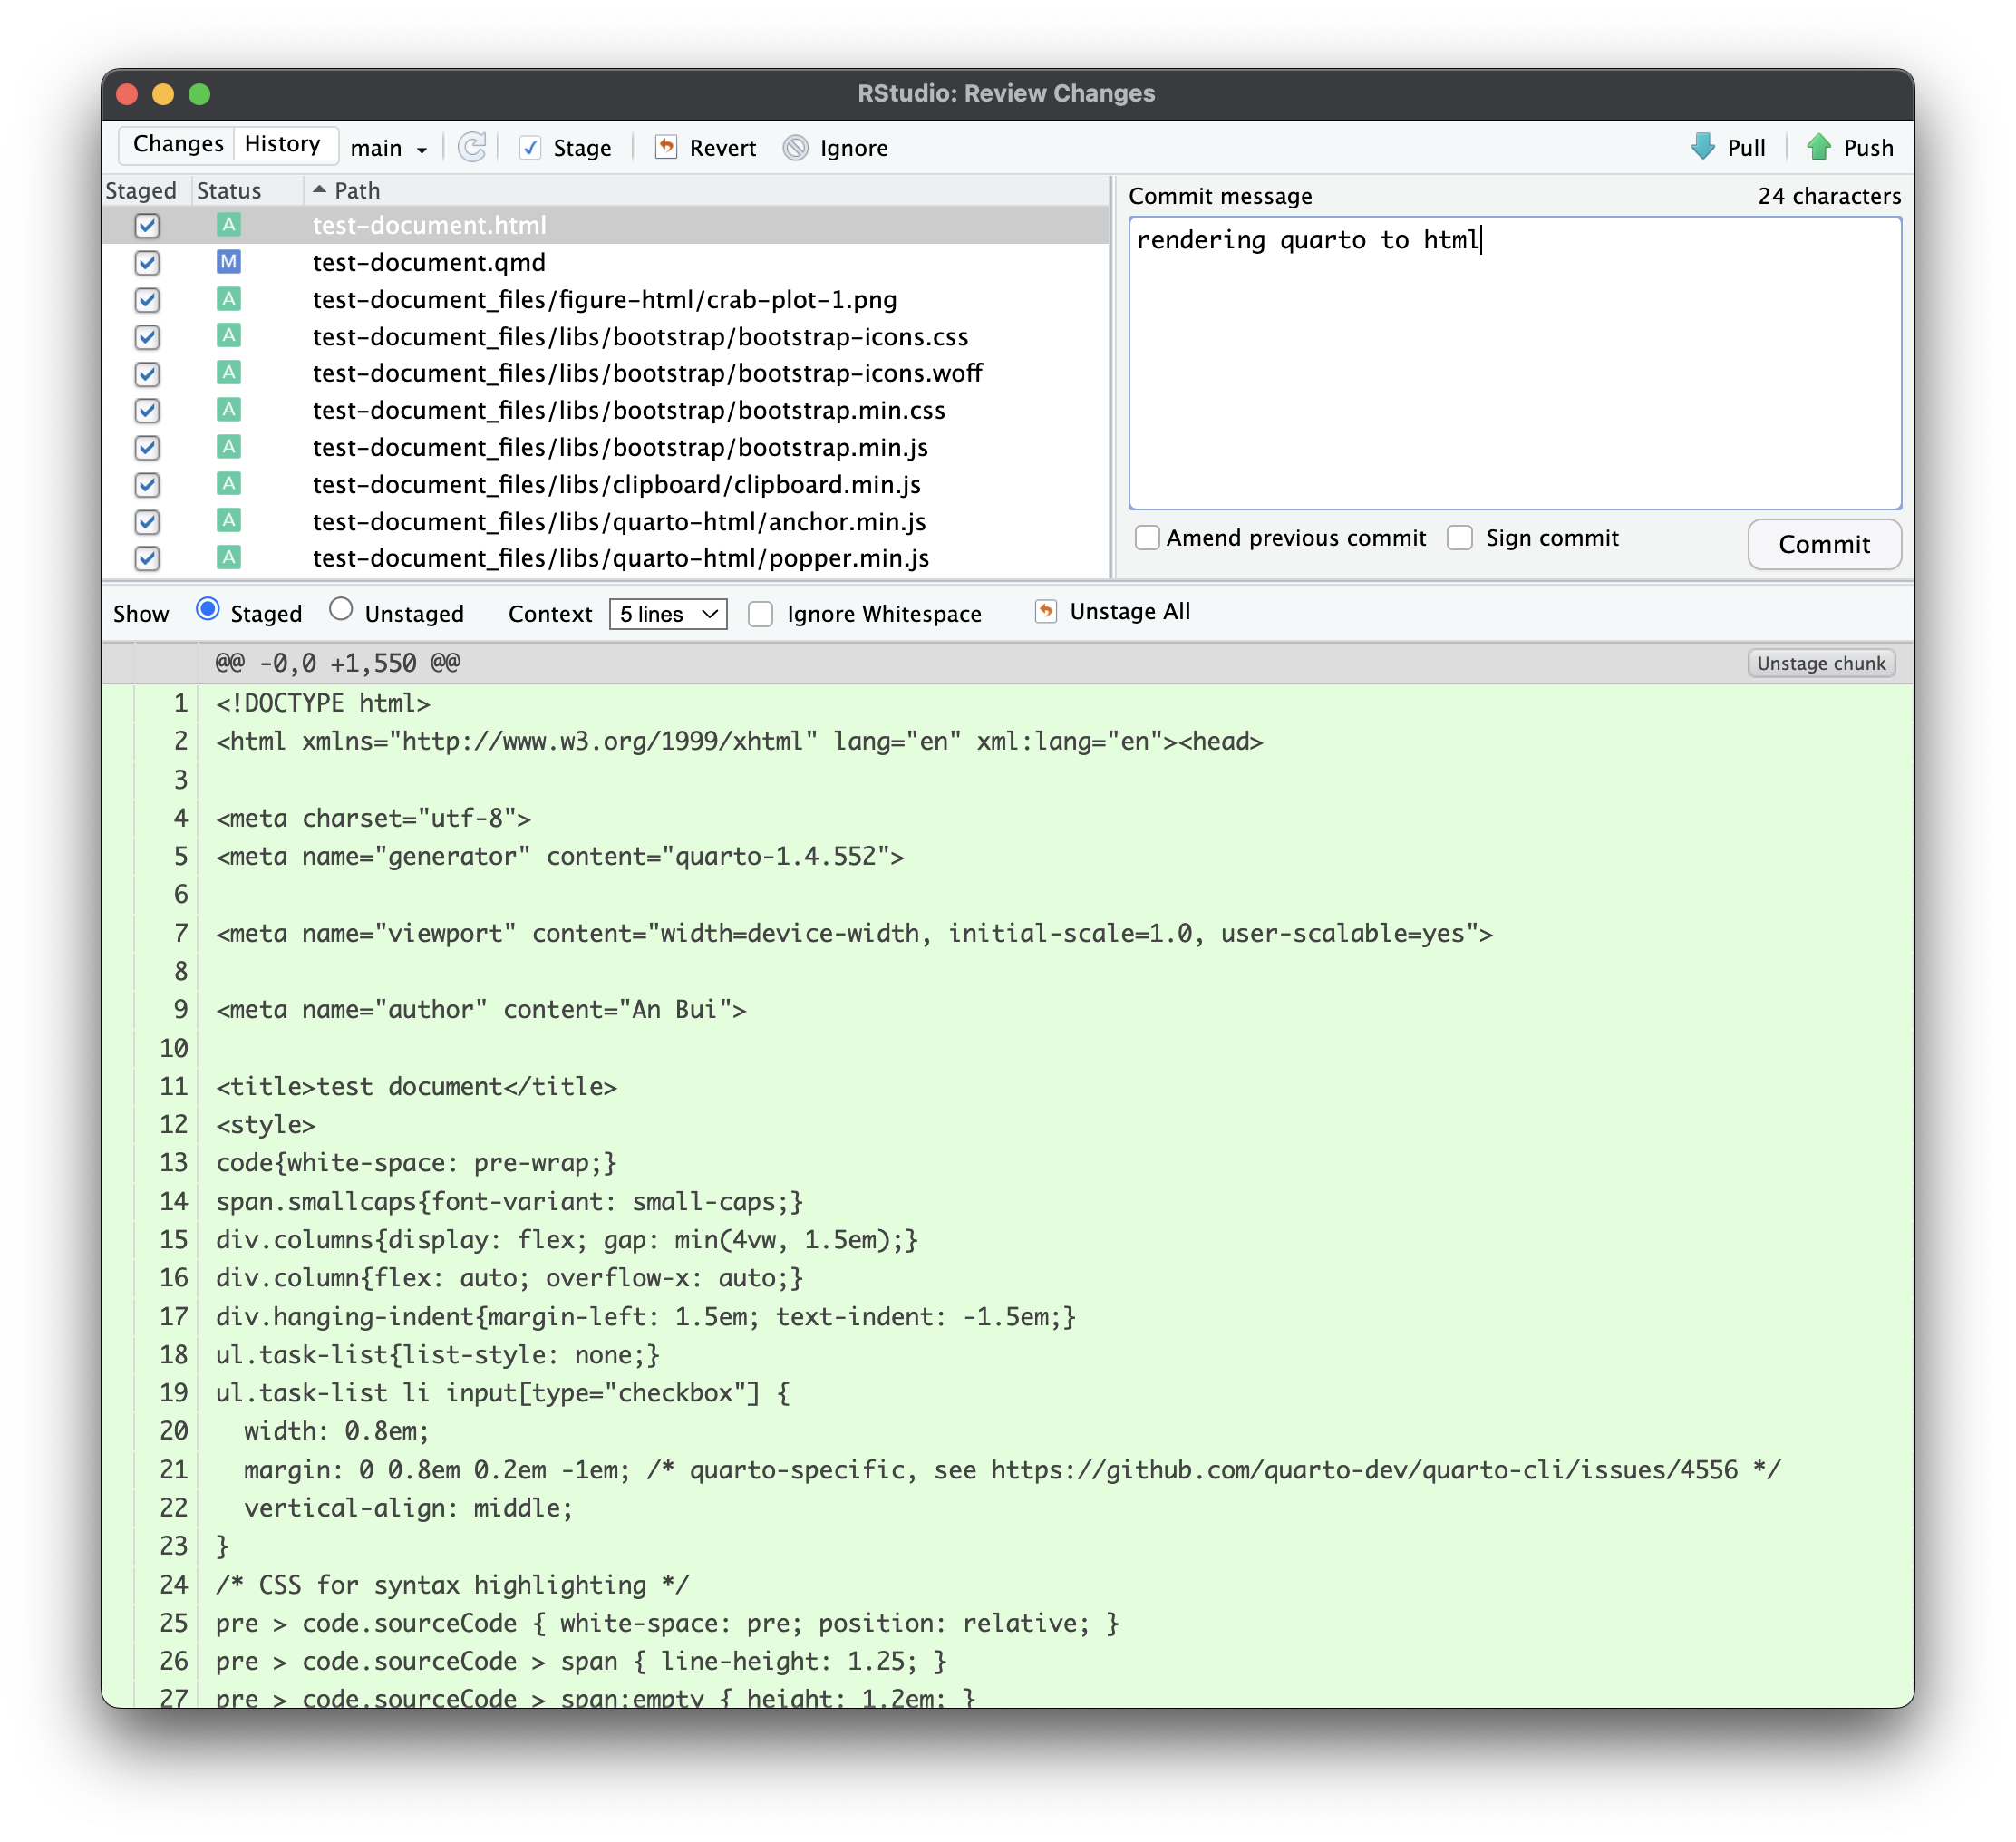
2. Commit and push these files.
Same as above: write a brief commit message.
3. Set up GitHub pages in your remote.
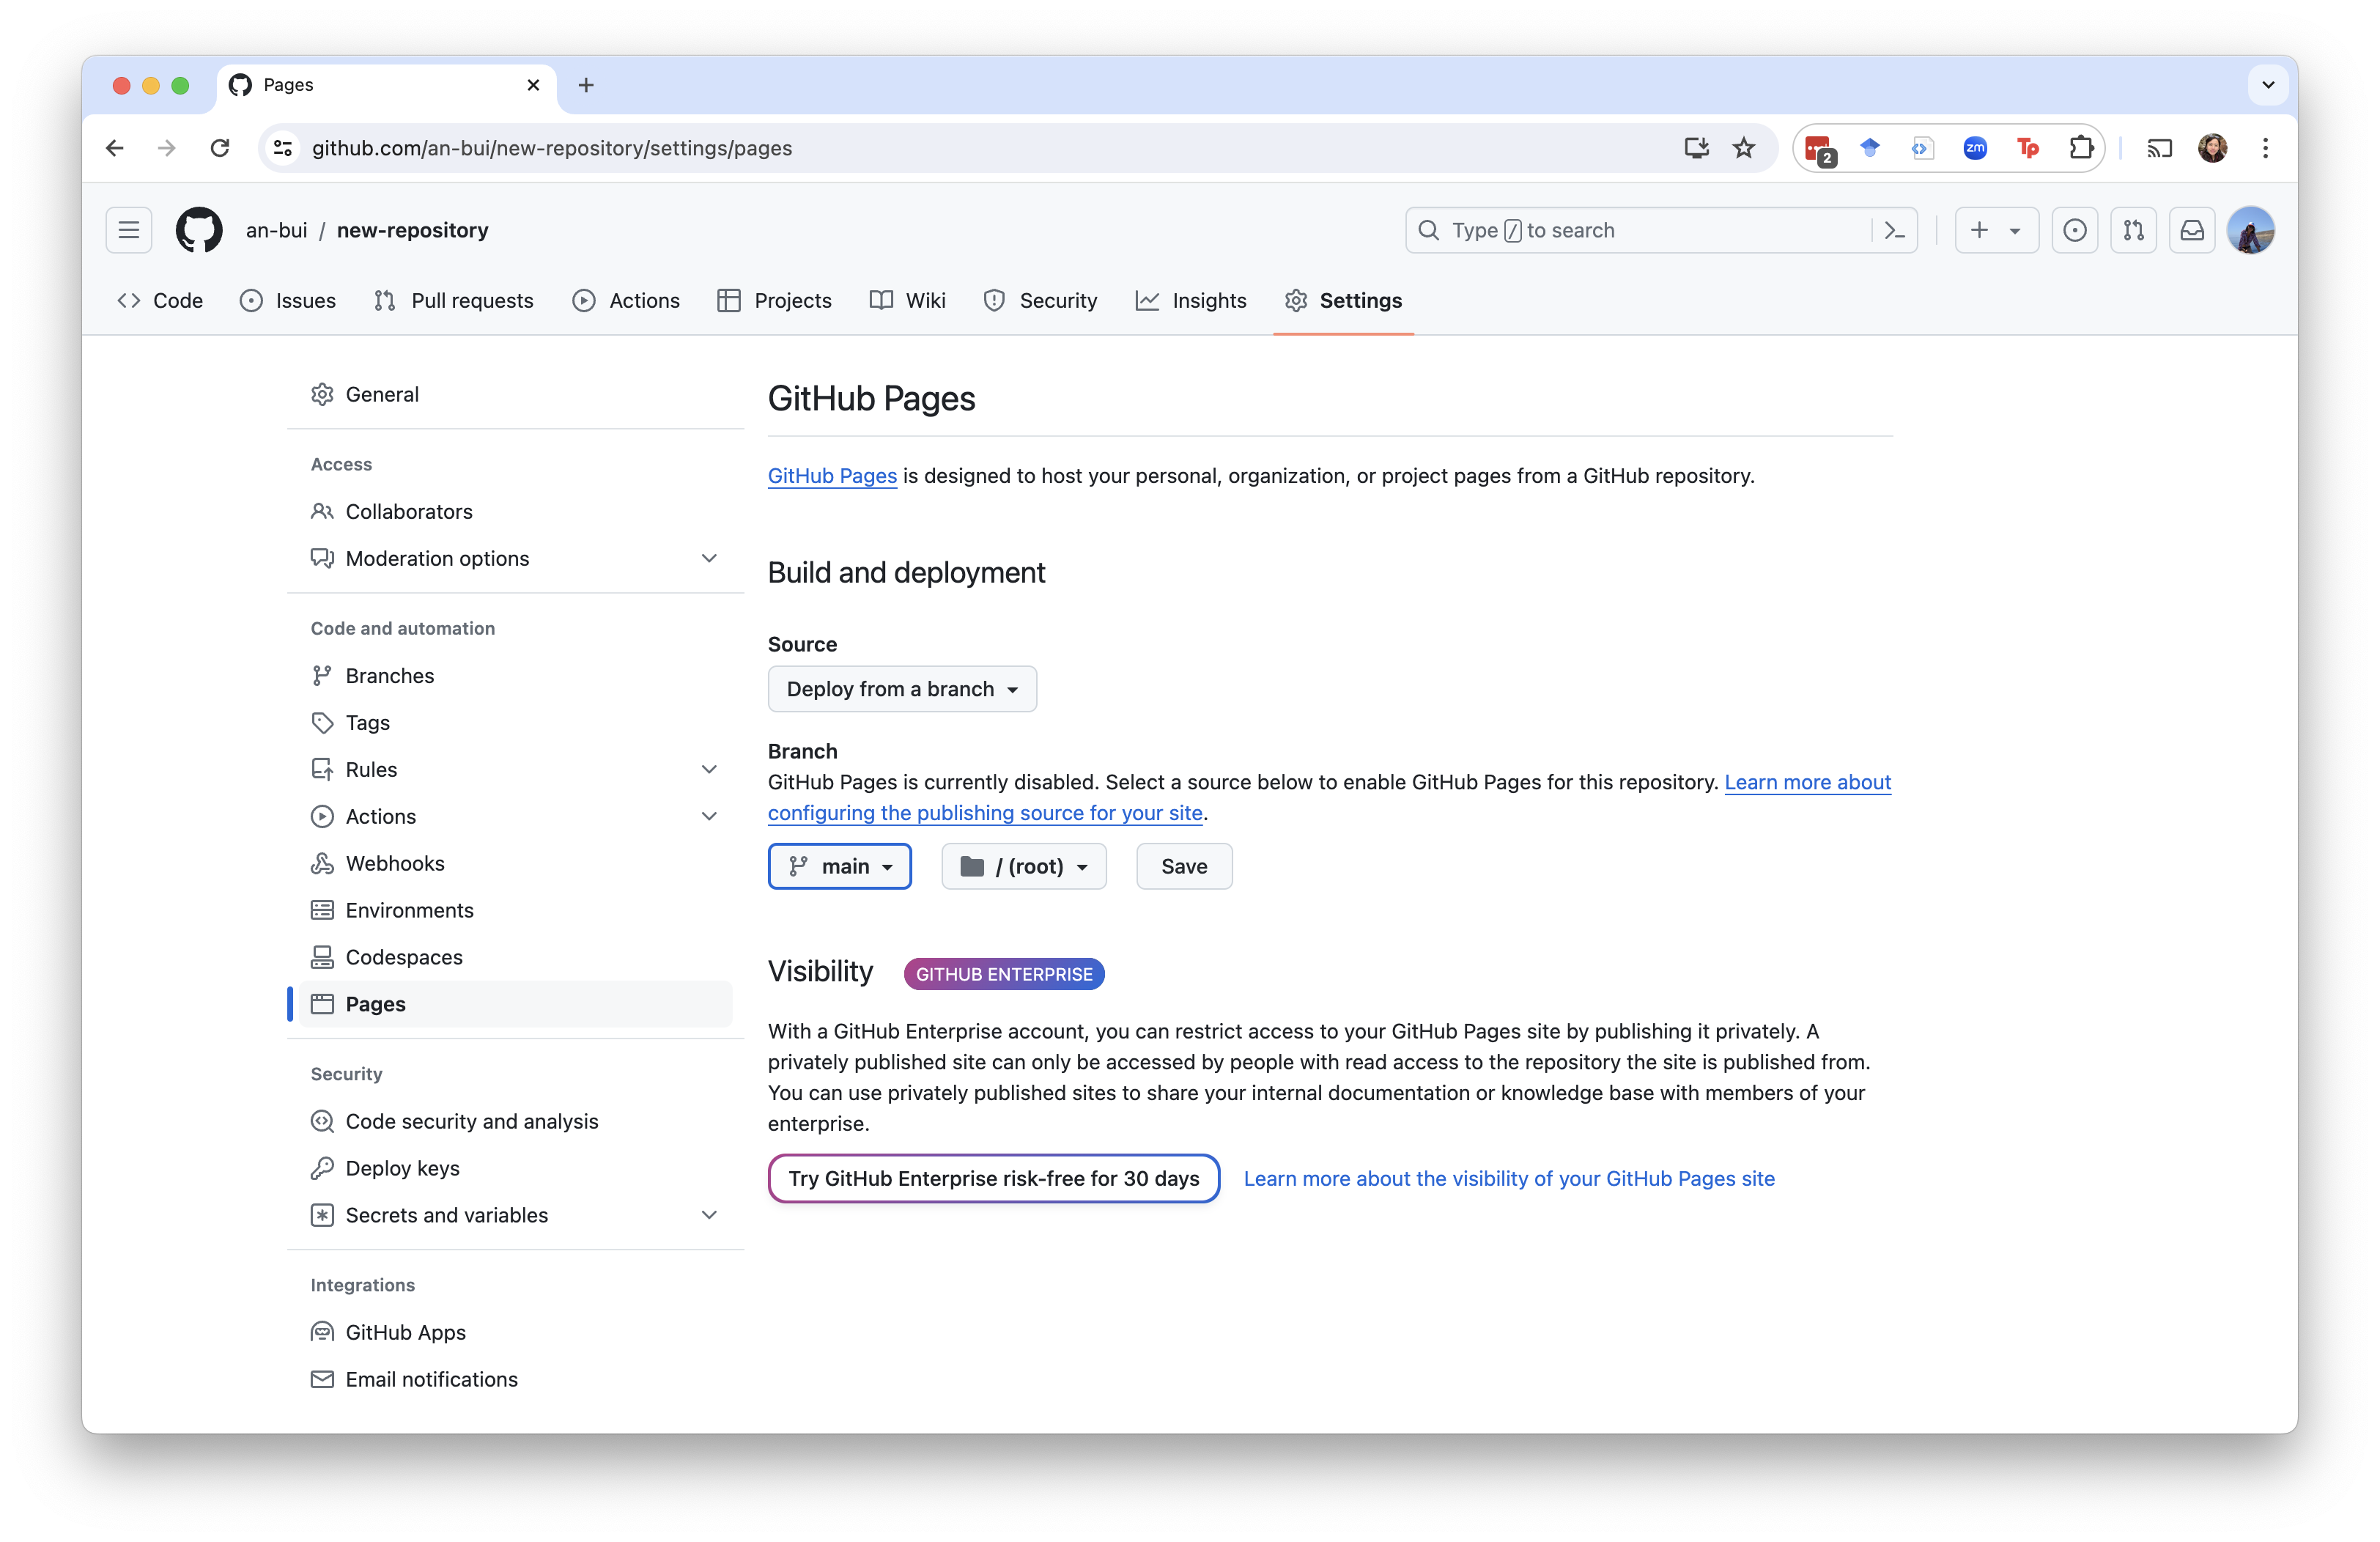
Navigate to Settings > Pages in your GitHub repo.
Under “Build and deployment”, choose the main branch in the root folder to enable GitHub pages.
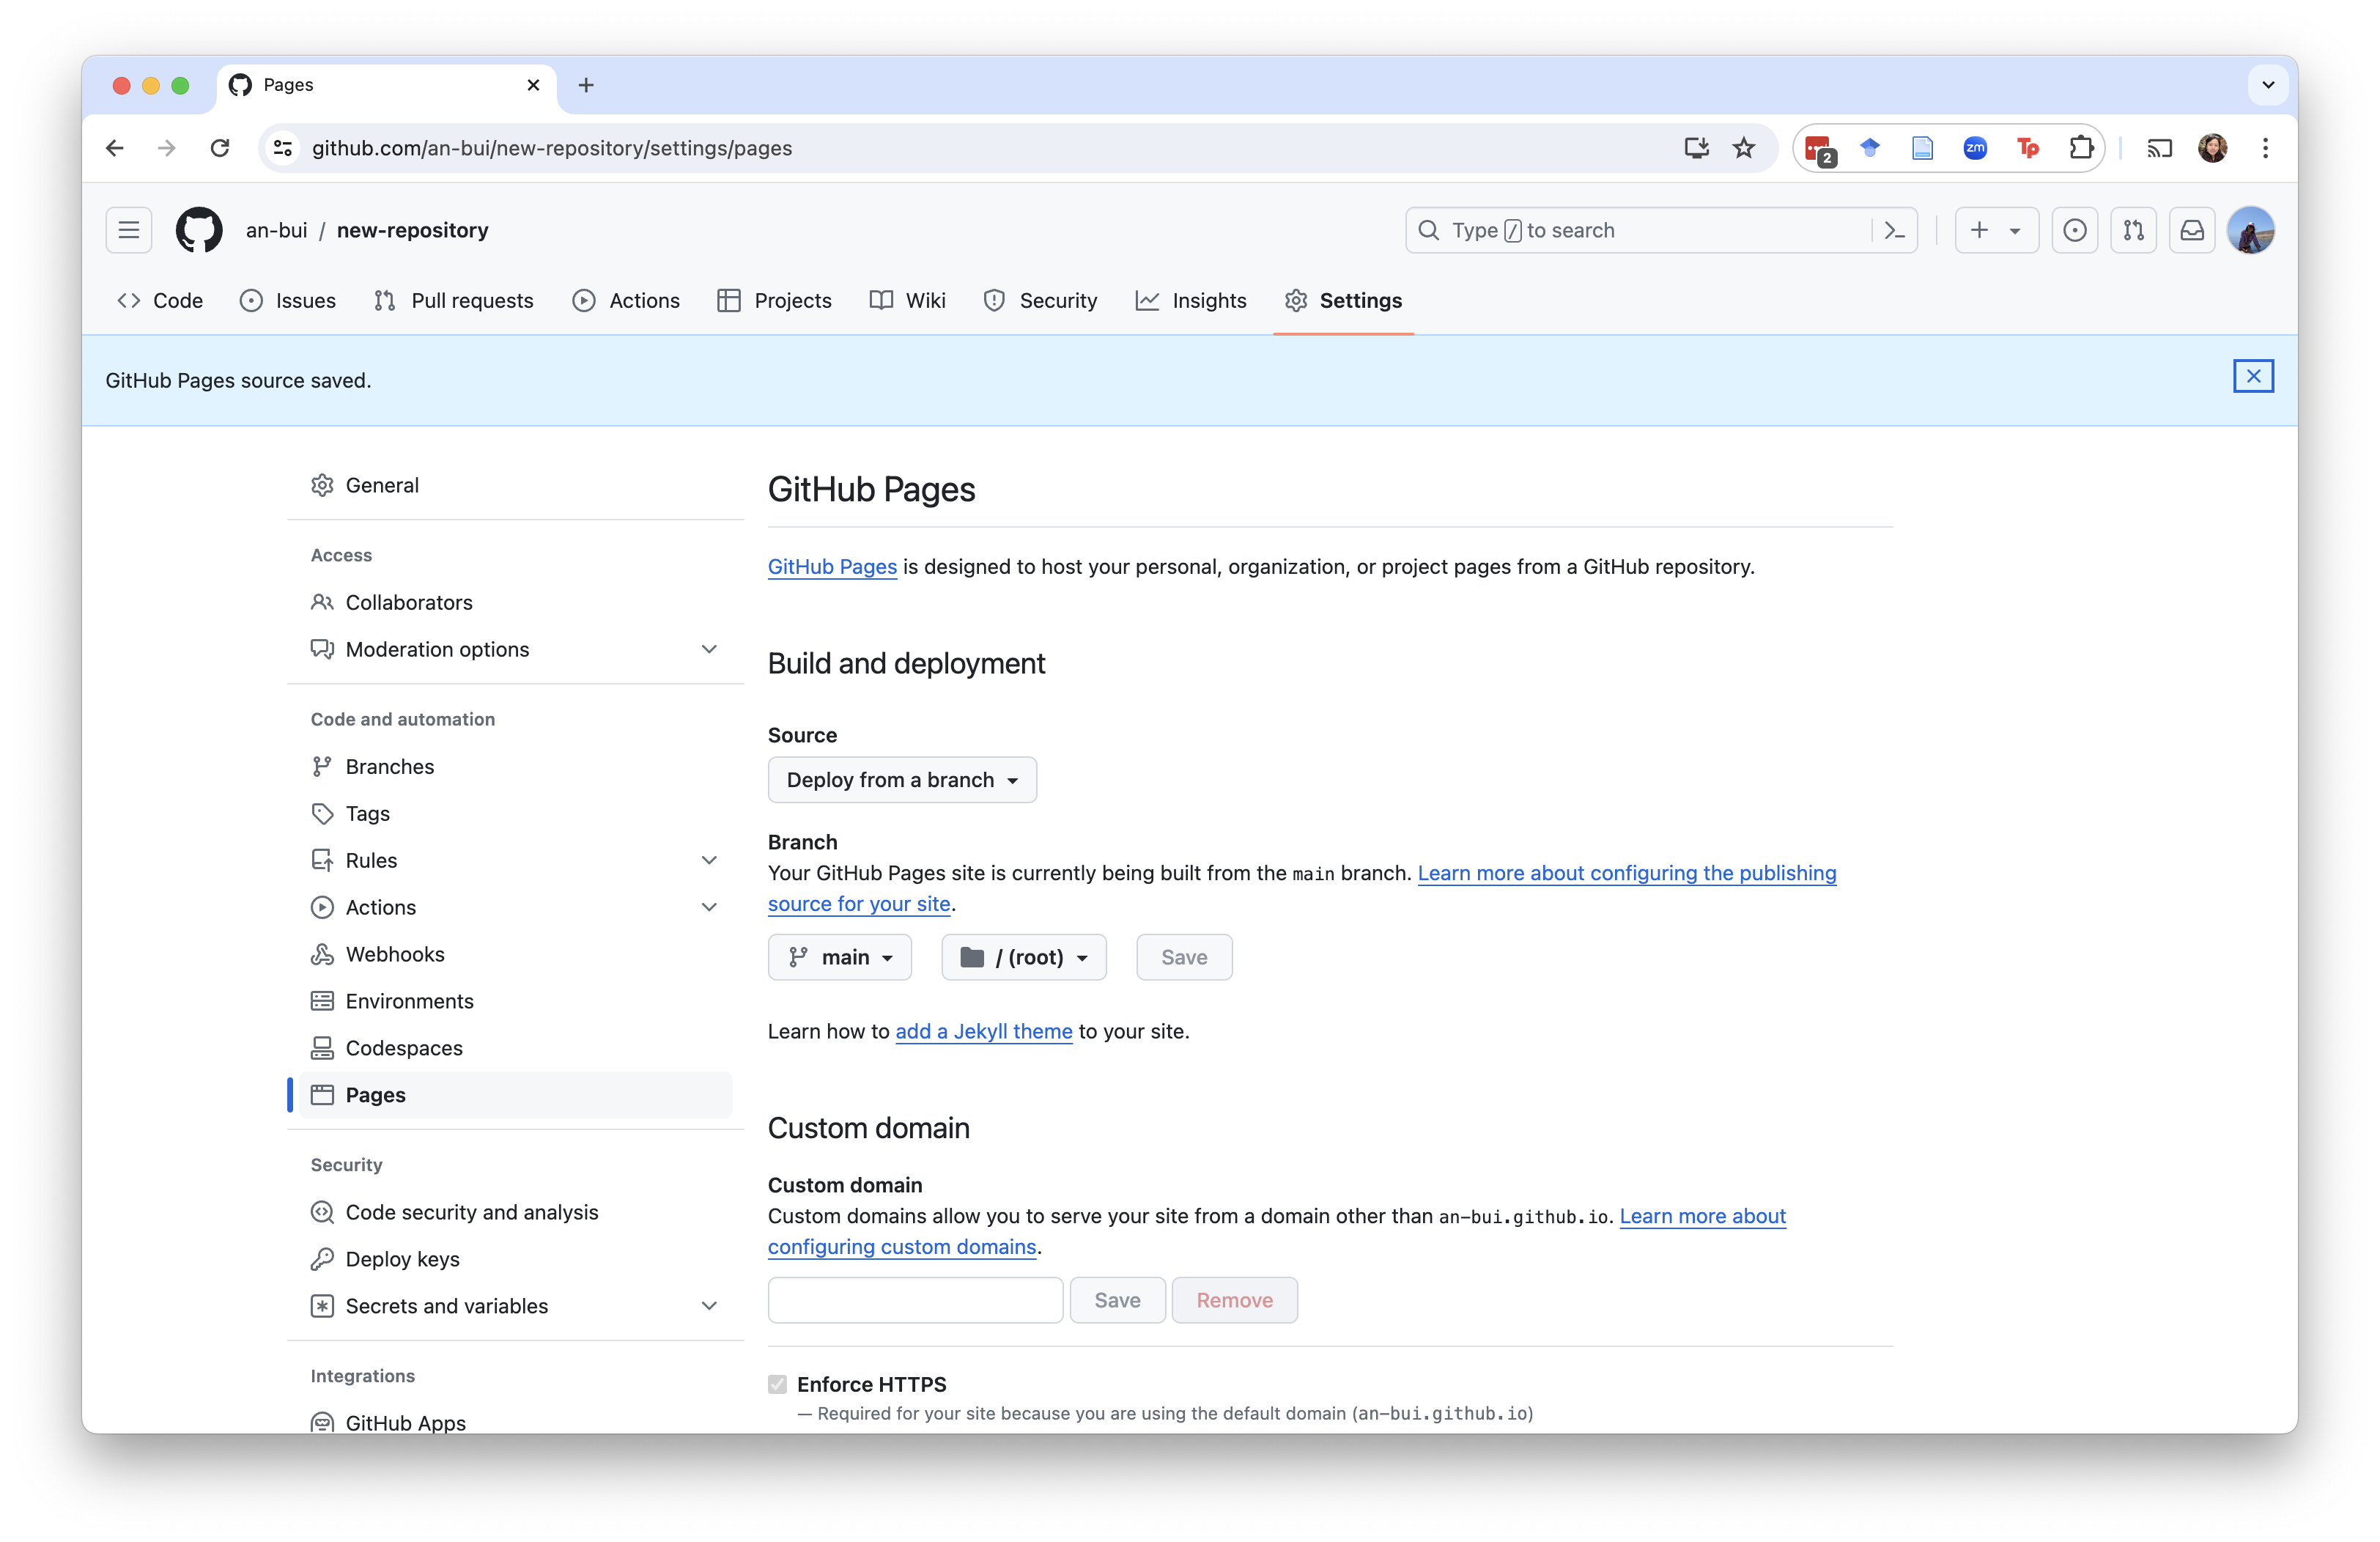
Hit “Save”. If successful, you should see a blue banner at the top: “GitHub Pages source saved”.
If you are making a website, this step will be slightly different in that you’ll choose a different folder when setting up GitHub Pages. Be sure to follow Sam’s instructions!
Back in the main page for your repo, you’ll see two new icons: a yellow dot next to your most recent commit, and a “Deployment” section on the right with “github-pages” in it.
Eventually, these will turn green, meaning that your GitHub pages set up is complete.
4. Look at your deployment.
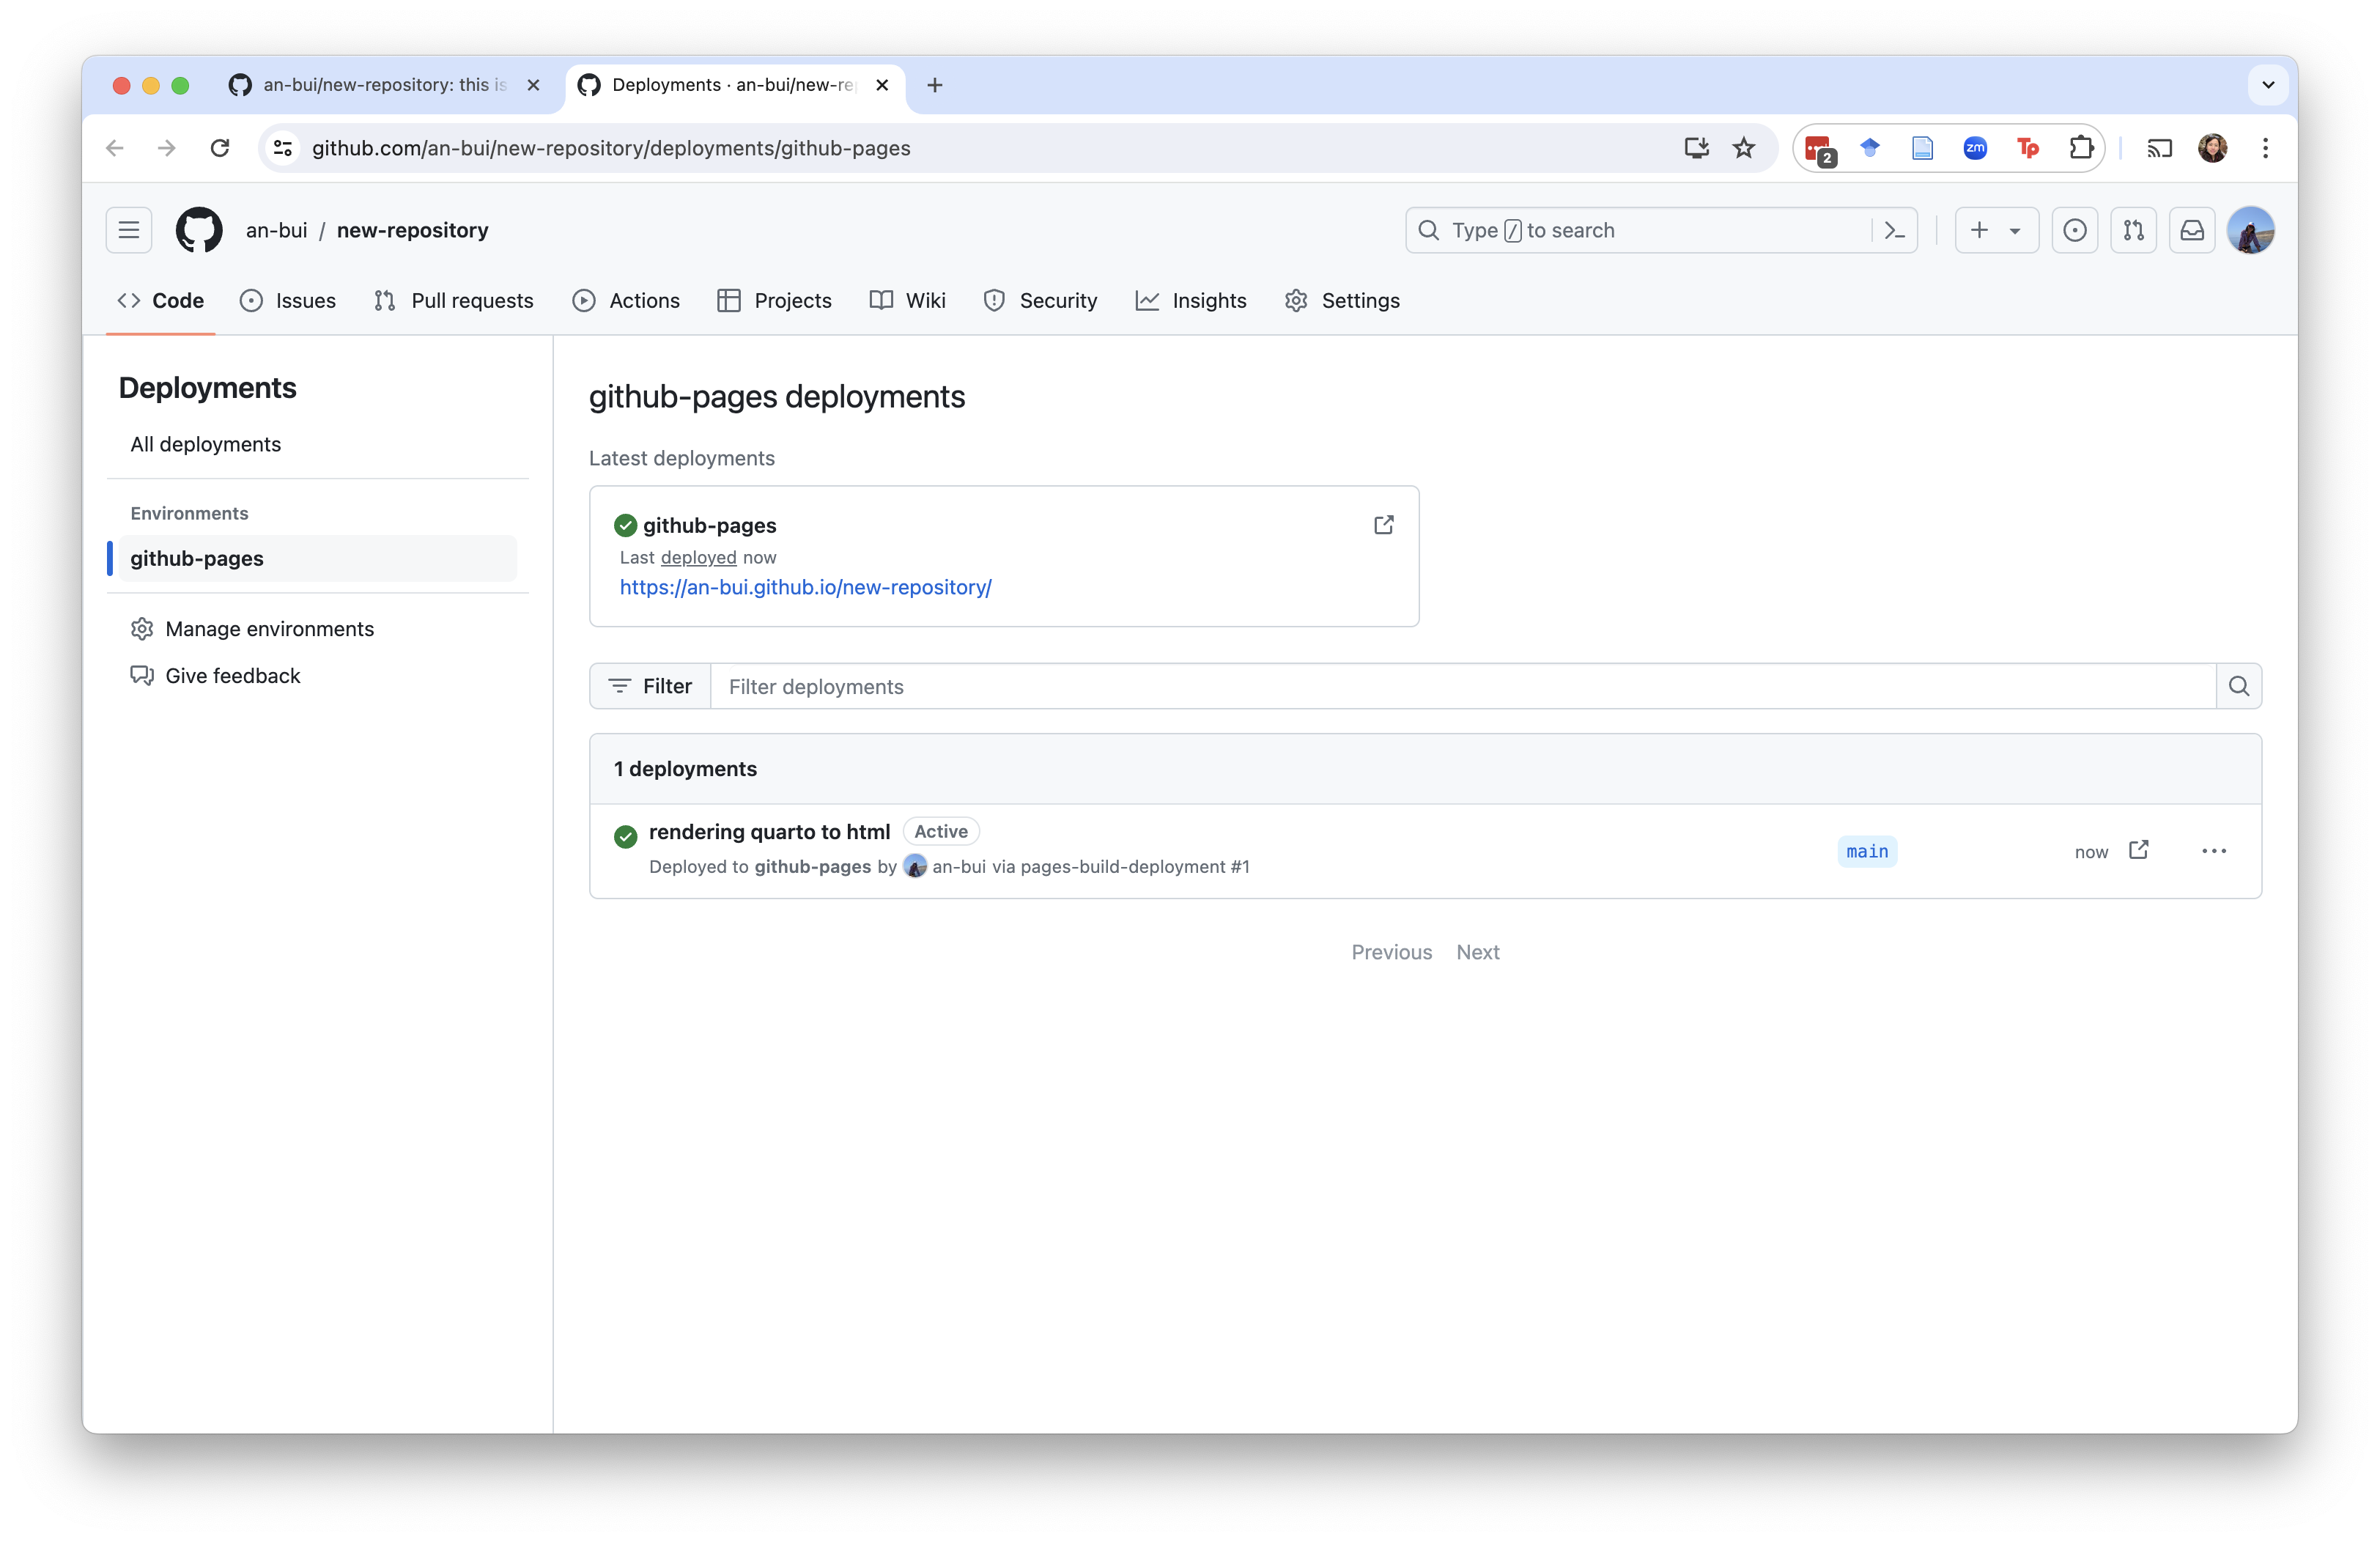
Click on the github-pages link under “Deployment”.
You should see a screen that has the url to your page and the most recent commit message as a deployment message.
Make a note of the url. It should be something along the lines of your-github-username.github.io/your-repository-name.
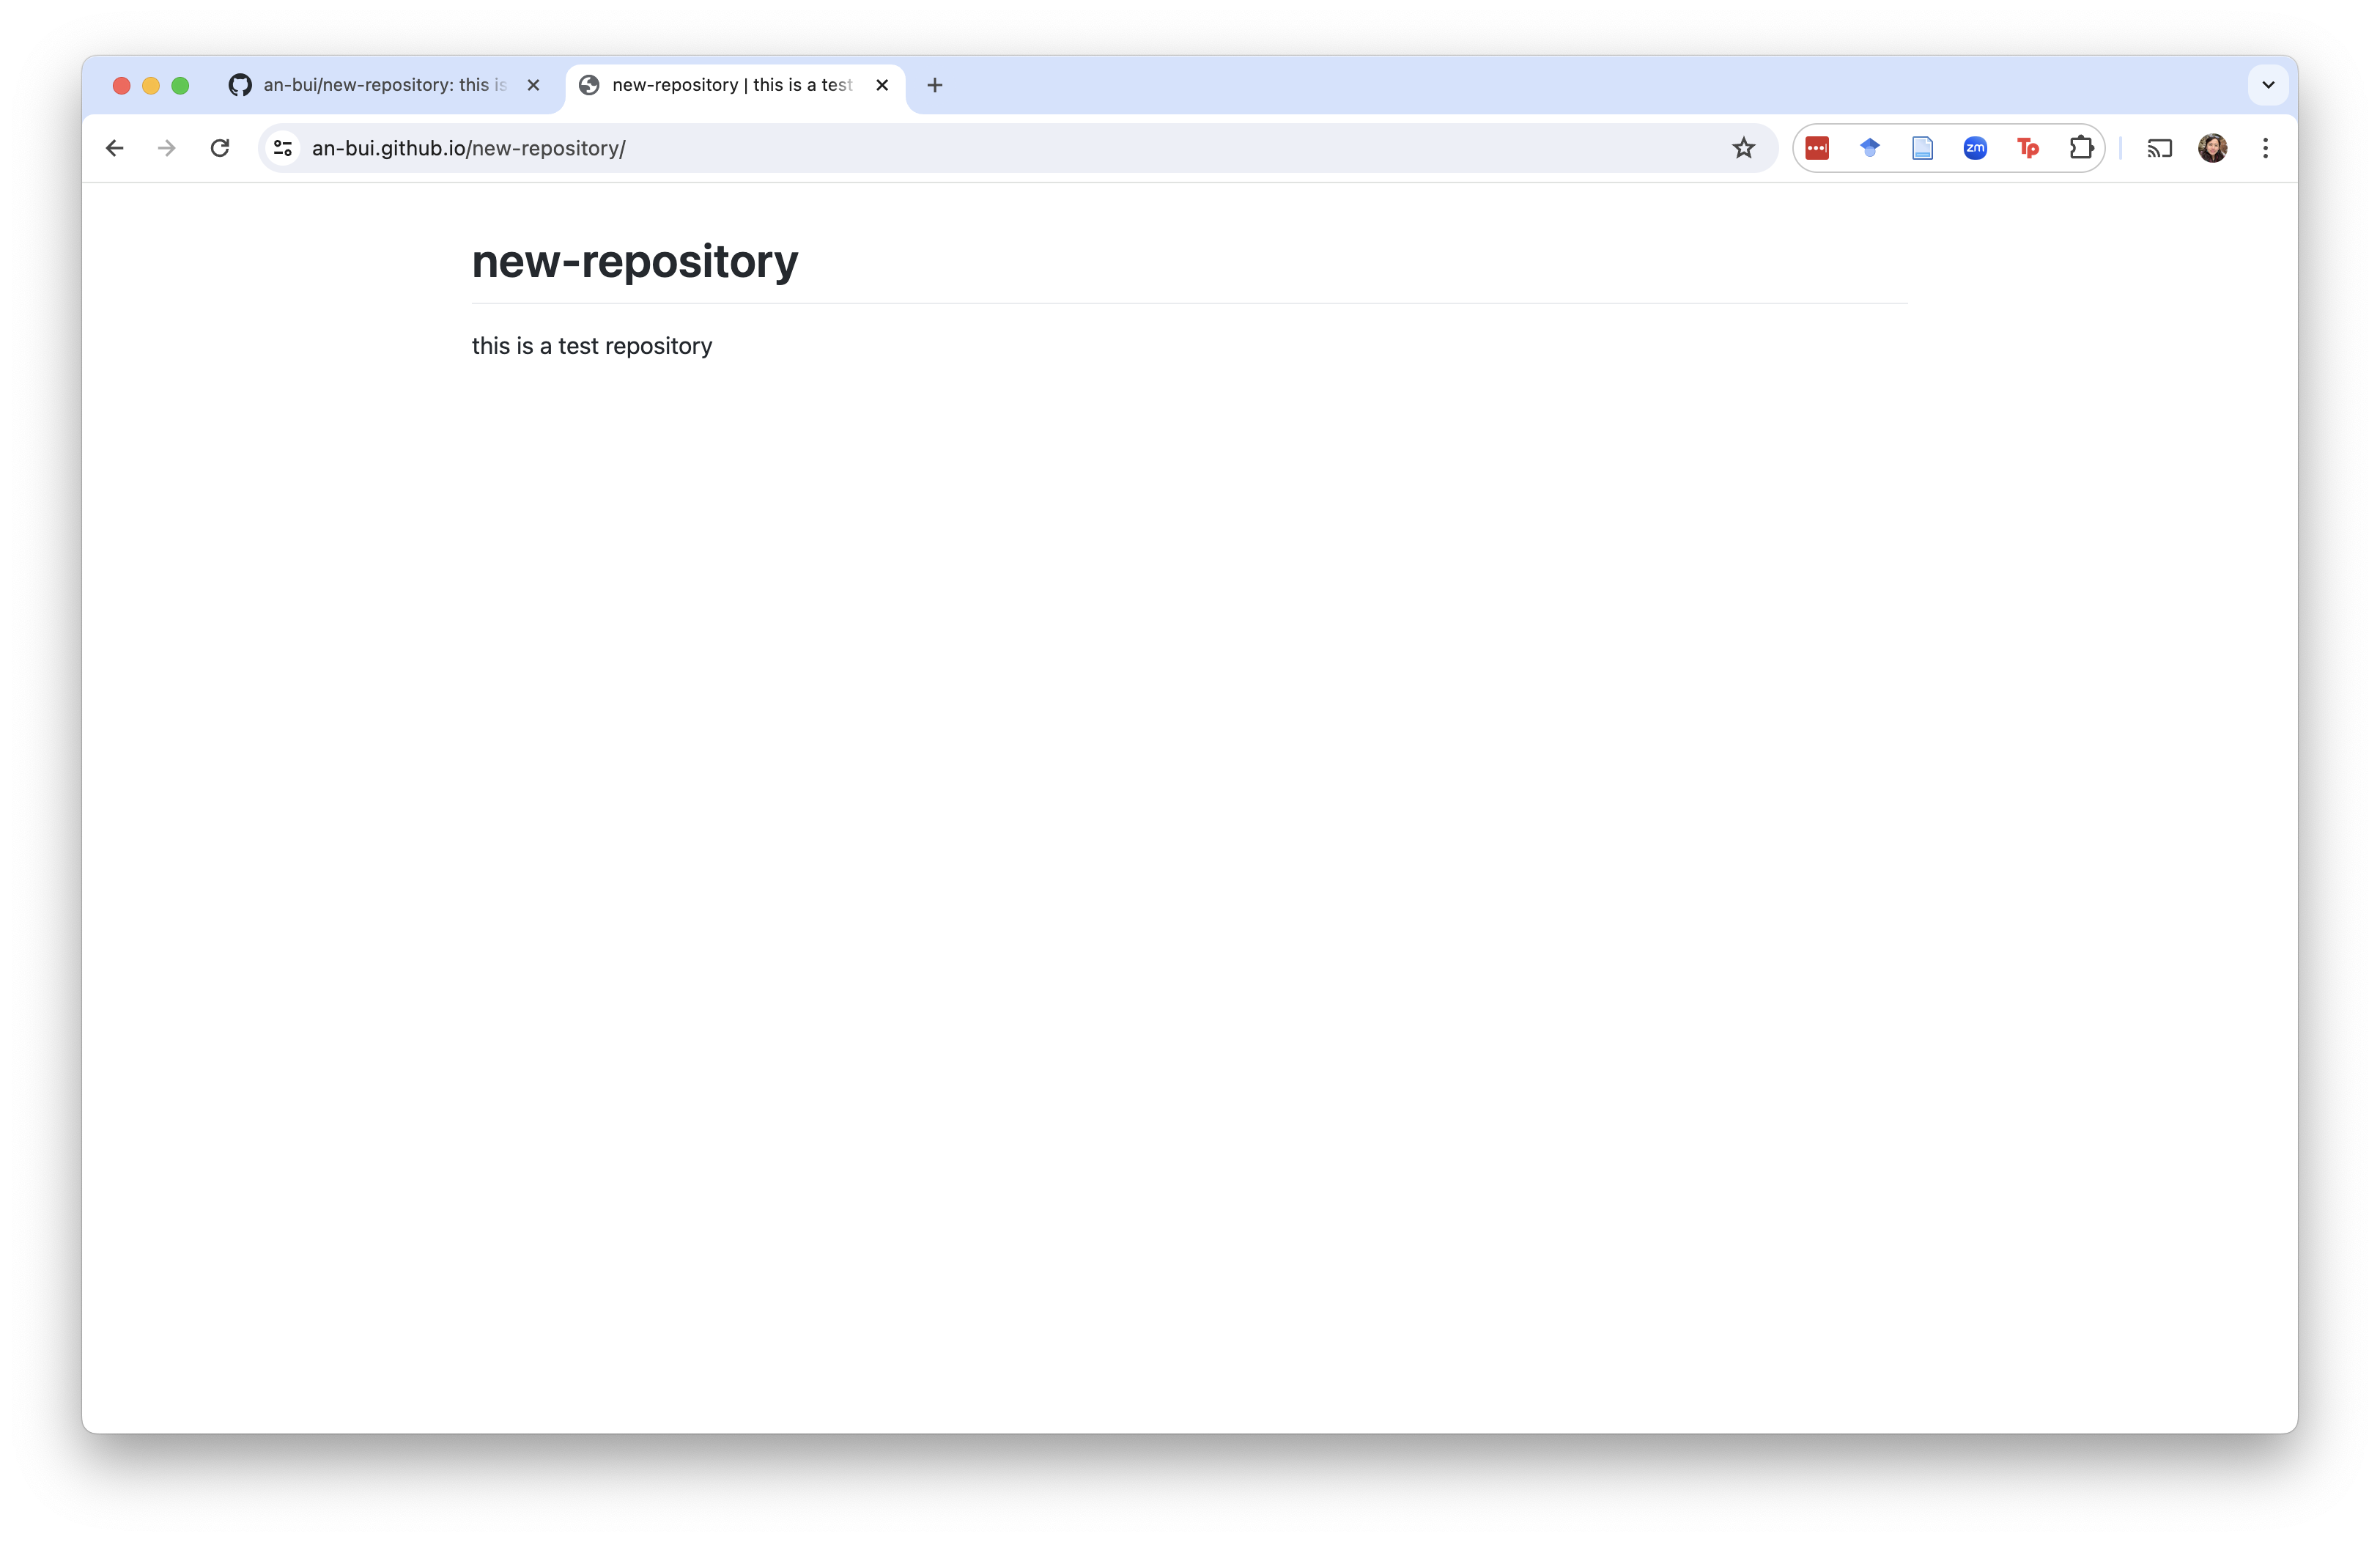
Click on the url. It should take you to a pretty bare page:
This is the rendered version of your README.
5. Find the url for your rendered .html.
Every rendered document in your repository is now accessible to anyone with the url to your GitHub pages. This means that you can share your rendered output without a file, just a link.
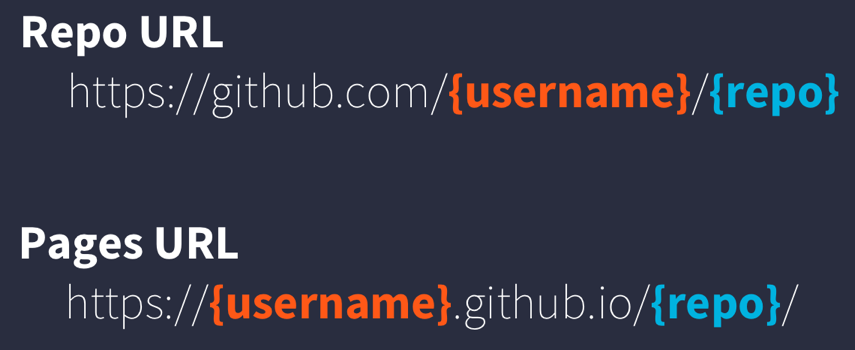
The link to your repo on GitHub pages is different from your repo on GitHub. This is the usual naming scheme:
Image from Halina Do-Linh, Camila Vargas Poulsen, Samantha Csik, Daphne Virlar-Knight. 2023. coreR Course. NCEAS Learning Hub.
But first, you need to find your file.
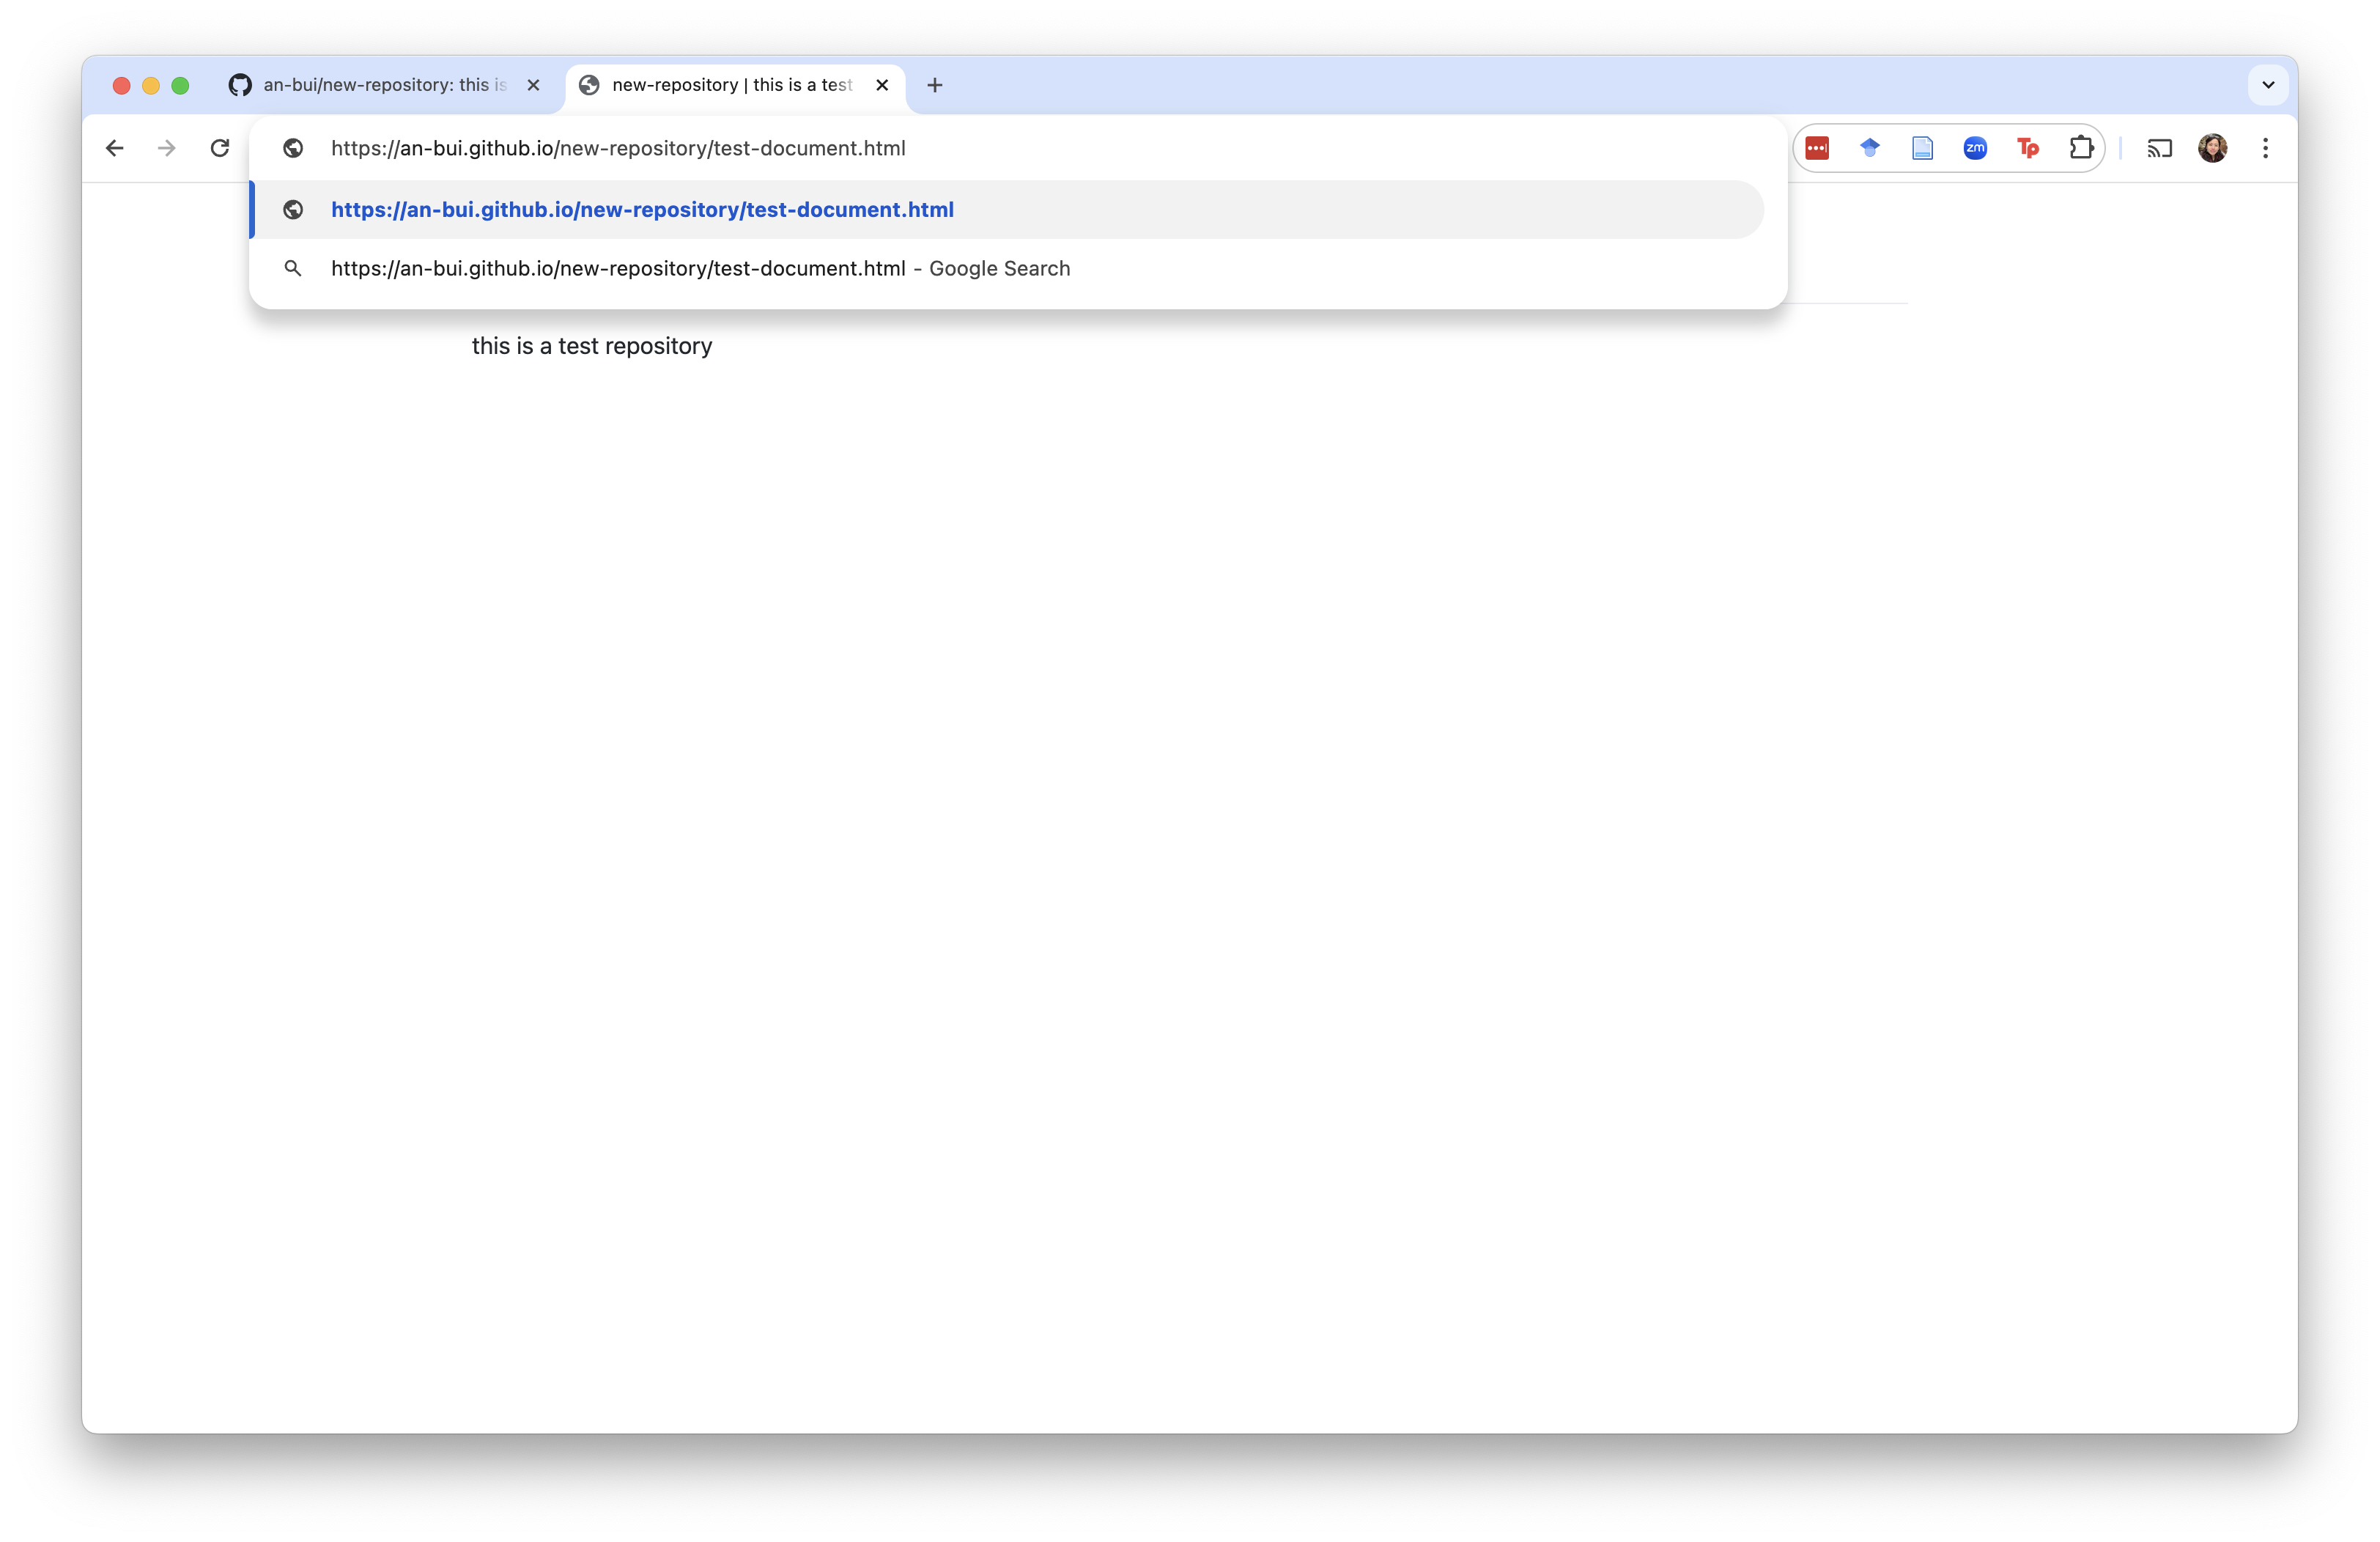
Rendered document urls take the form: your-github-username.github.io/your-repository-name/[whatever folders the file is in]/the-file-name.html.
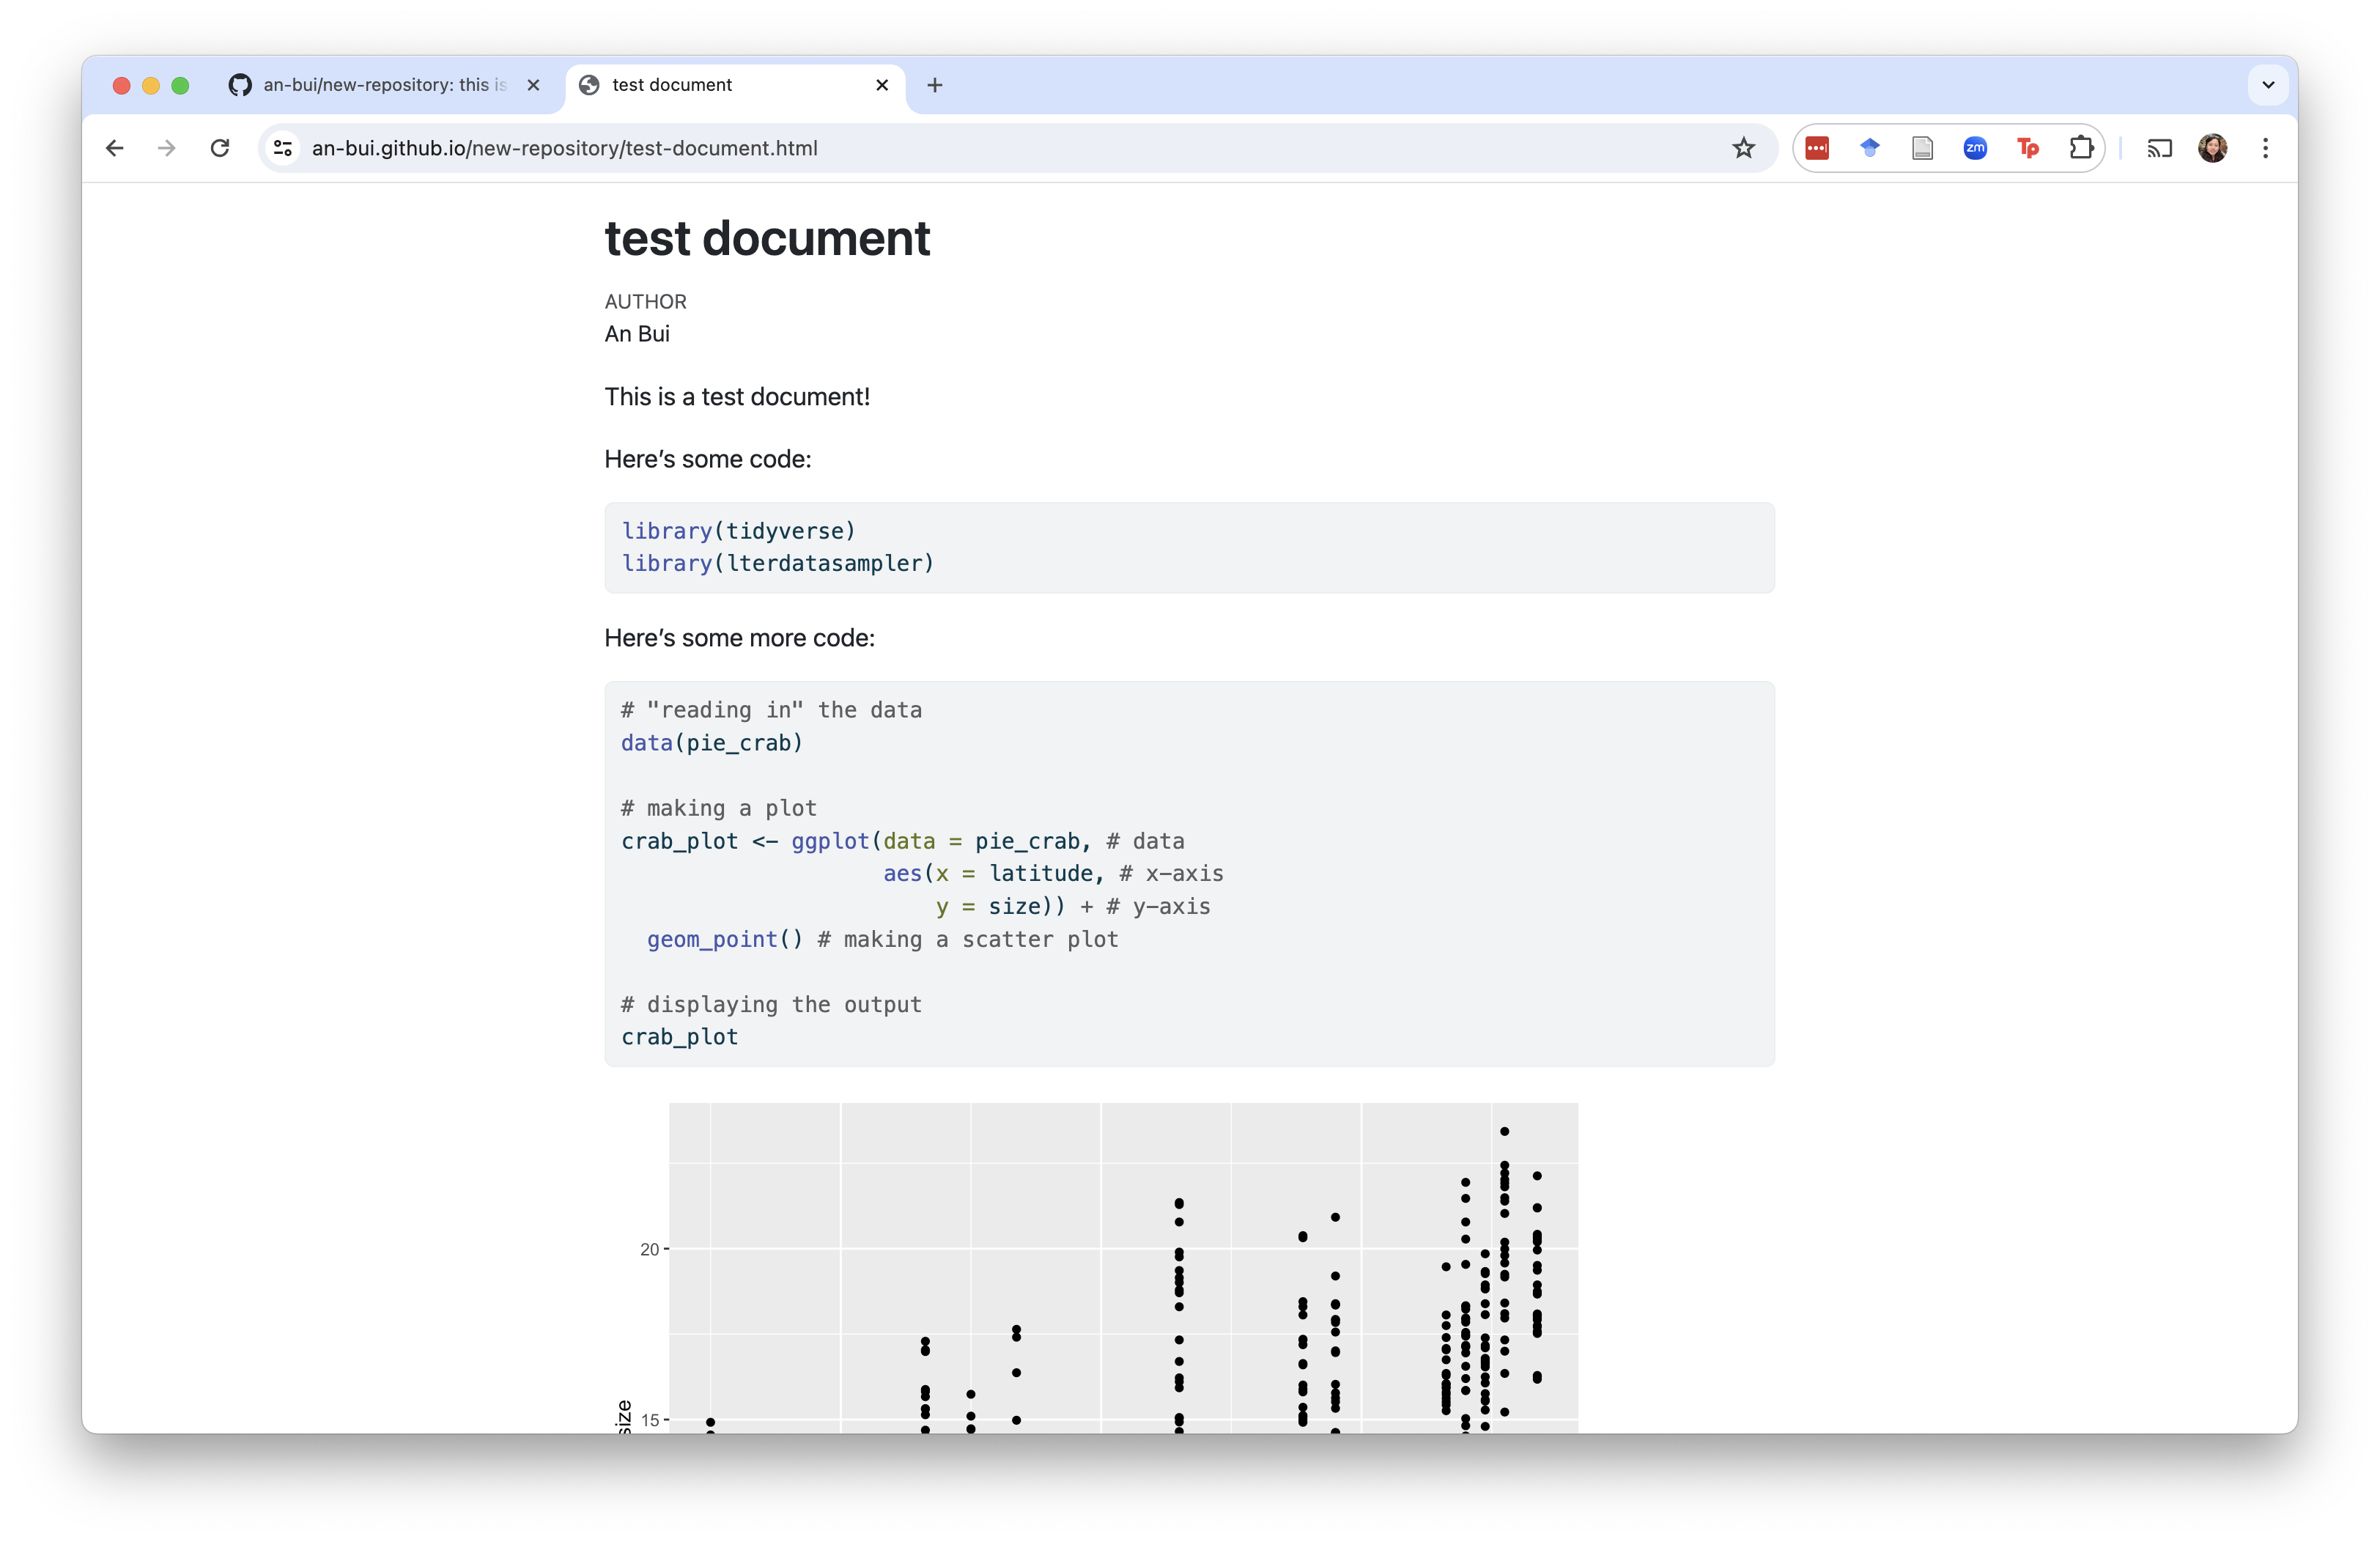
In this example, the url for the rendered .html is https://an-bui.github.io/new-repository/test-document.html. This means that test-document.html is in the root folder (i.e. is not in any subfolders) in new-repository.
Navigate to that url. You should see your rendered document as a webpage!
localhost!
When you first render your document, you can open it up in a browser. It will look like a webpage, but the “url” will include something like localhost:. This is not a real url! It is temporary and not shareable. If you’re unsure you’re looking at the right thing, check the url. If it looks like an actual url, then you have it right.
6. Save your url somewhere.
The best way to do this is to put a link somewhere in the README of your repo. For example, the README for this example repo includes the url to the rendered .html.
Forking
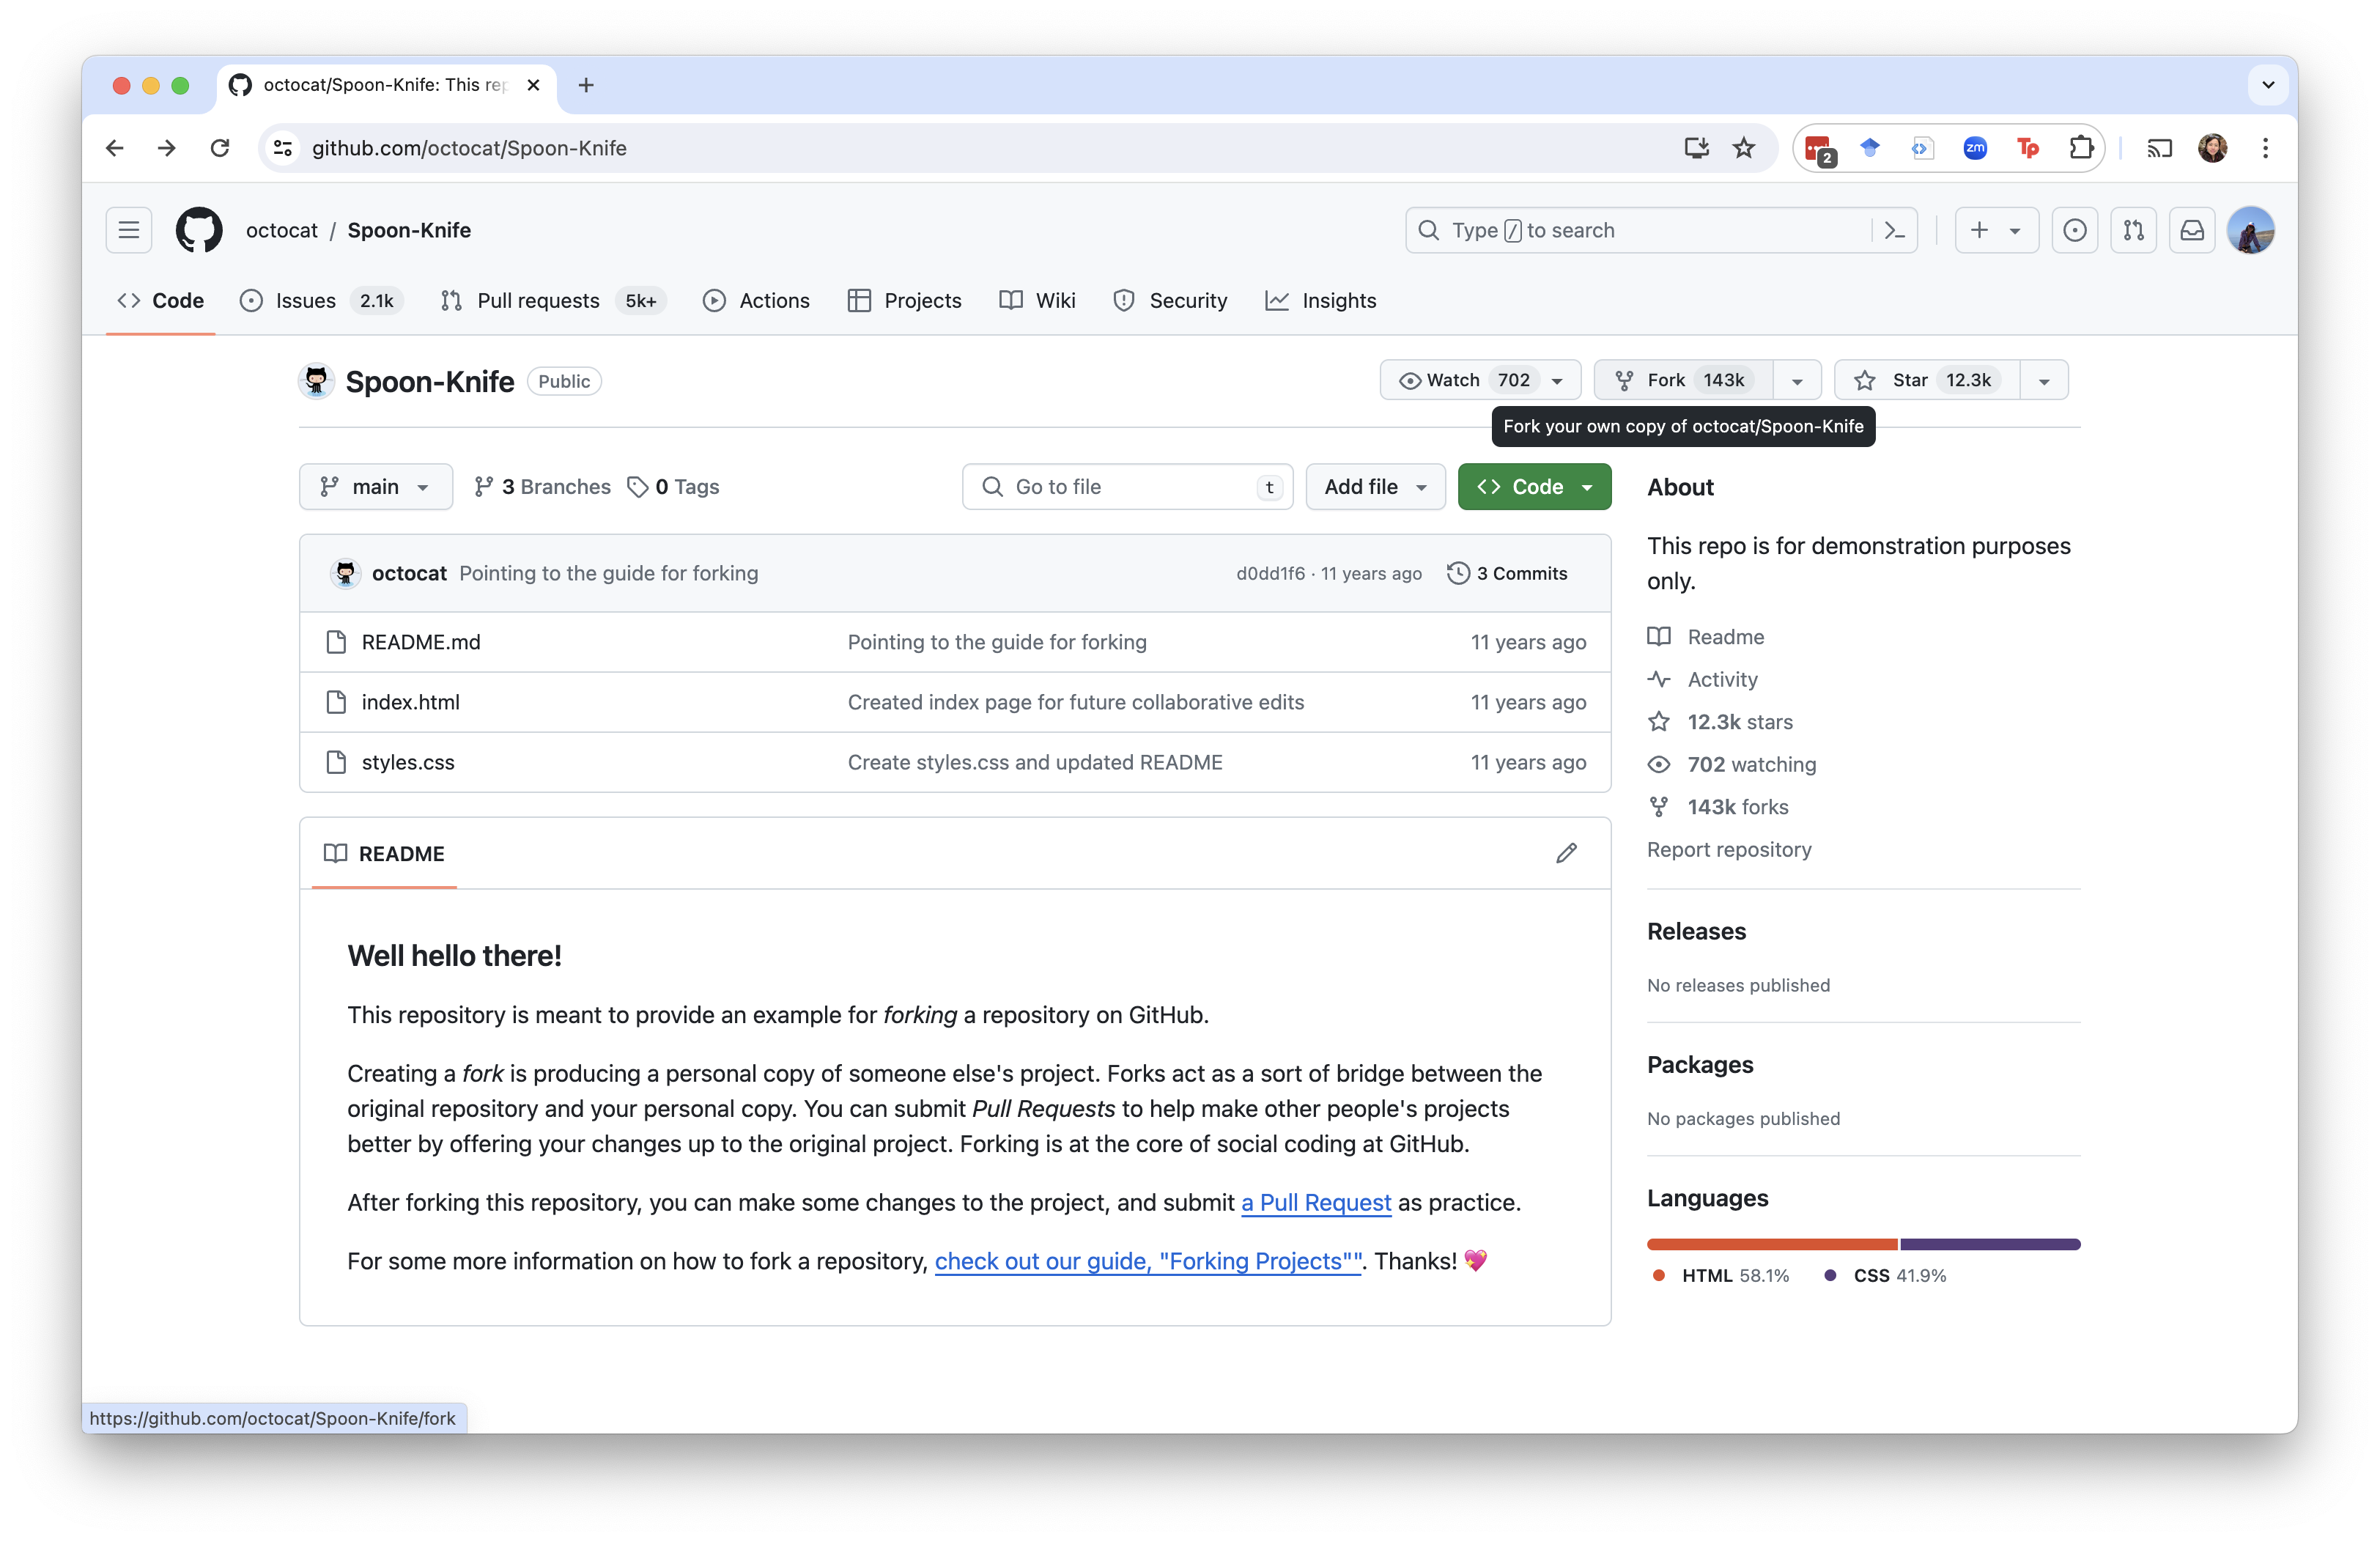
Forking is the process by which you can copy and reuse another person’s code. Imagine having a meal with someone else, and using your fork to take something from the other person’s plate. You can then do whatever you want with the food you’ve taken: eat it, mix it with other things, etc. This is the idea behind forking.
2. Create the fork
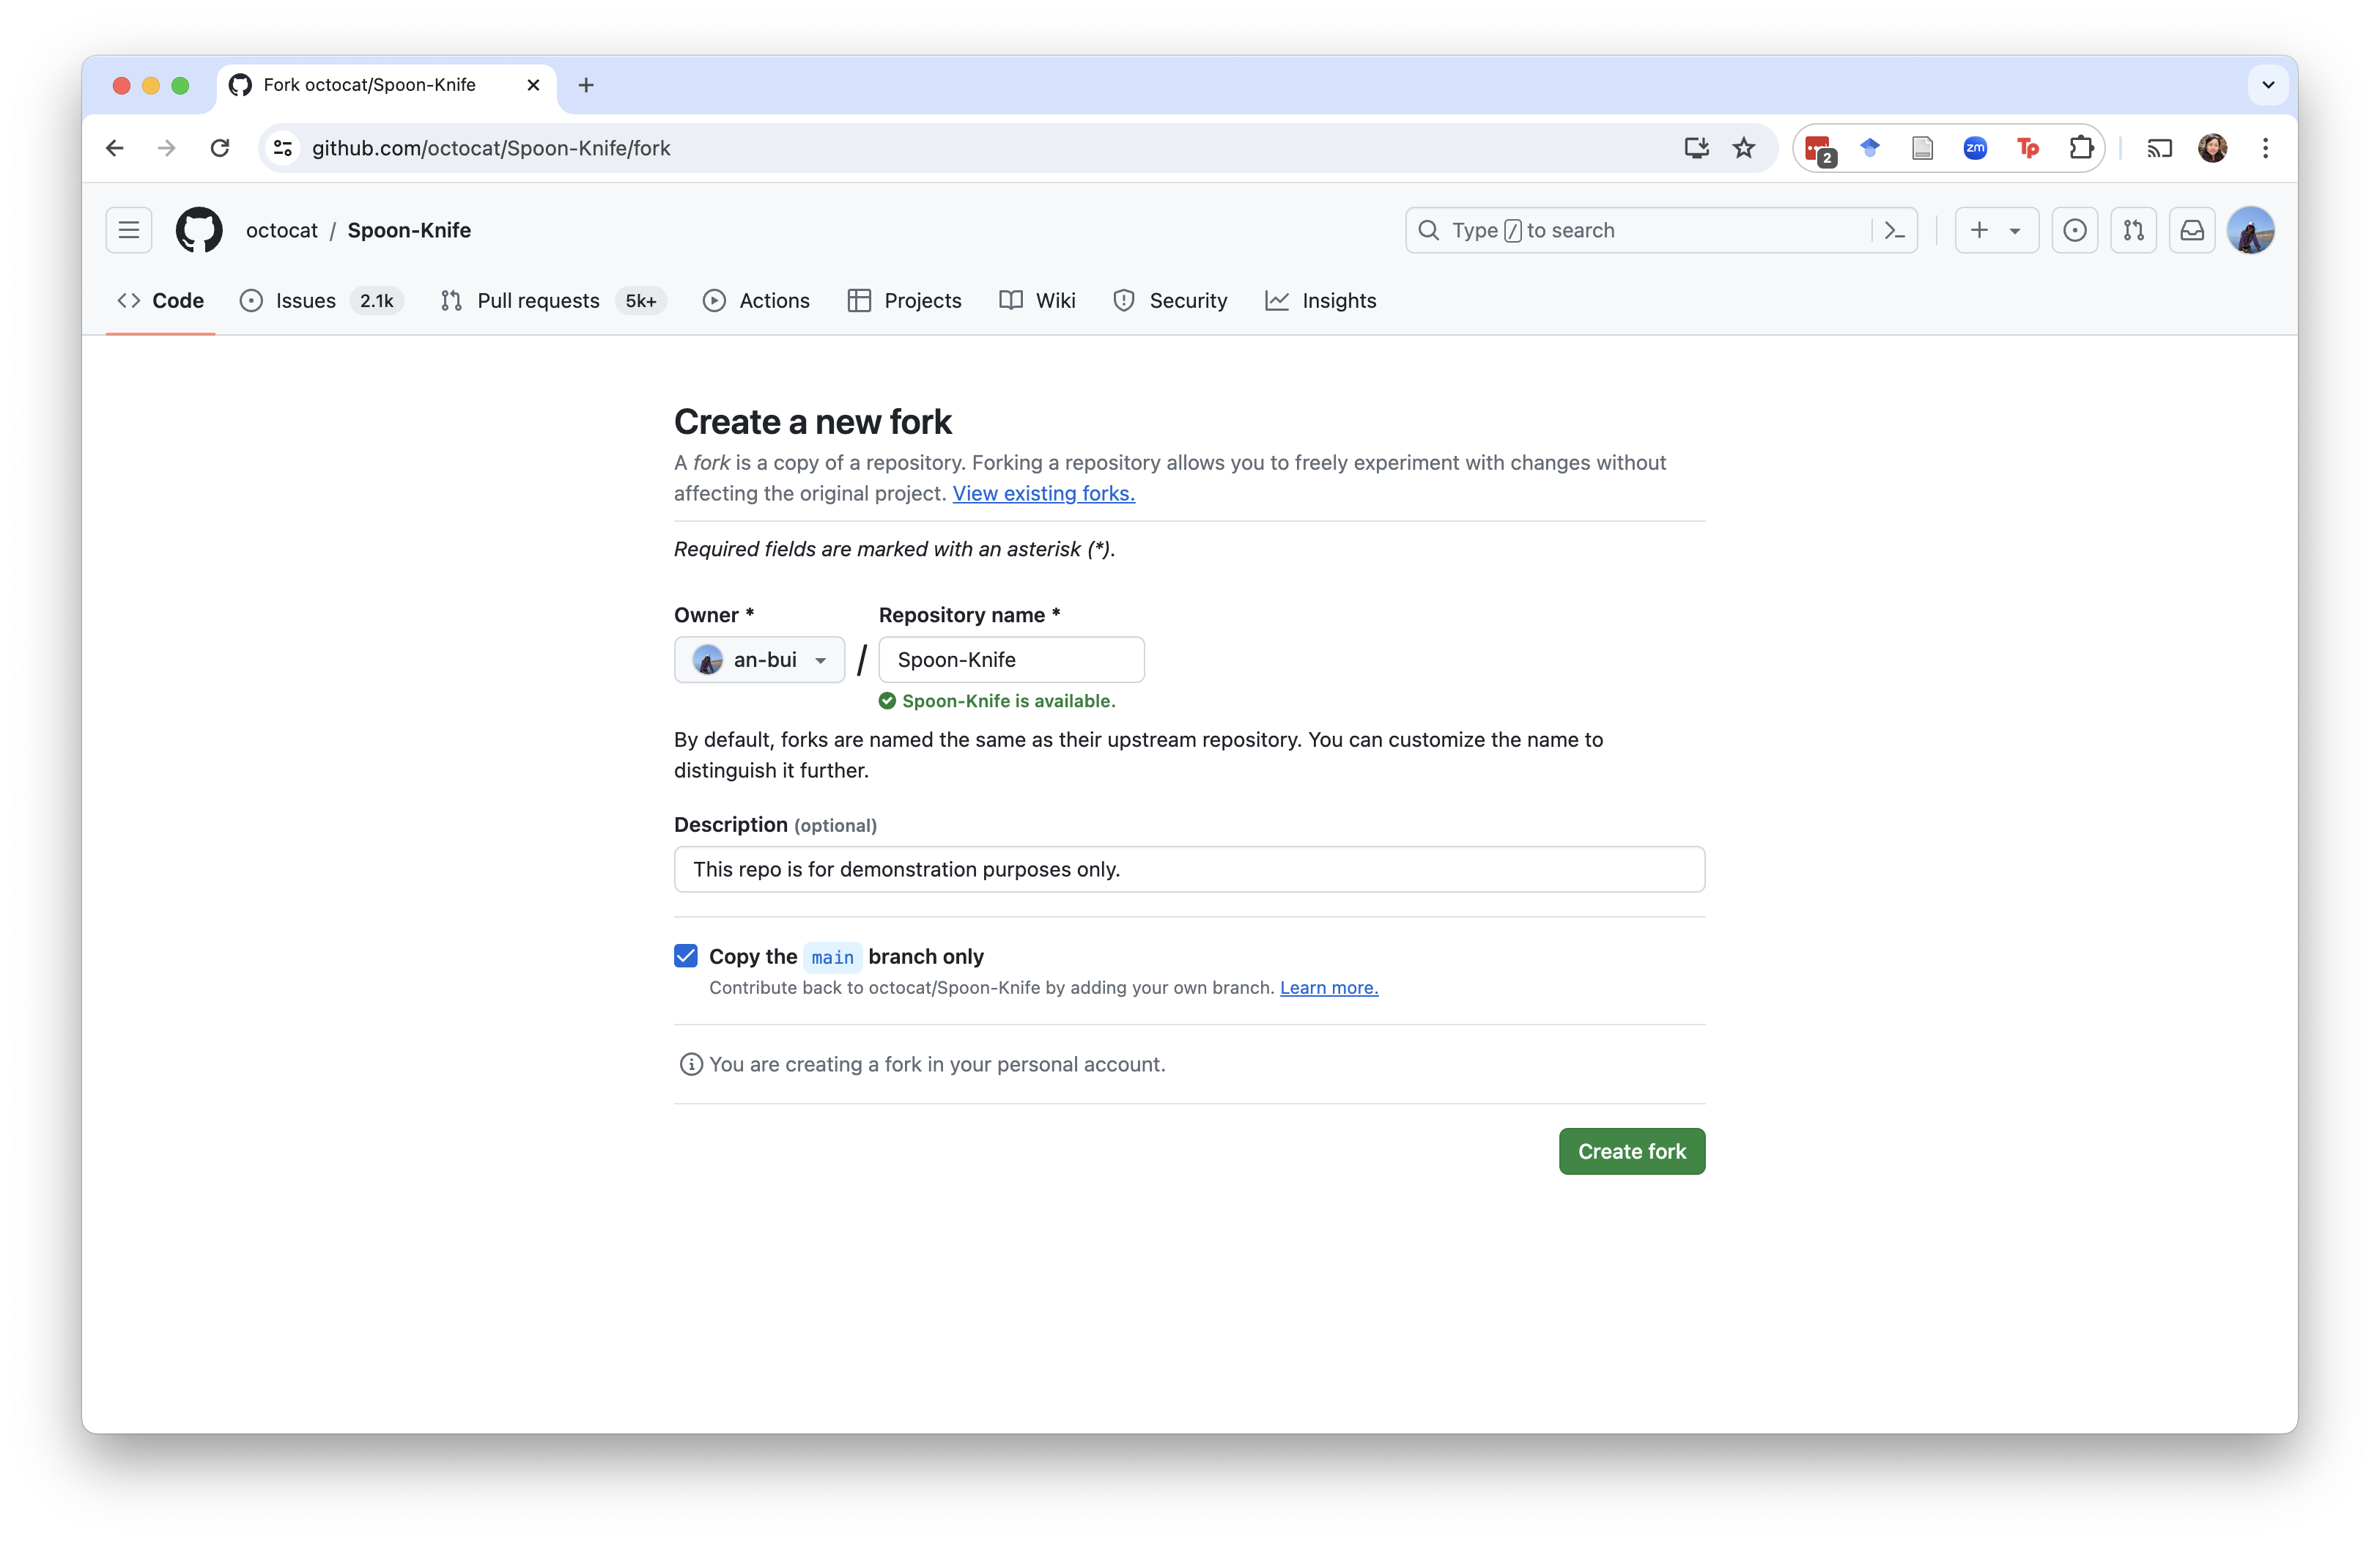
Click “Fork”. You’ll be led to a screen to “Create a new fork”.
You can rename the repo if you want, or write a new description. You’ll also copy the main branch.
You will have to wait for a bit.
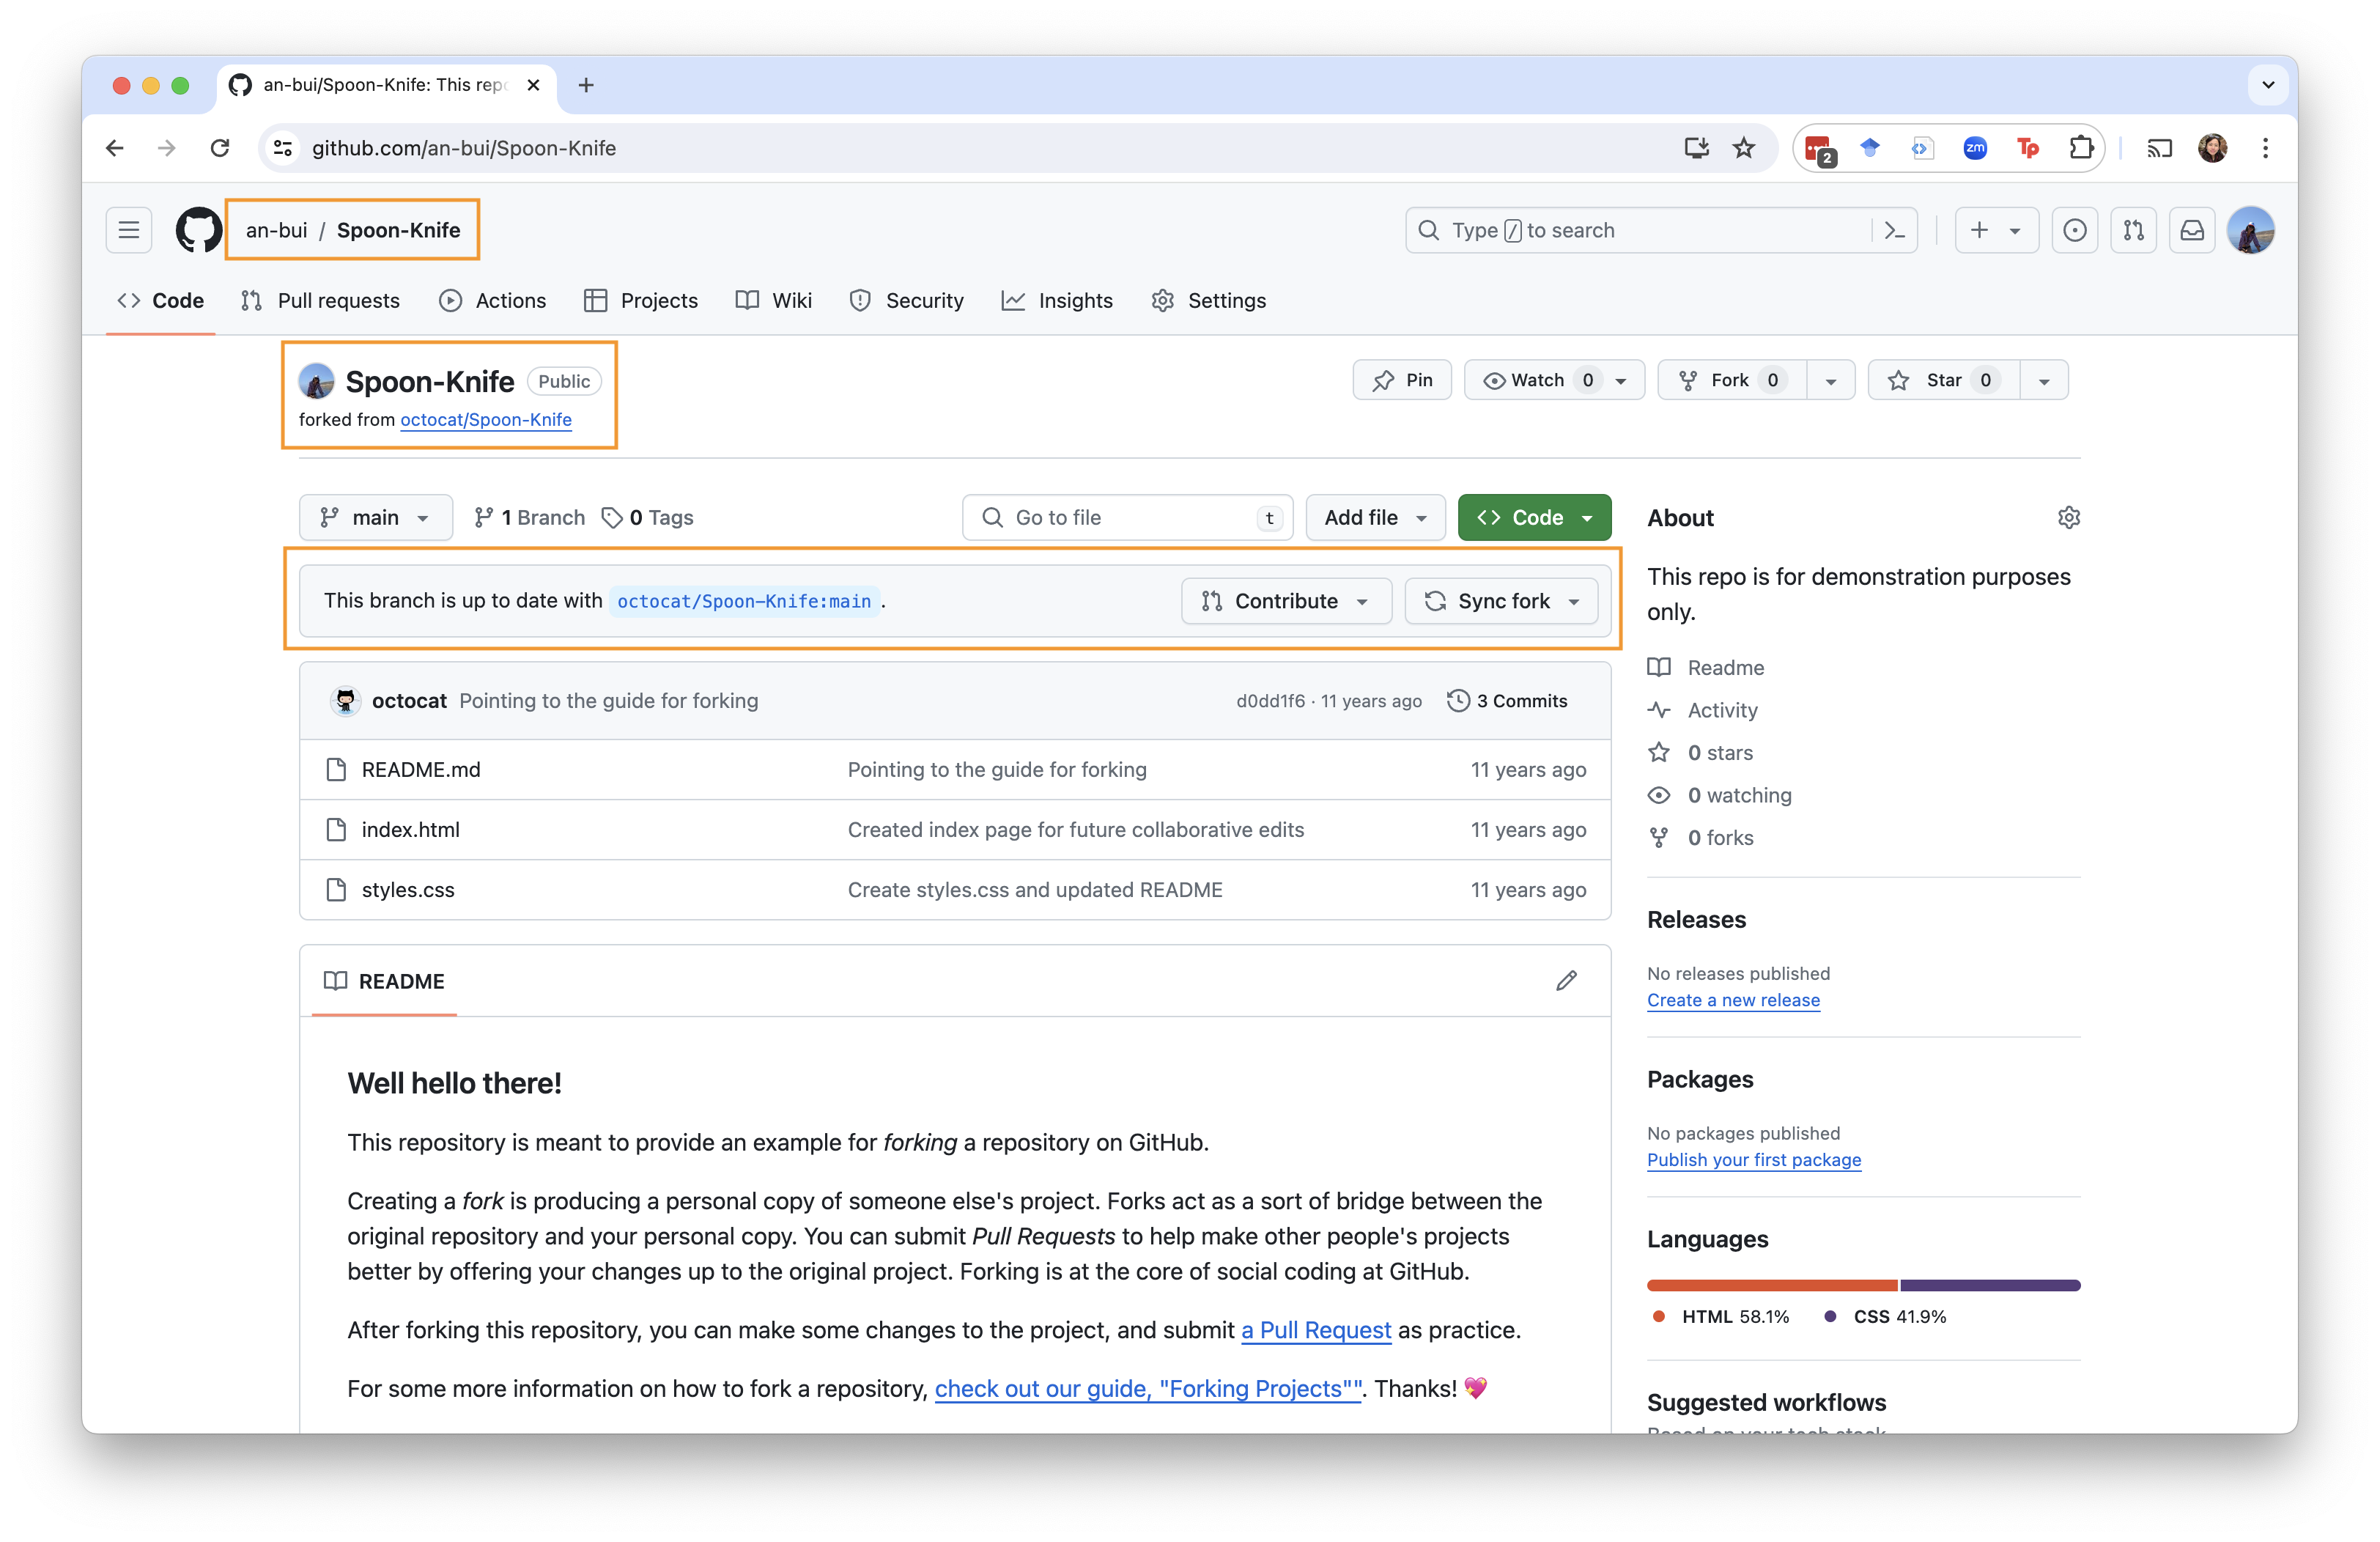
Once it’s done, you should see a screen that looks like a normal repo with some indications that you have forked someone else’s repo:
- under the repo name, you will see “forked from” another repo.
- a message saying “This branch is up to date with…”
3. Clone the repo.
This is the same process as cloning your own repo.
Click the green “Code” button and copy the url that shows up.
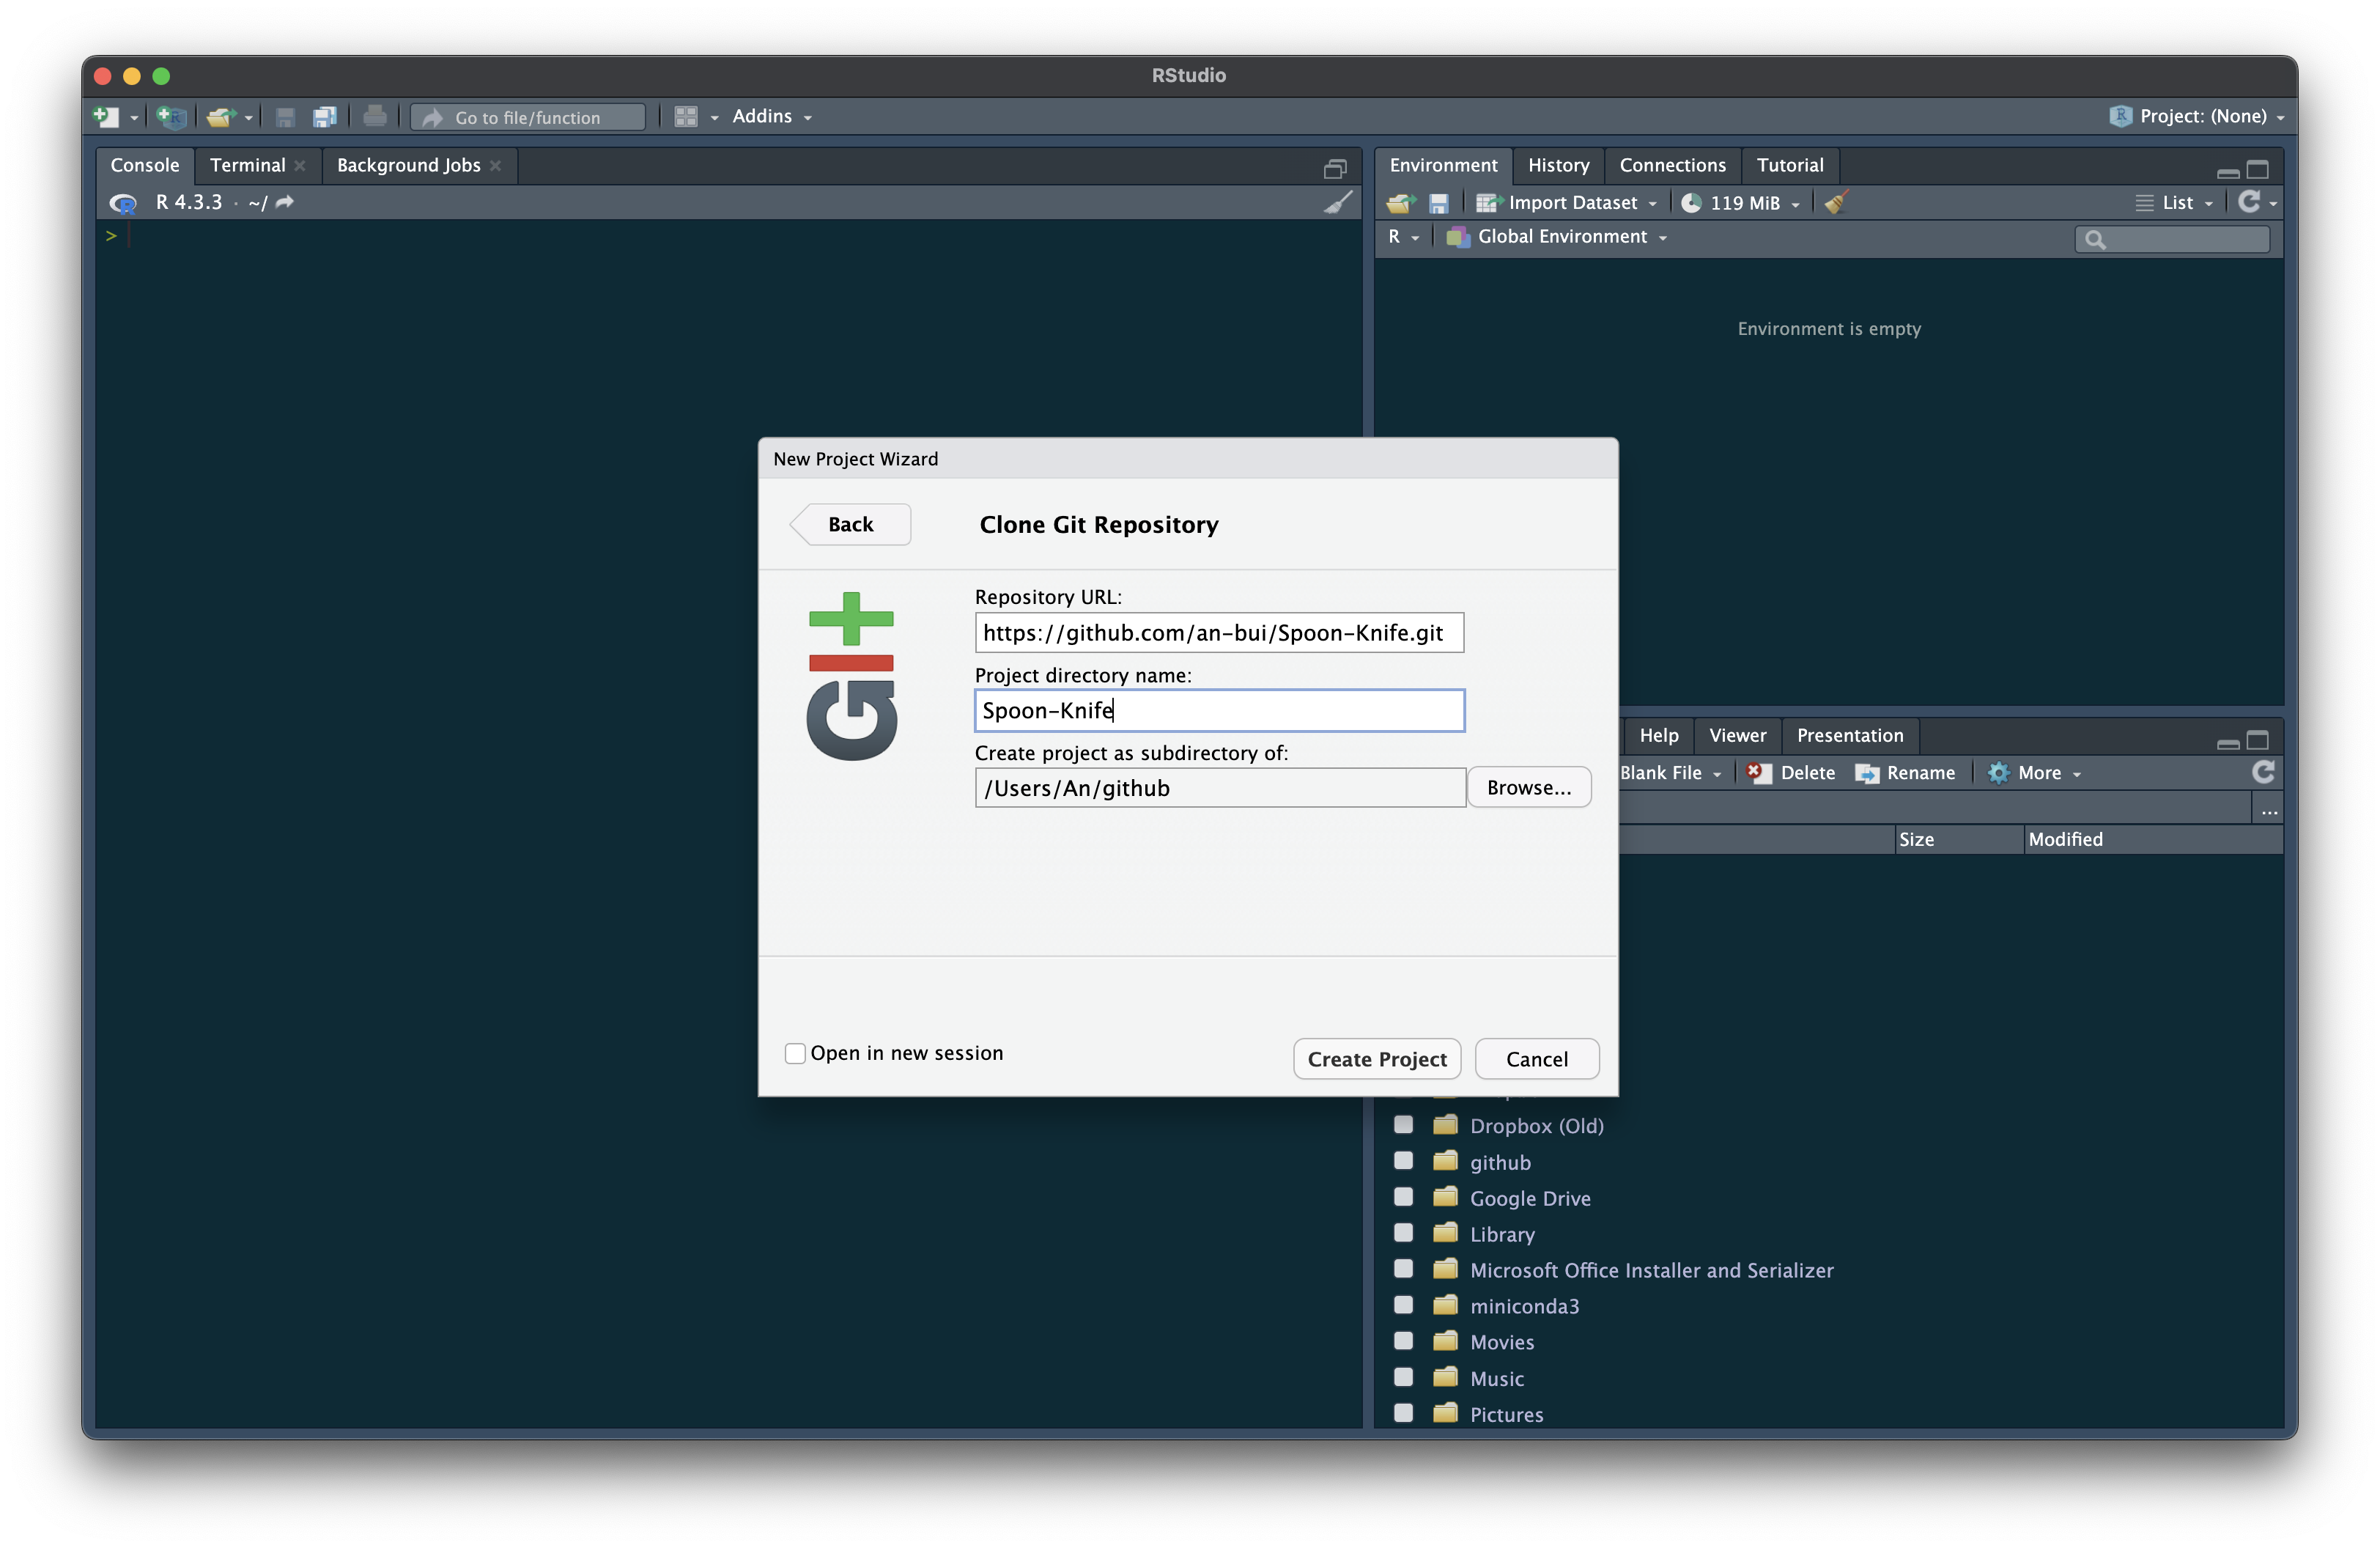
Then, create a new project in RStudio.
Select “Version Control”.
Paste the url you copied and hit tab.
Make sure that you are creating a project as a subdirectory of your git/github folder.
4. Work in the repo.
This is the same as working in your own repo: write code, make changes, commit and push them.
Your changes will only be saved to your forked repo, not to the original repo. Thus, you are reusing people’s code and writing new code without overwriting their work.
5. Incorporate upstream changes (if there are any)
The original repo is “upstream” of your fork. Sometimes, there are upstream changes to the original repo that you want to incorporate into your fork.
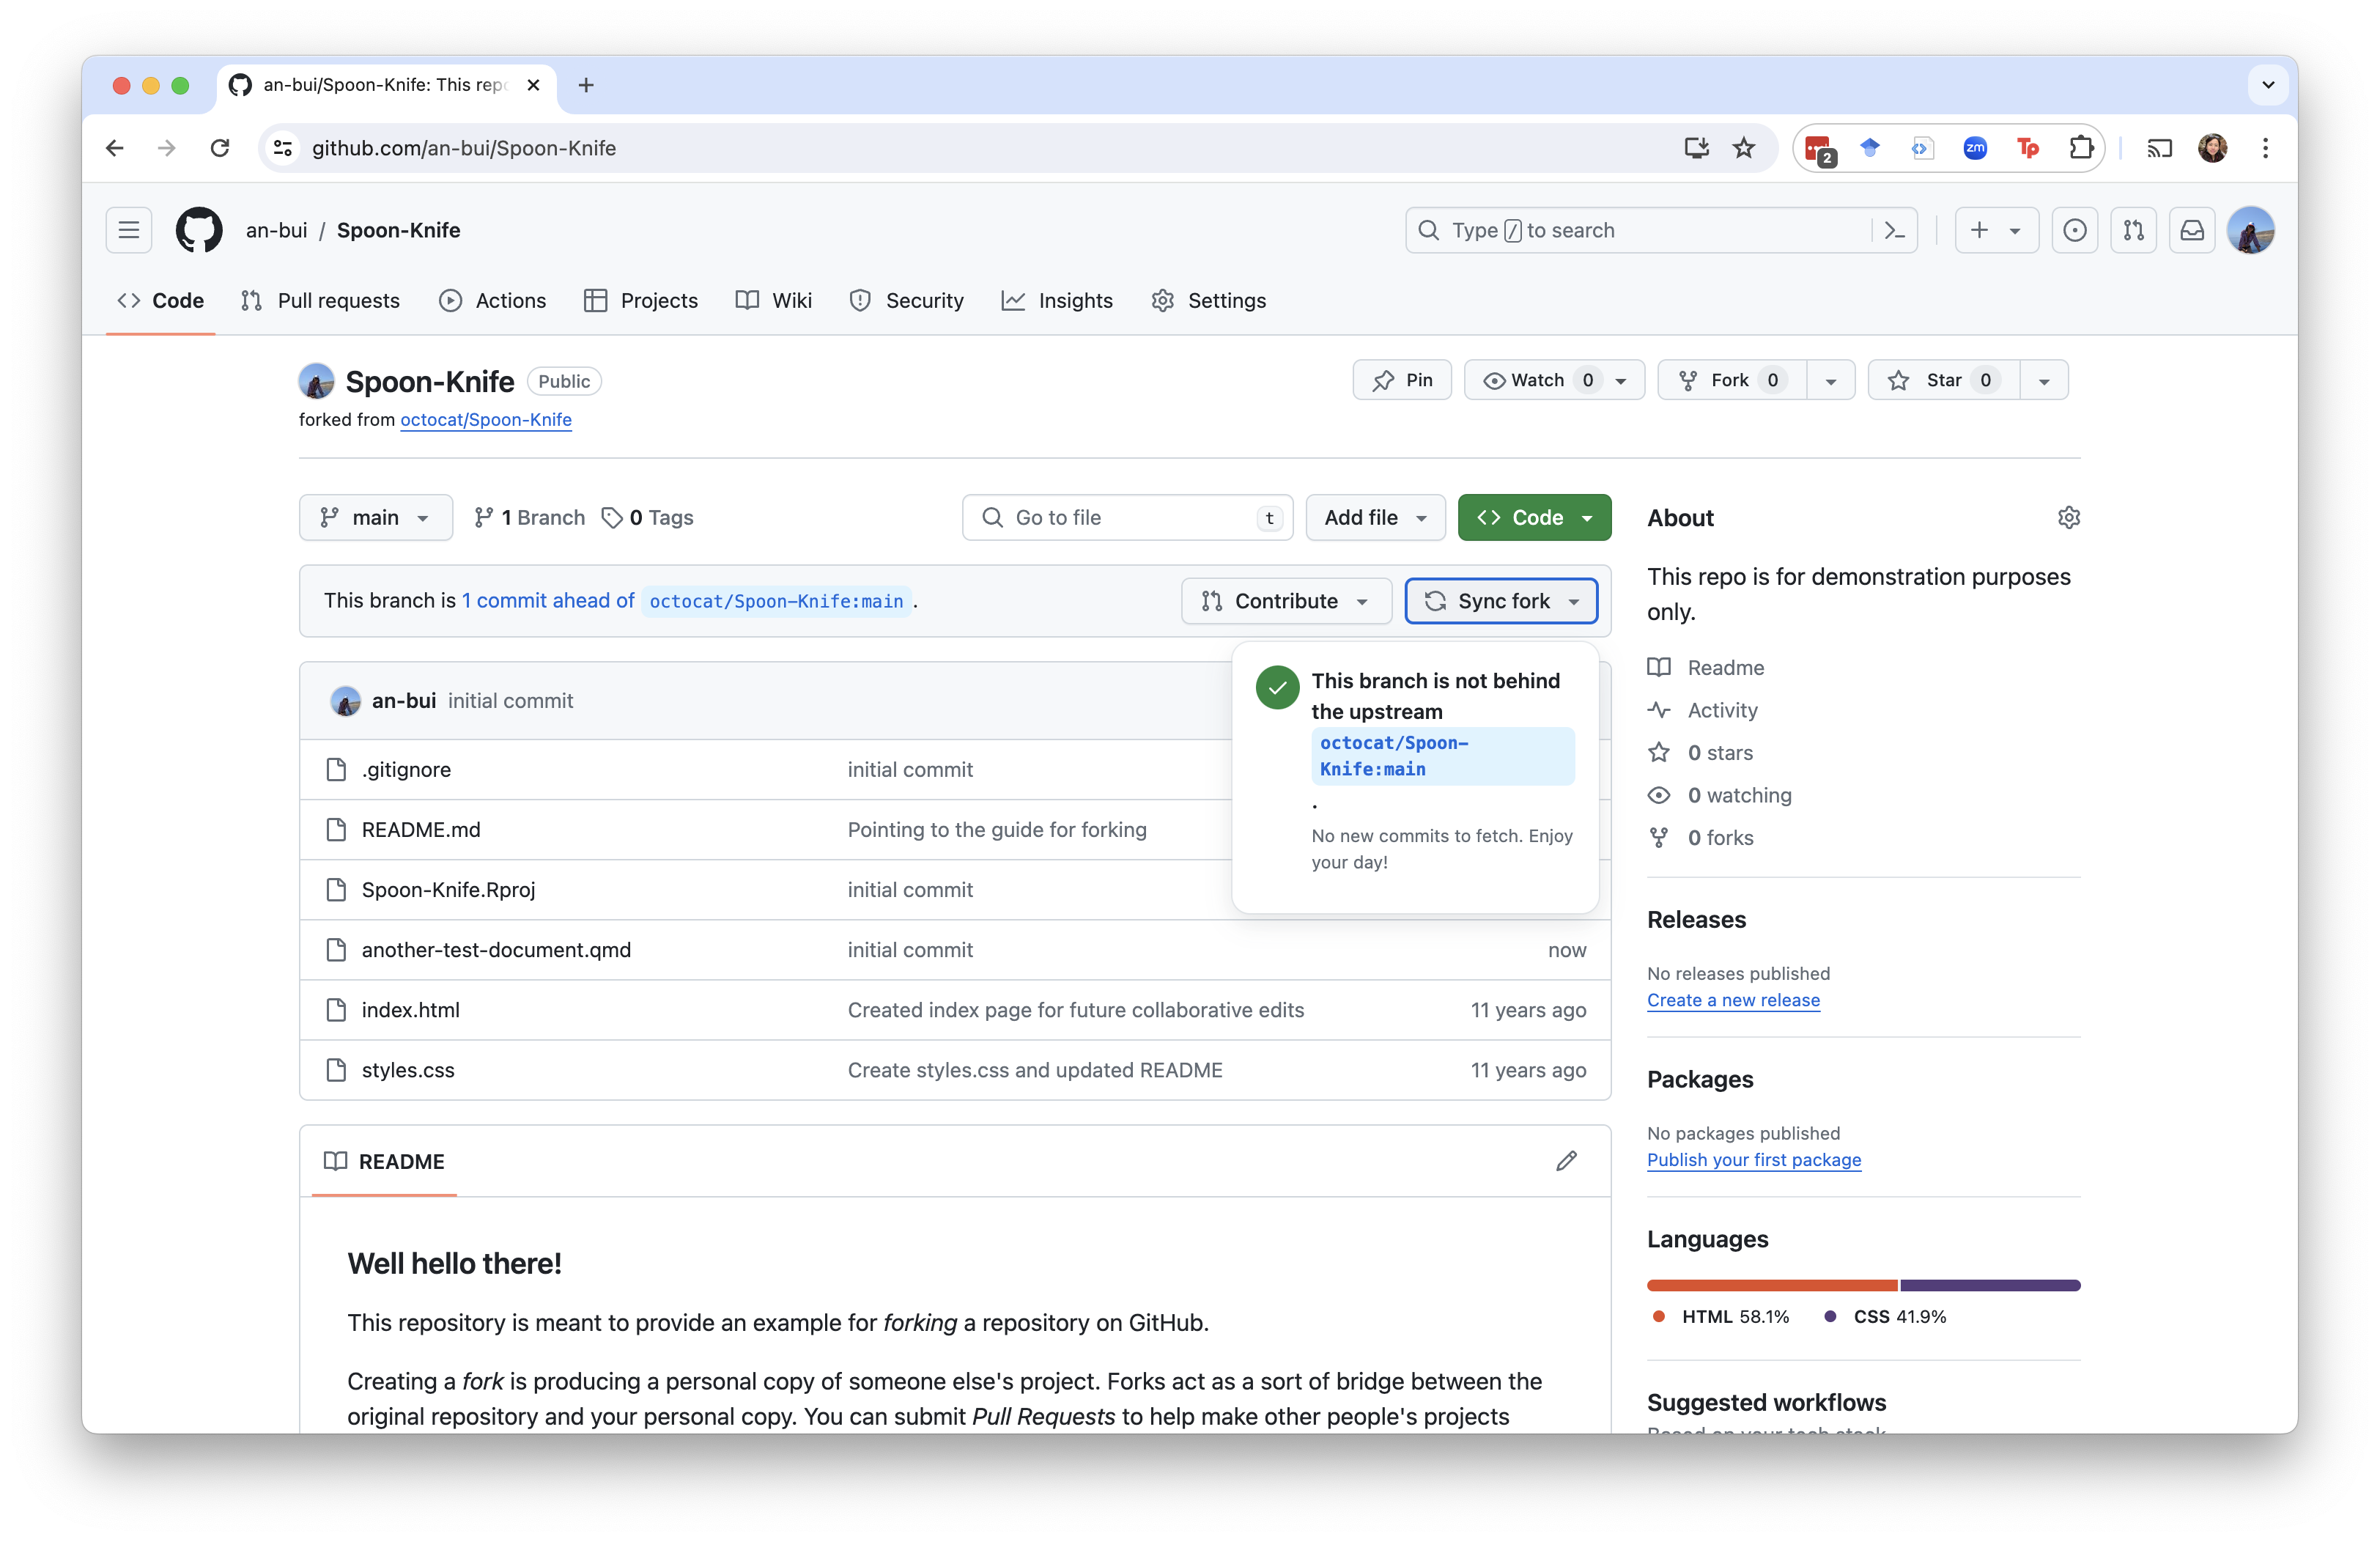
If there are upstream changes you want to have in your fork, then sync your fork by hitting the “Sync fork” button.
These changes will now be in your remote, but not in your local.
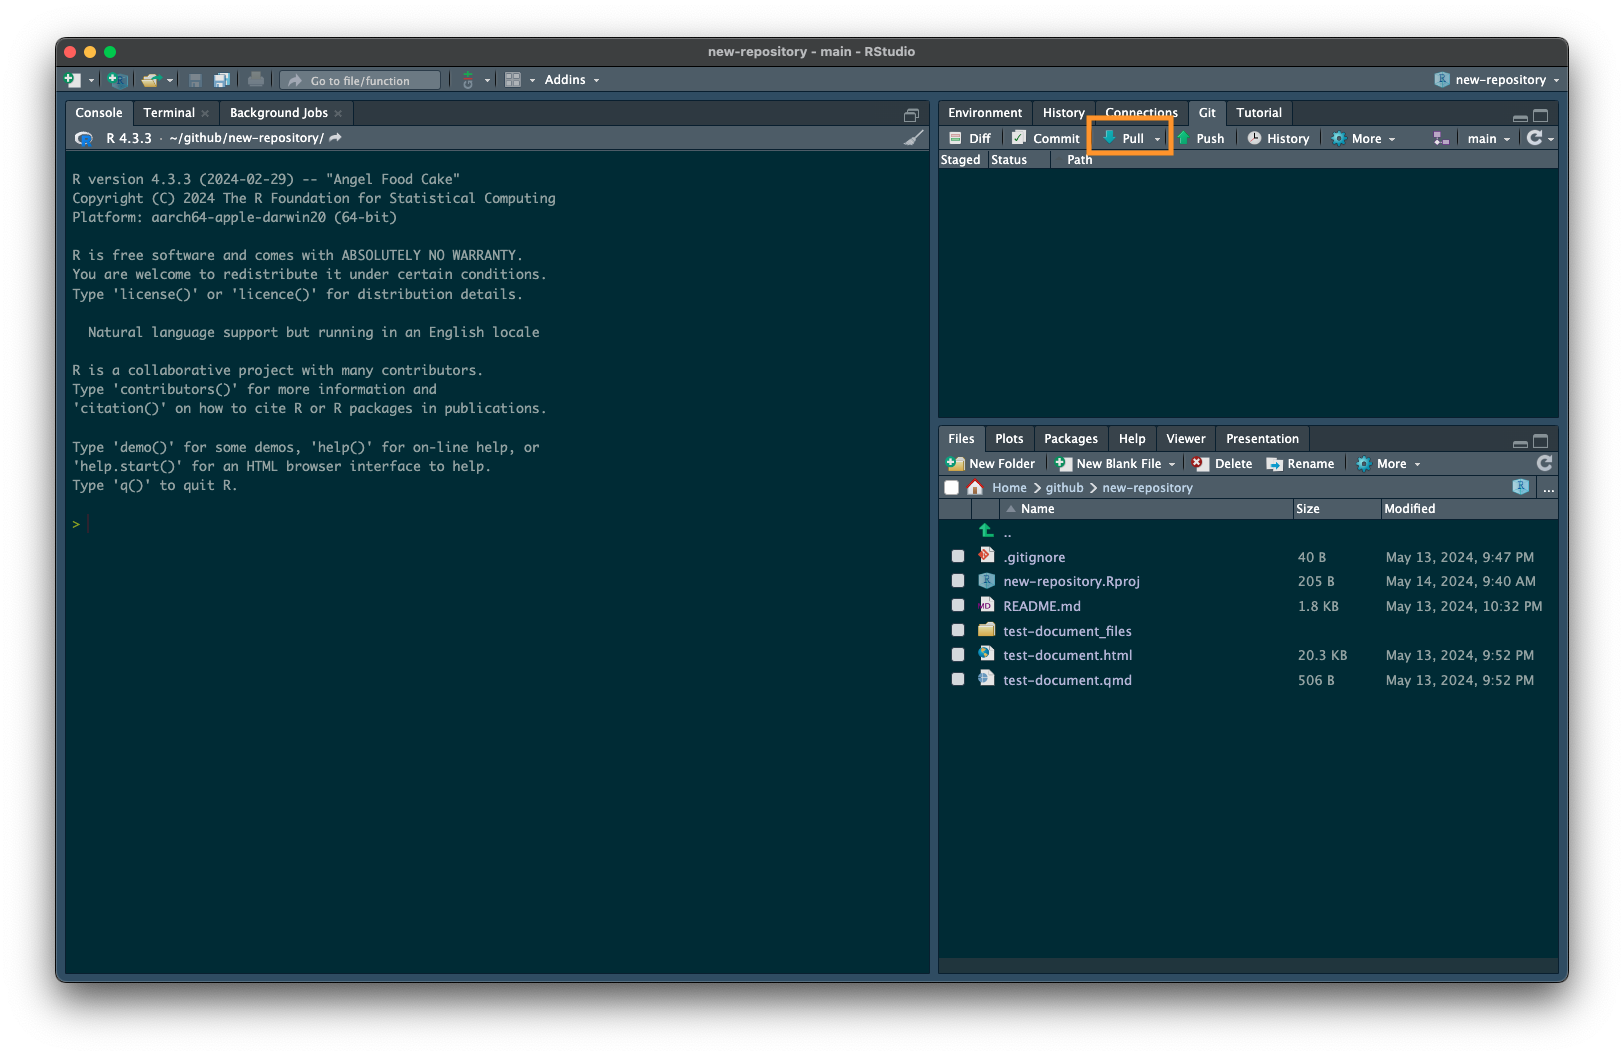
Go back to RStudio and open the Git tab. Click “Pull” to get the changes into your computer.
Collaborating
Another powerful way to use GitHub is to work with other people. You can add collaborators to a repository and they can commit/push changes just like you can, and you can pull each others changes to your respective computers.
GitHub is a powerful tool to collaborate, but it doesn’t replace good communication with collaborators. When working with someone else in the same repo, be sure to communicate with each other about what you’re doing, what part of the document you’re going to be working in, etc. This requires you to actually reach out and contact them - so do it!
1. Add collaborators to your repo.
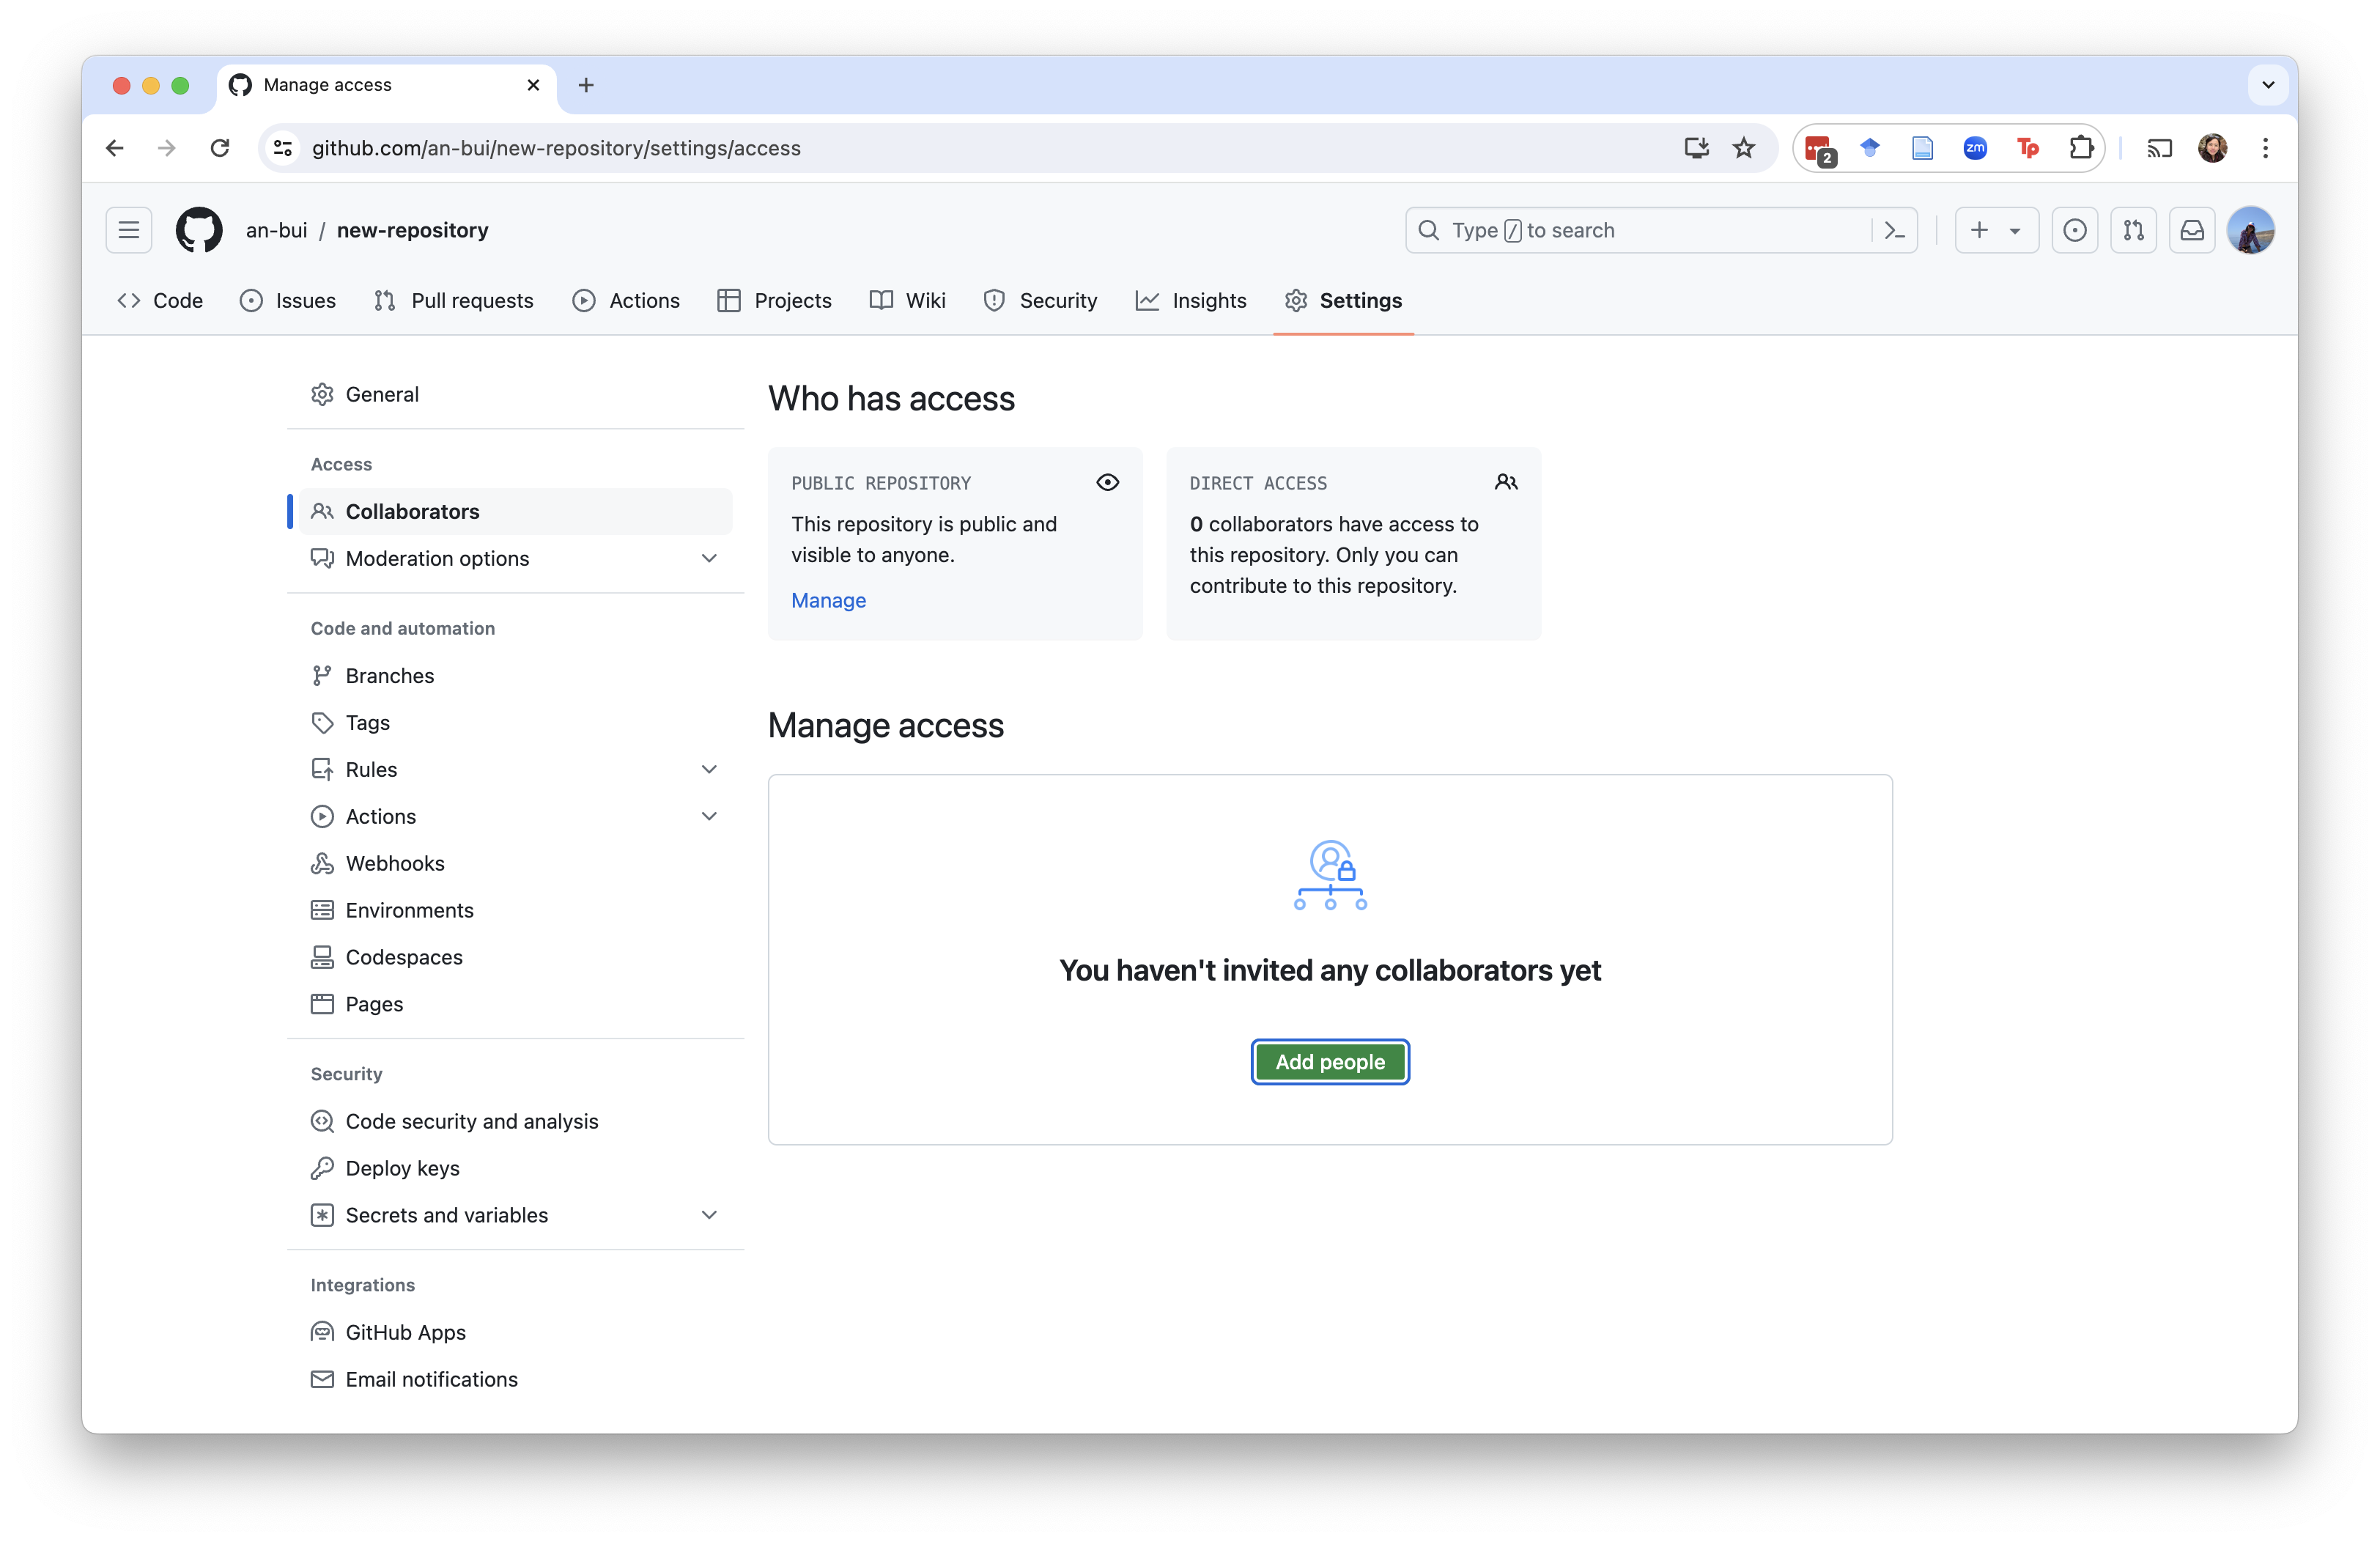
In your GitHub repo, navigate to Settings > Collaborators.
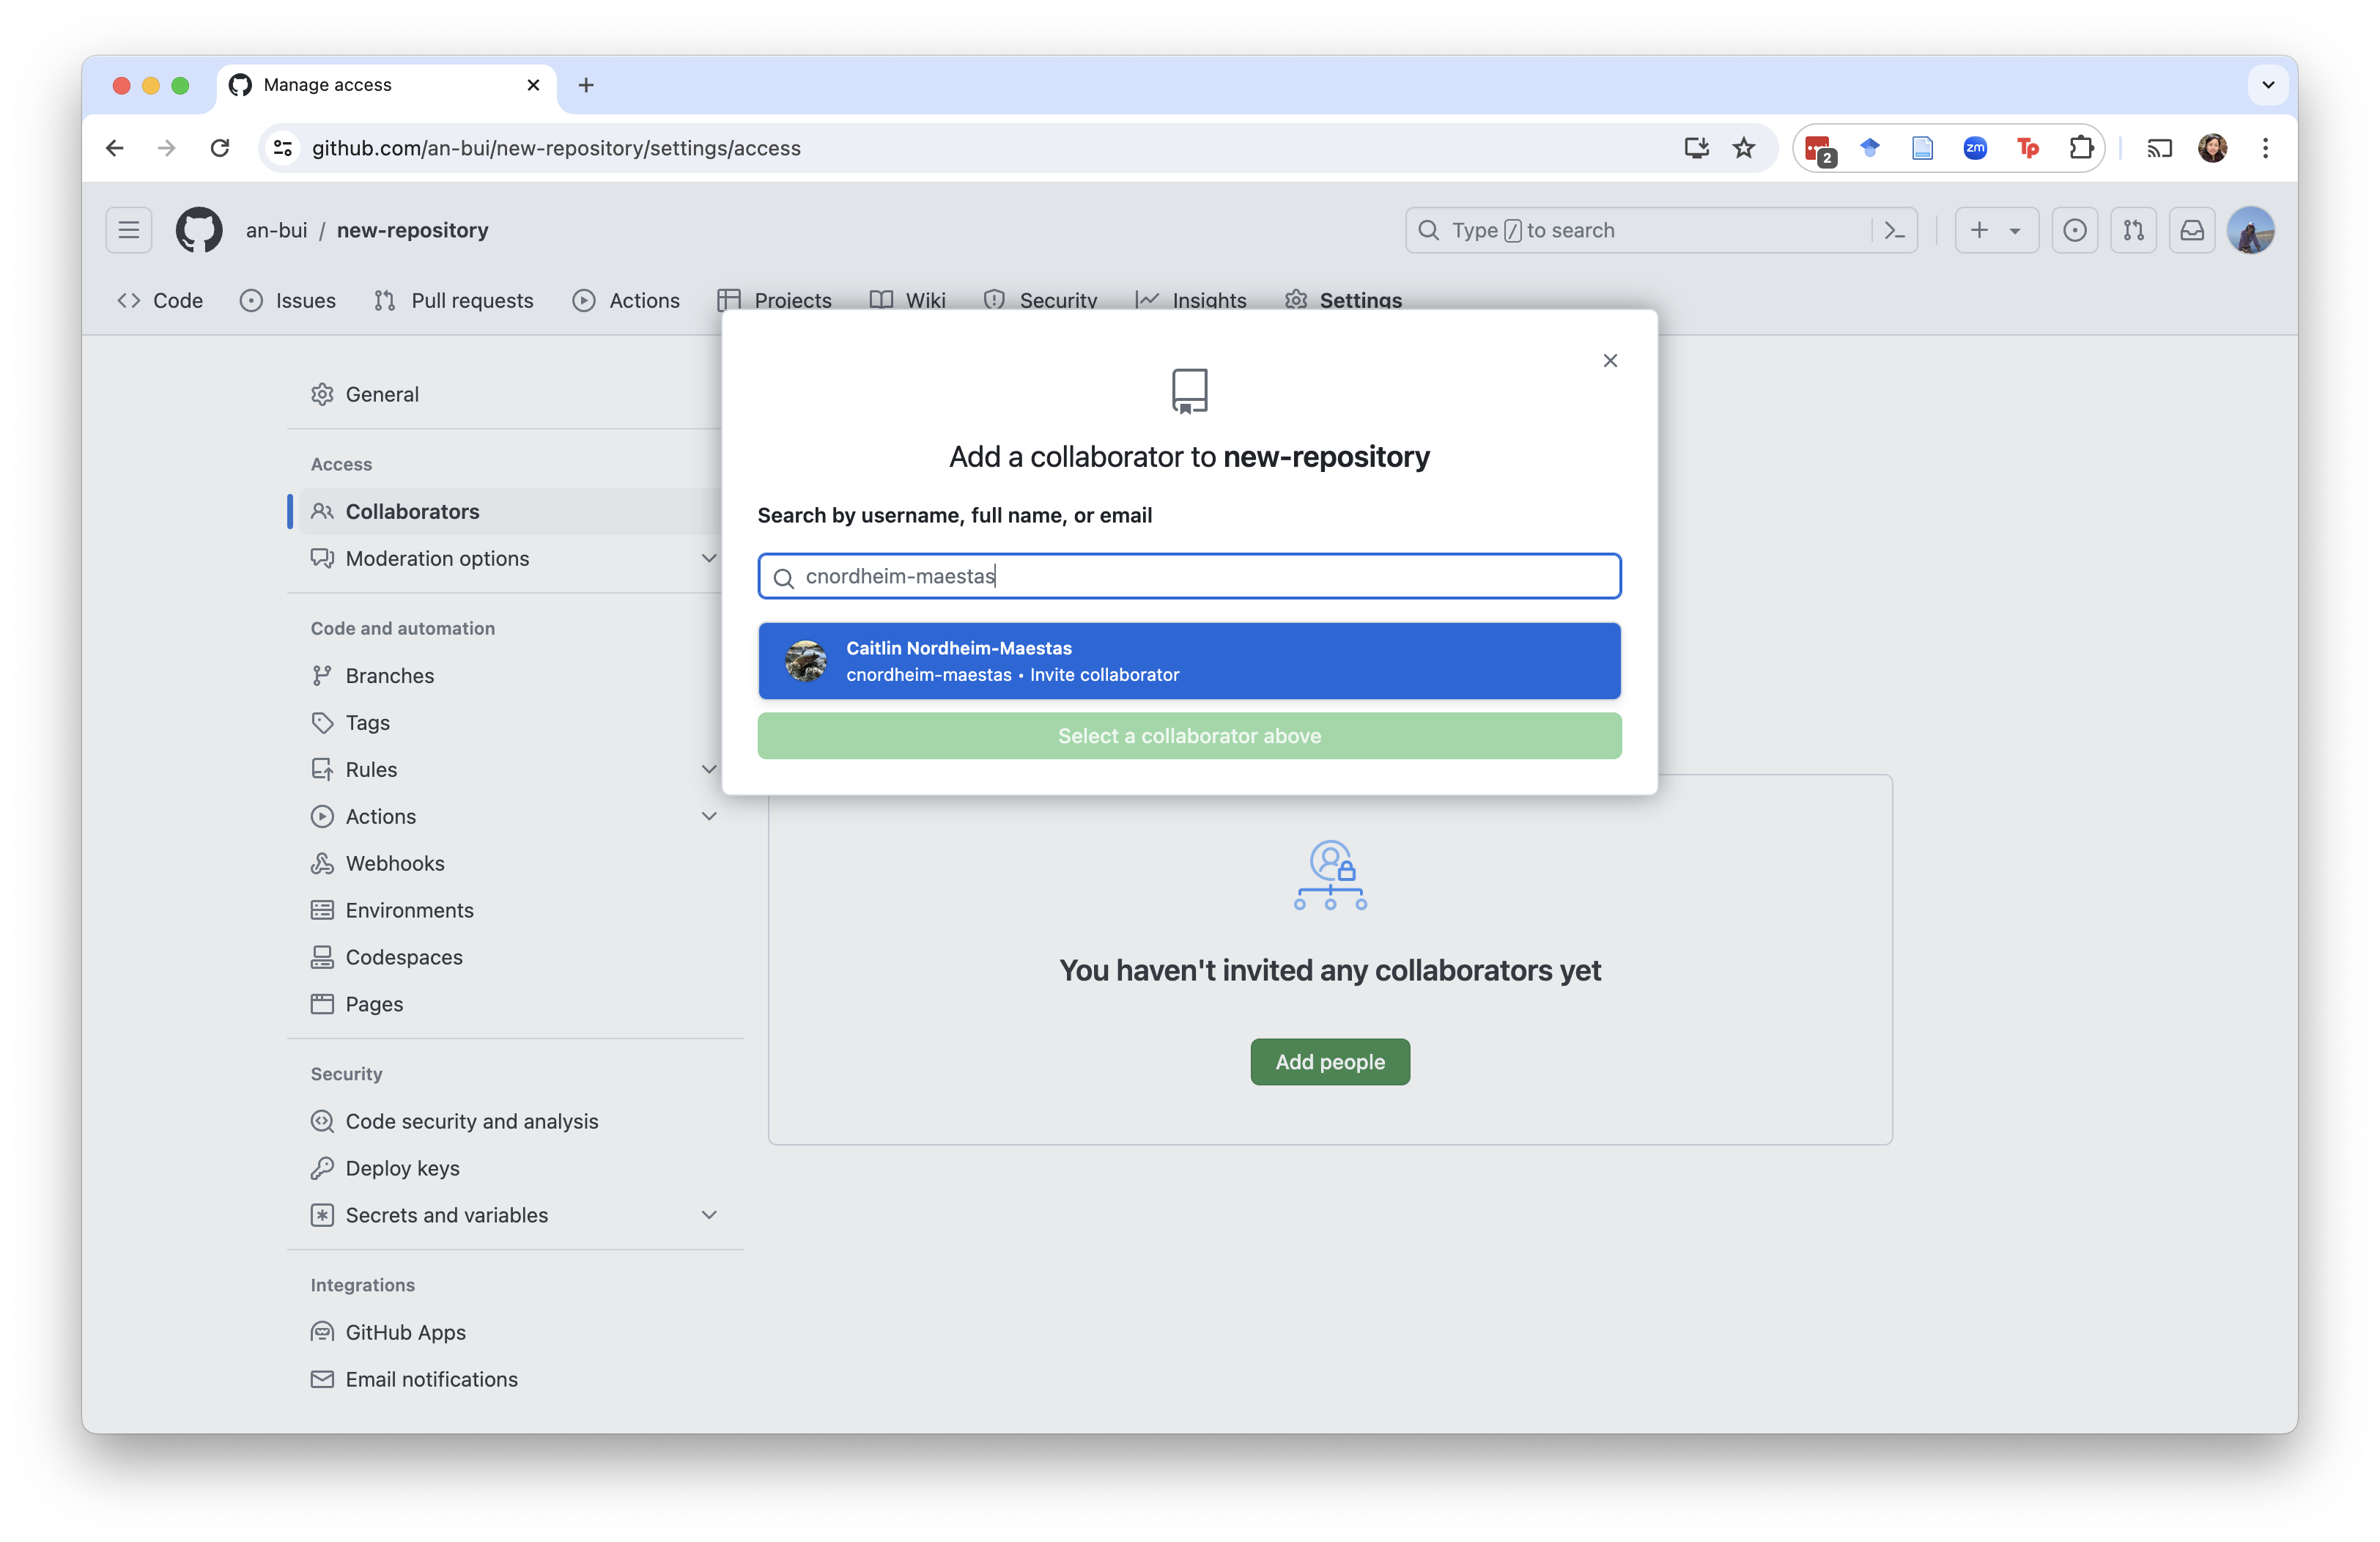
Find your collaborator by searching for their GitHub username.
Select their username.
Hit the green “Add … to this repository” button.
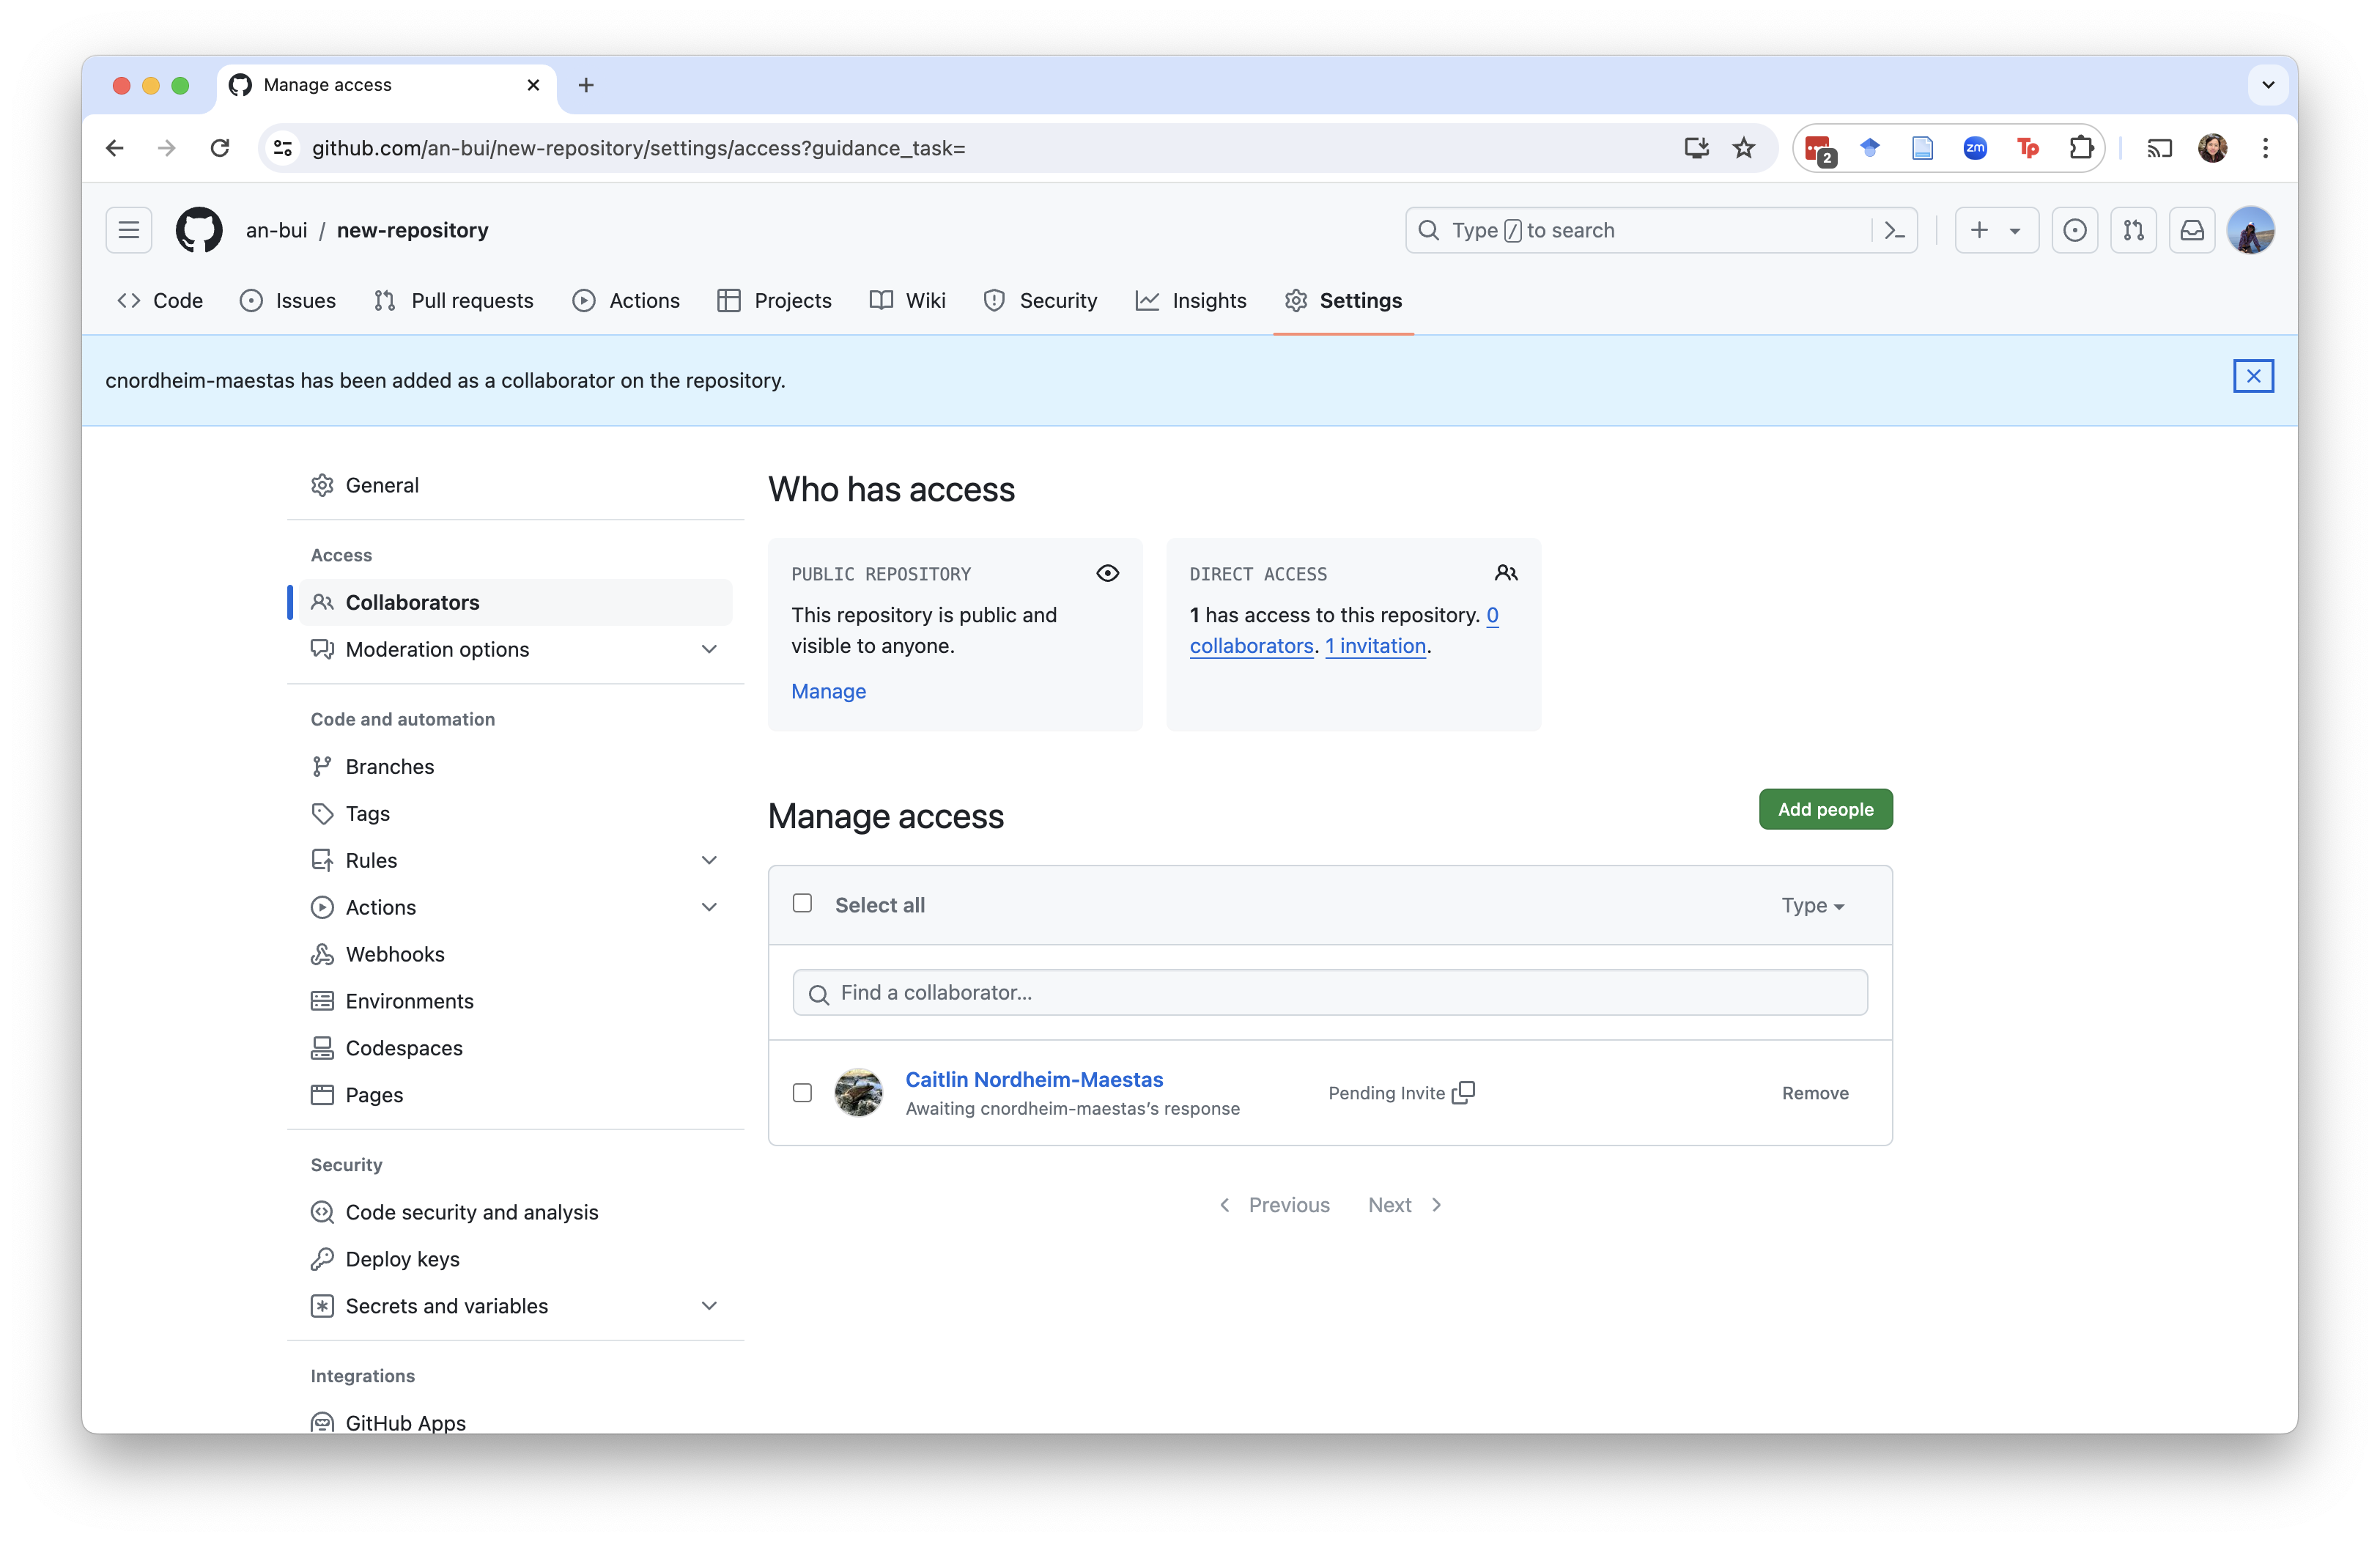
If successful, you should see the other person listed as a collaborator and a blue banner that says “… has been added as a collaborator on this repository.”.
2. For the collaborators
You will receive an email with an invitation to the repo. Accept the invitation.
You should then see something like “you have push access to this repository”. That means you can work out of this repo and commit/push changes as though it was your own.
Clone this repo to your computer.
3. Make changes, commit, push.
Same as above!
4. View changes to the repo.
When your collaborator has made changes in the repo, you will see them on the remote.
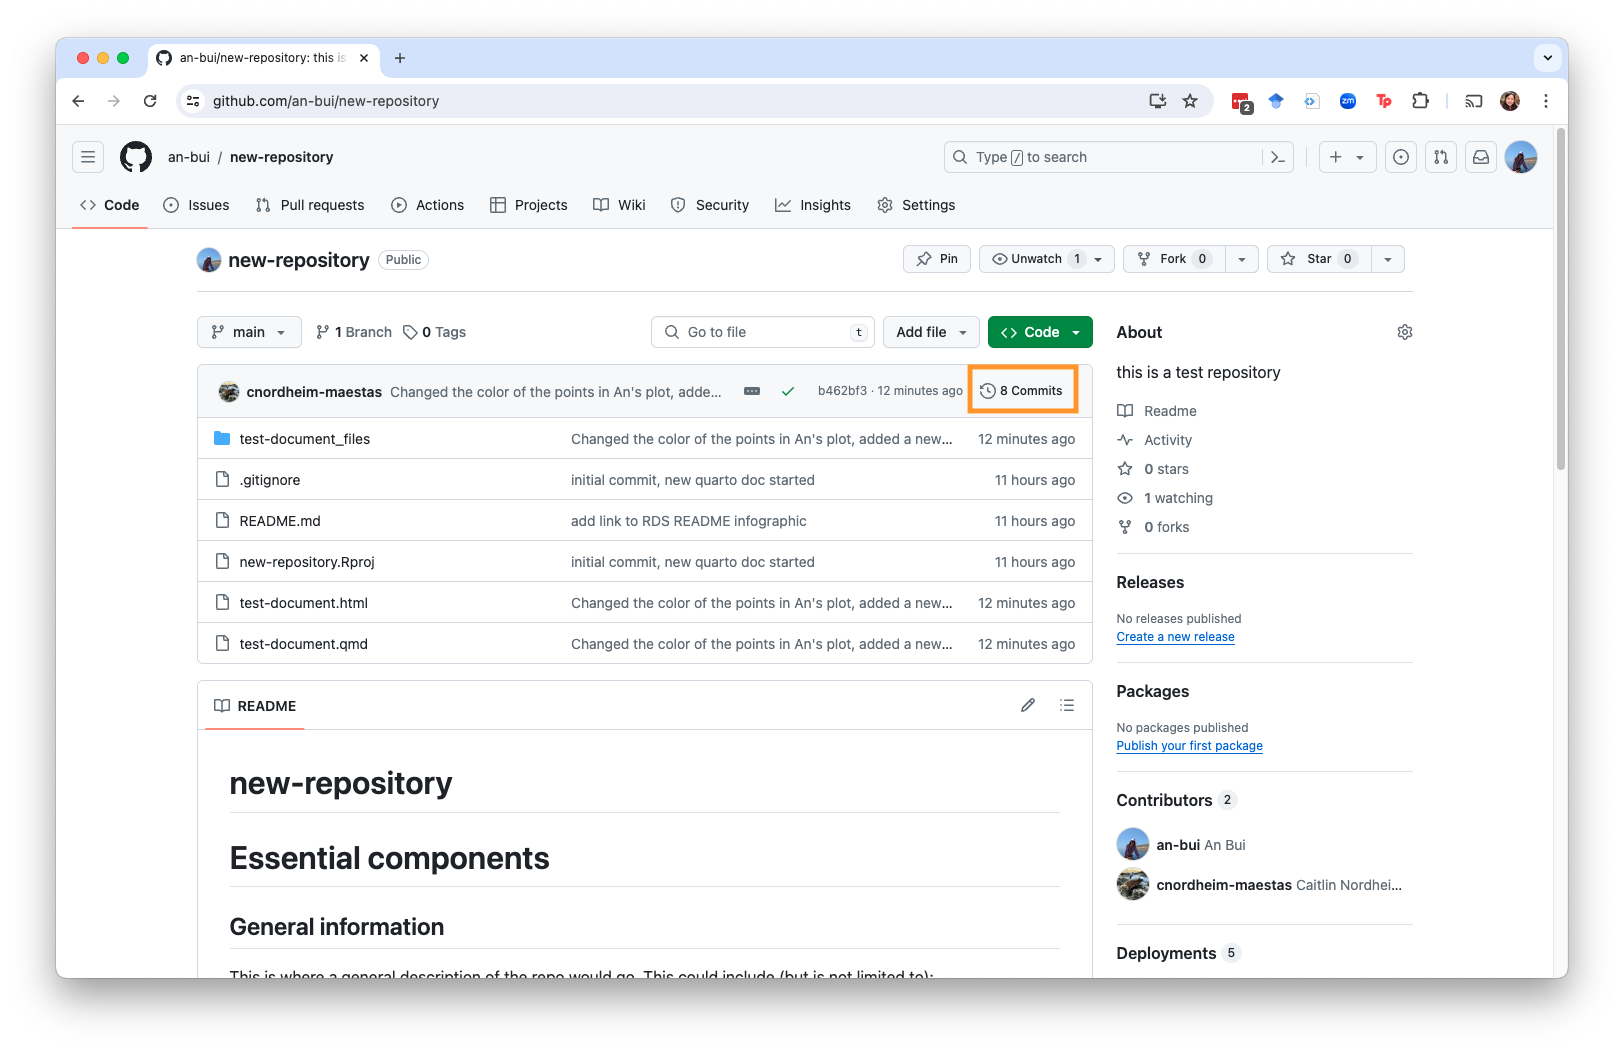
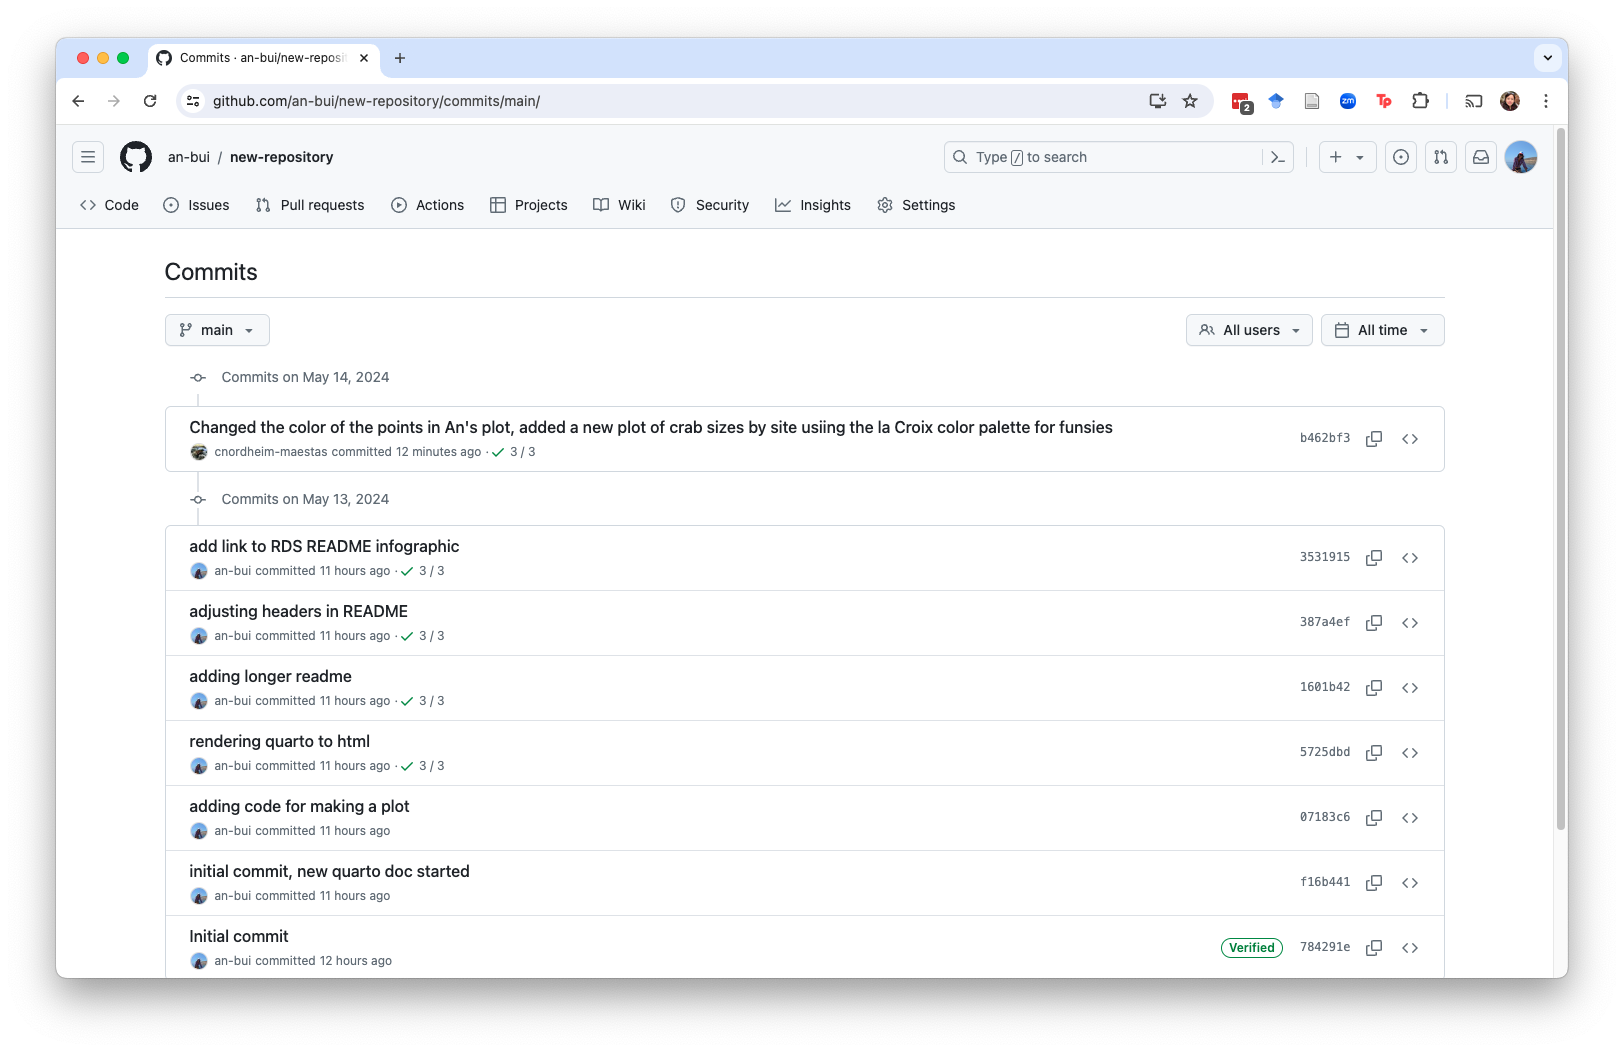
You can also see the history of changes by clicking the “Commits” button.
5. Incorporate changes
You and your collaborator will be working out of the same repo. That means that you can pull each others’ changes to your respective computers.
When collaborating with others, it is best practice to pull often. If you’re starting up a coding session, pull any changes. Before you commit/push changes, pull more changes.
This prevents situations called “merge conflicts” which can range from easily fixable to extremely frustrating. See a guide to navigating merge conflicts here.
One easy way to avoid merge conflicts is to make sure that you and your collaborator are working on different parts of the document, or on different documents entirely. Once you’re both done with your respective parts, incorporate everything into one document.
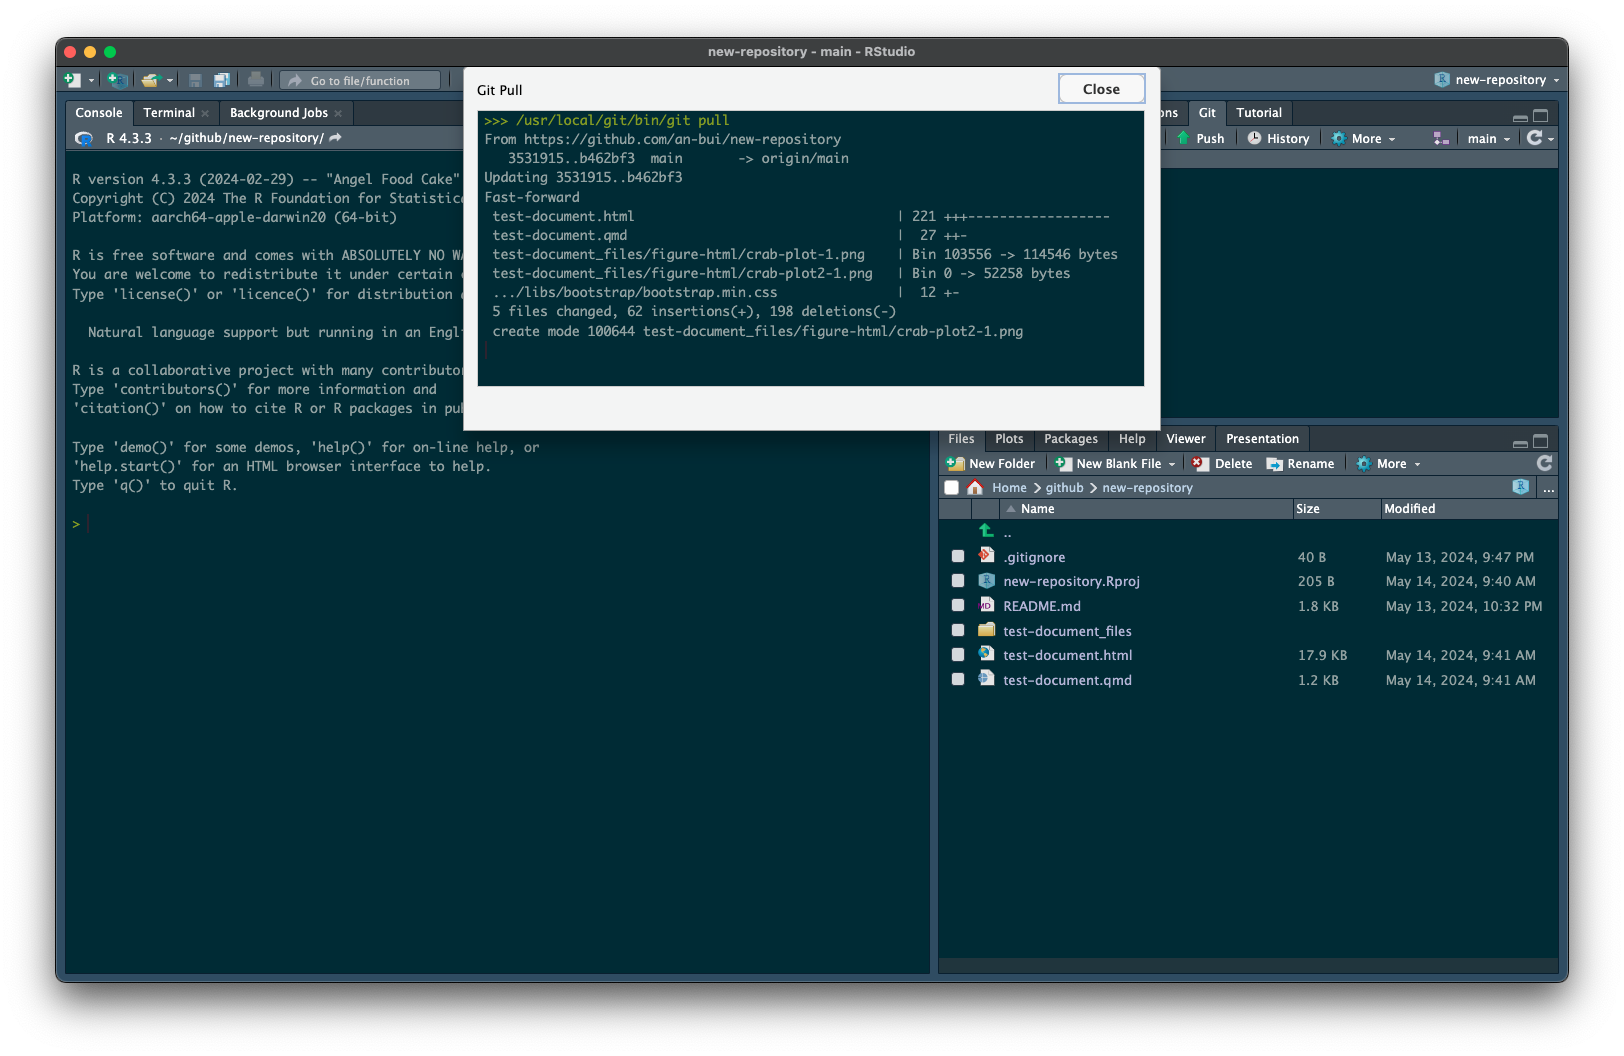
Pull changes by hitting “Pull” in the Git tab.
A window should pop up with a summary of changes, additions, deletions, etc. that you are pulling from the remote.
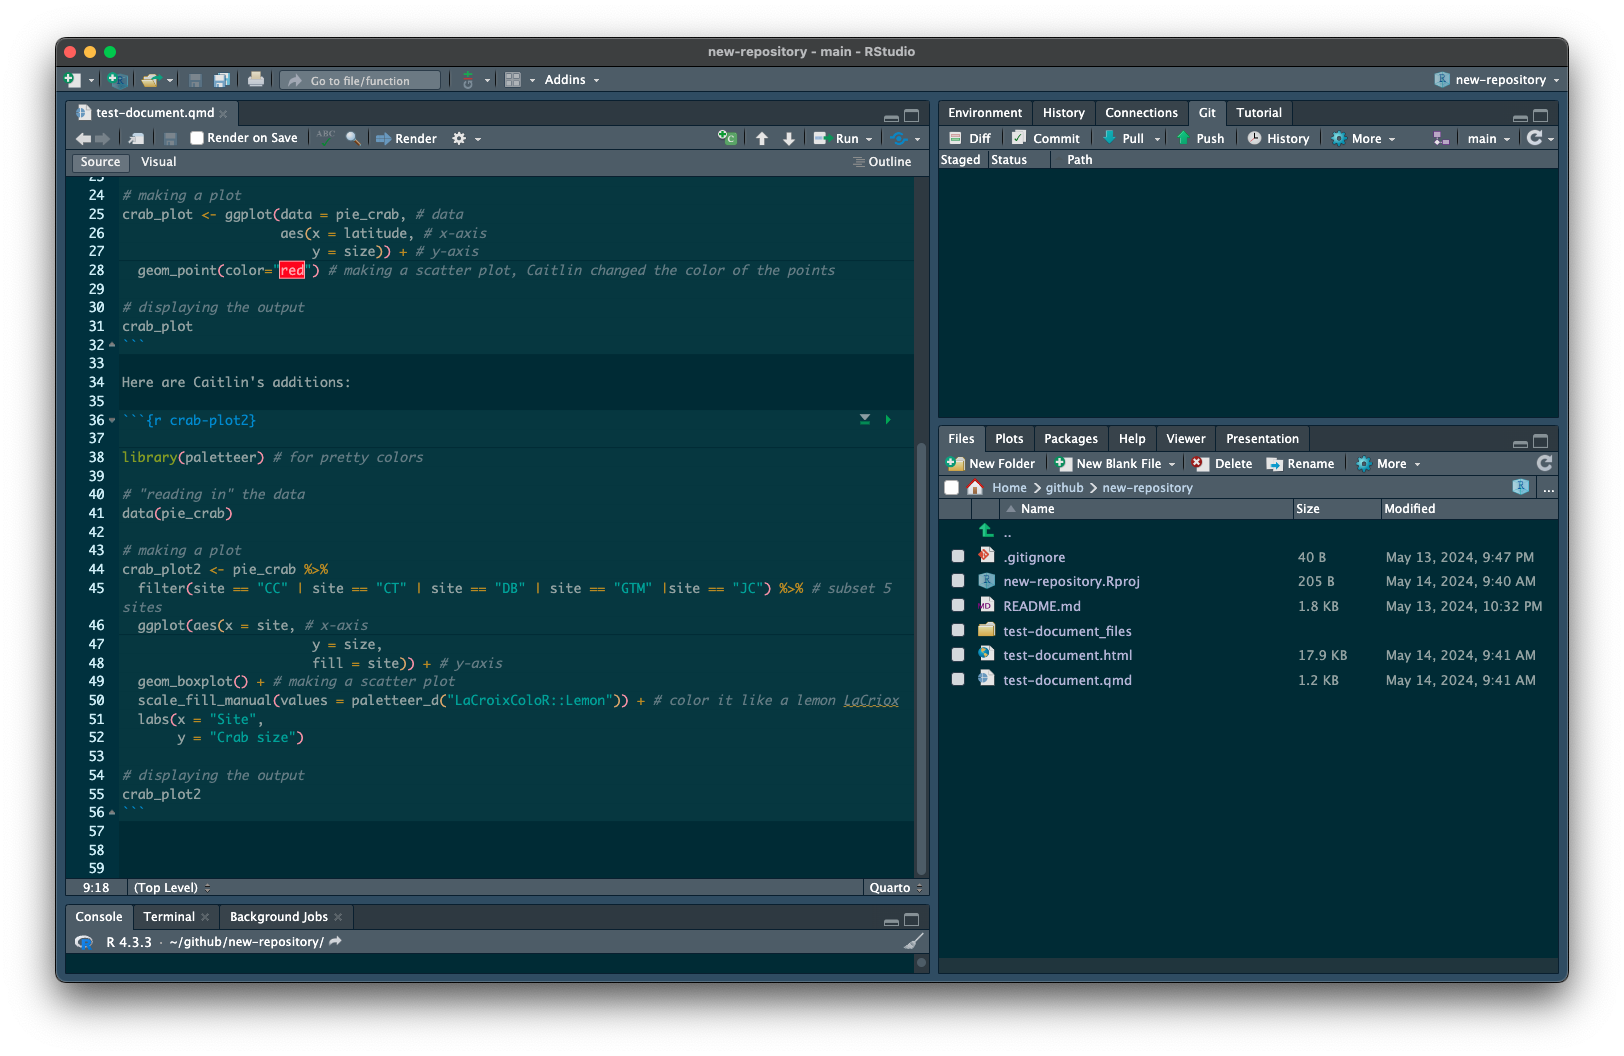
You will then see the changes on your computer!
You can keep working in your document as usual. You can also edit your collaborator’s work. For example, maybe you needed to add some comments to the code to annotate it, or maybe you need to change one of their functions to something new. Whatever it might be, be sure to continue communicating with your collaborators so that everyone is on the same page.
Browsing your remote repo
GitHub allows you to easily browse the history of your repository. Think of this as time travel!
1. Find your commit history
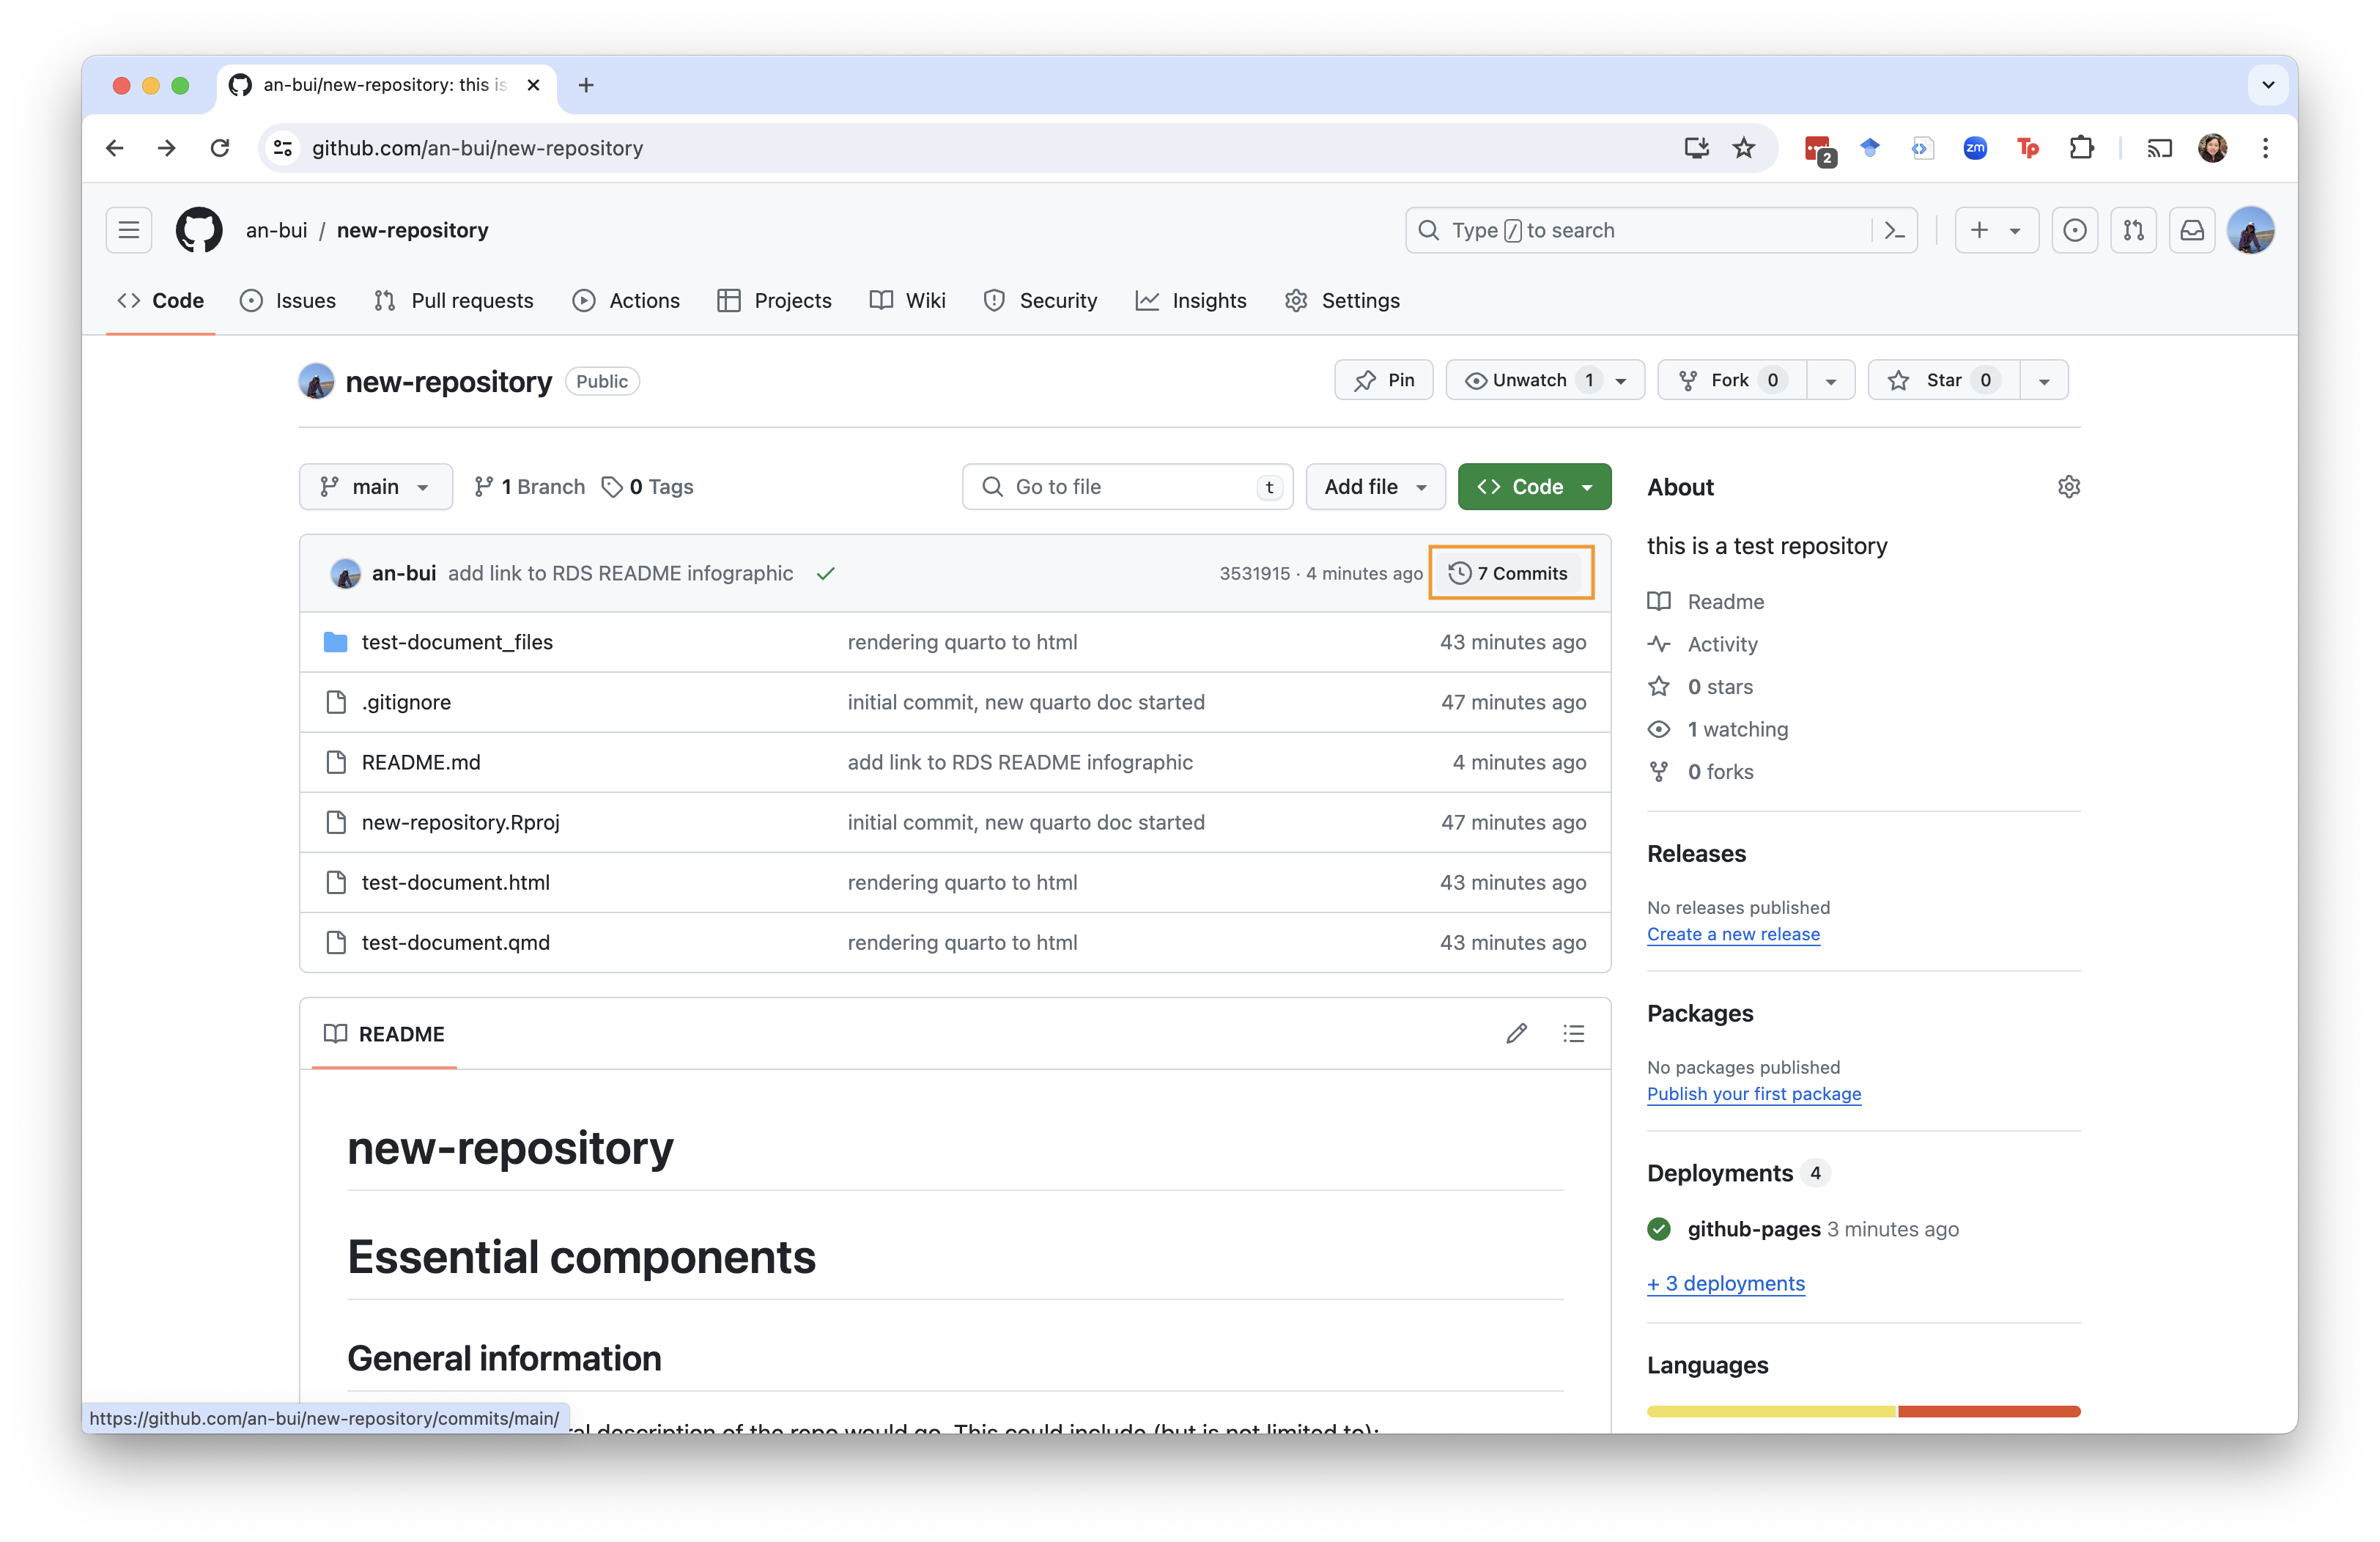
Each commit/push you make to your repo gets stored in your commit history. The commit history is a list of all the commits you’ve made.
Find your commit history in your repo. It should look like an arrow in a circle with the number of commits you’ve made. Click this.
2. Browse your commit history
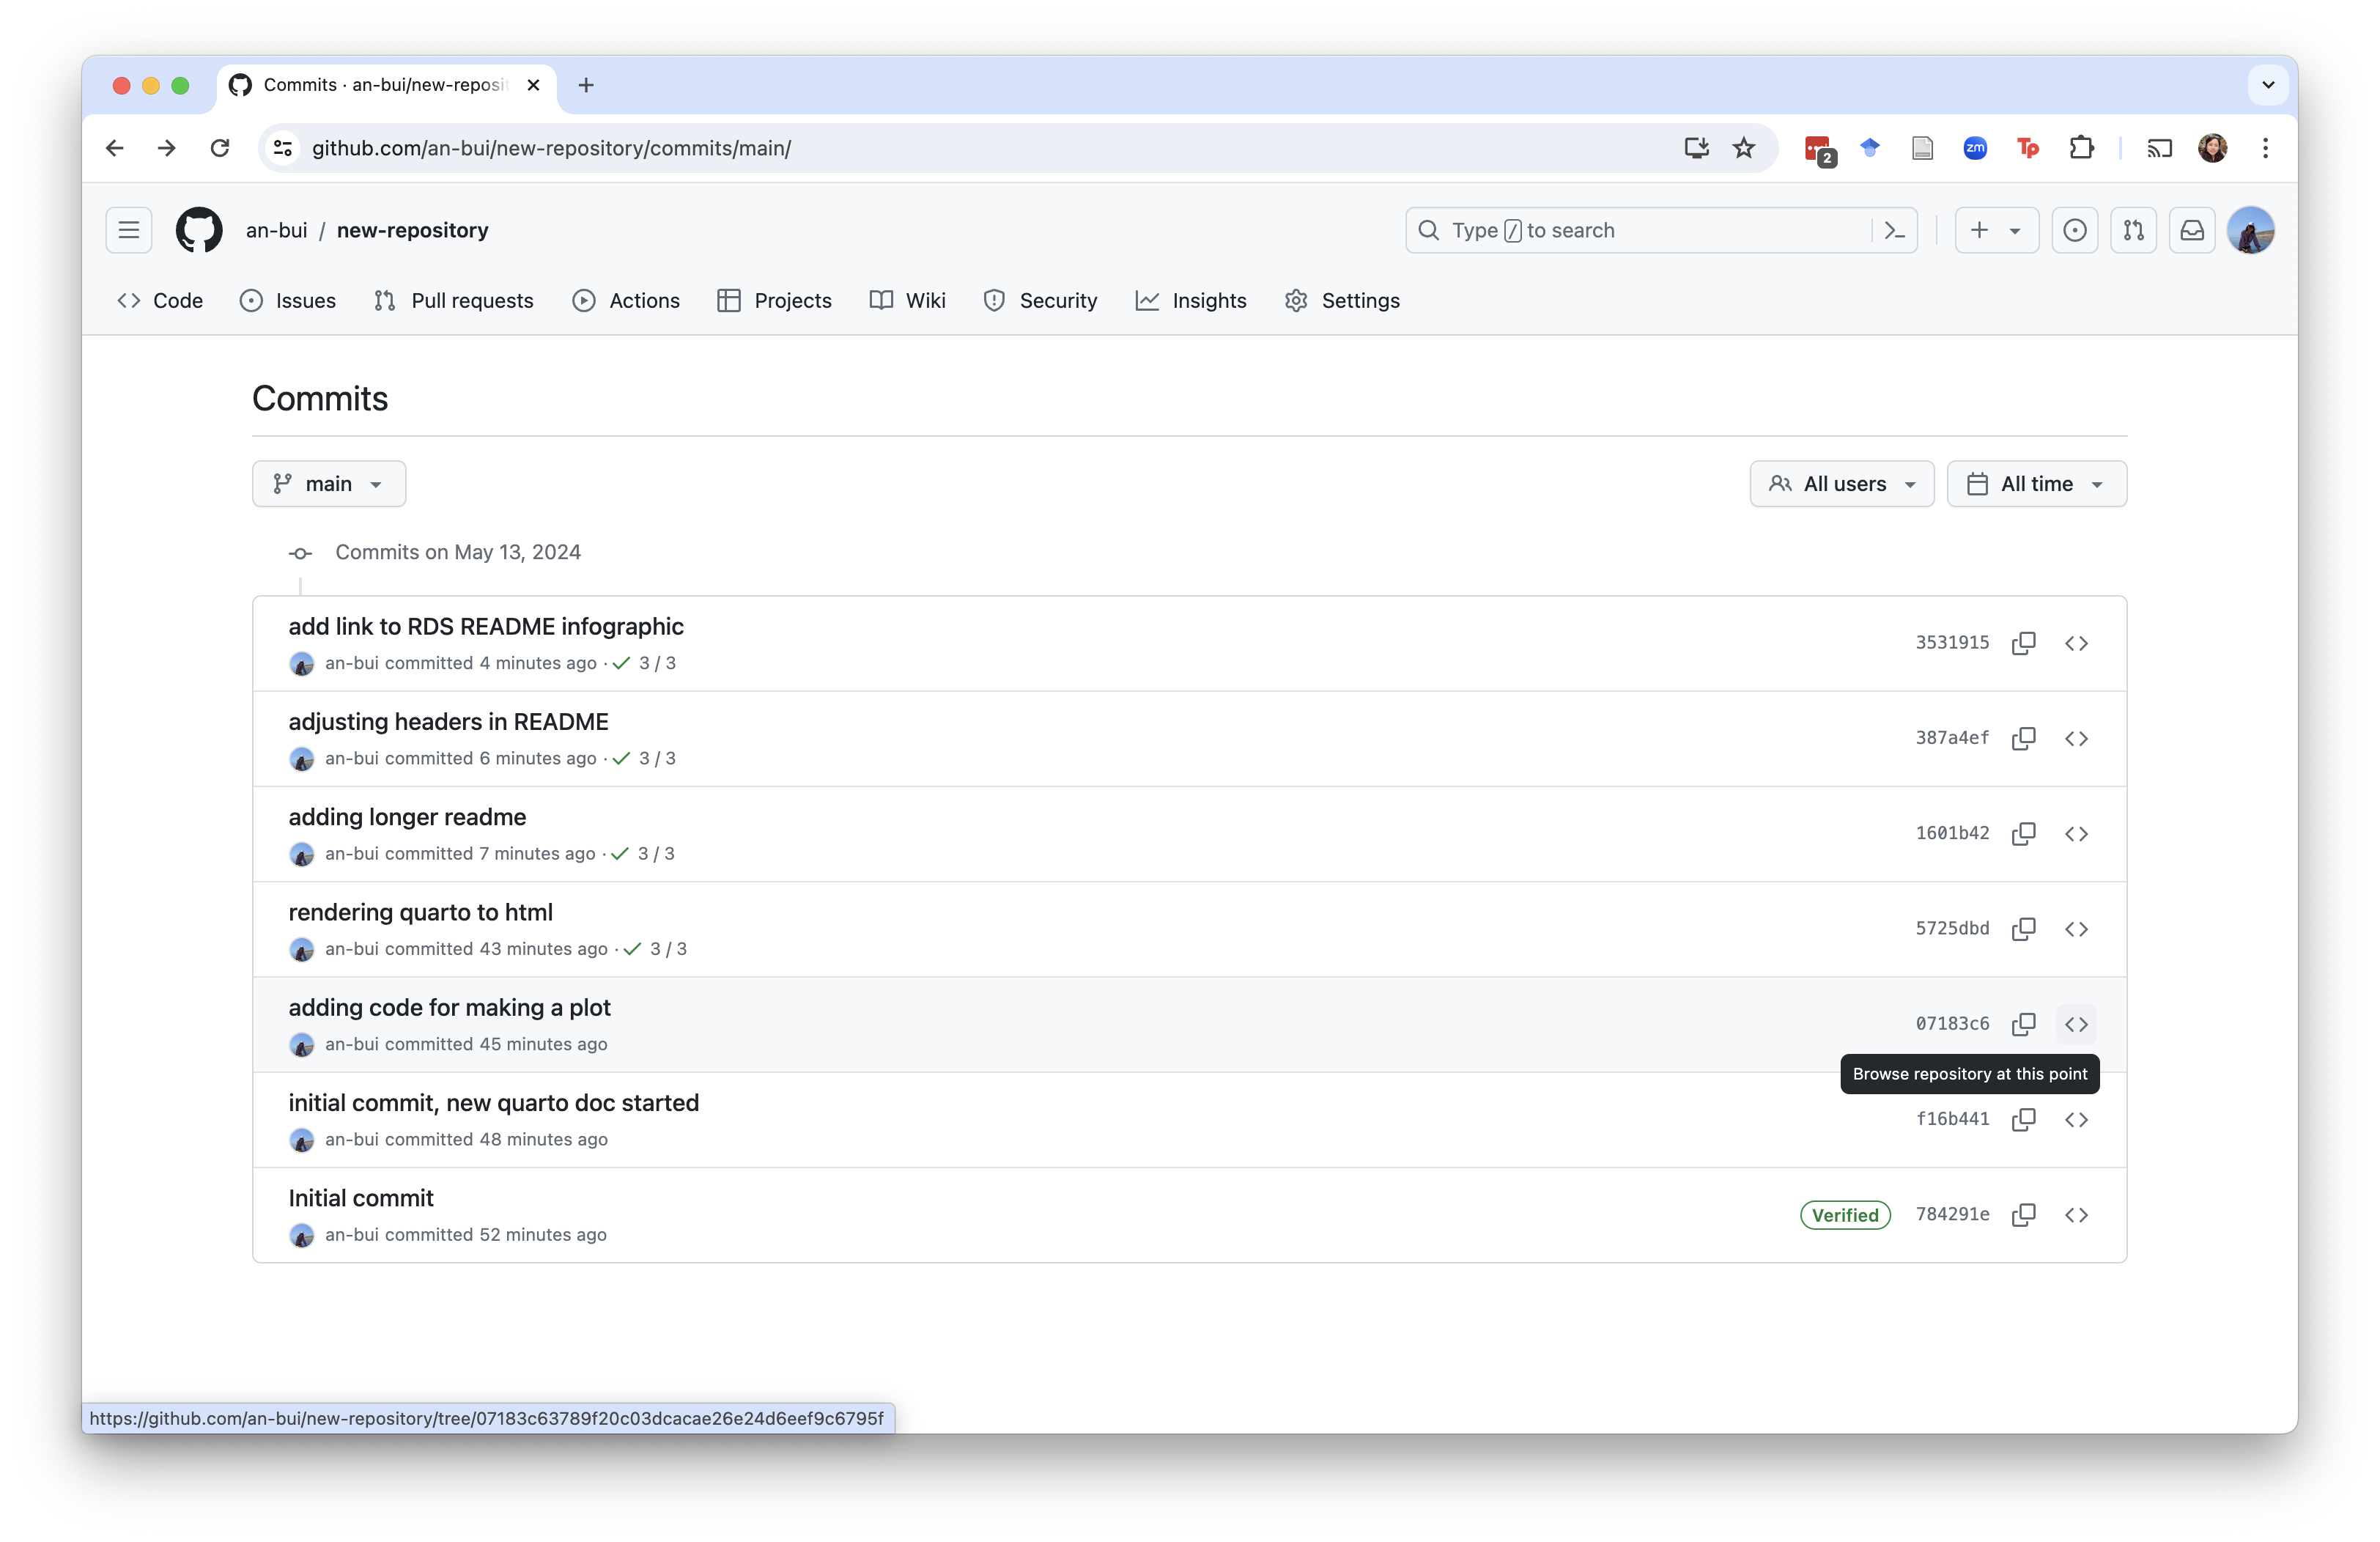
You can see the list of all commits you’ve made.
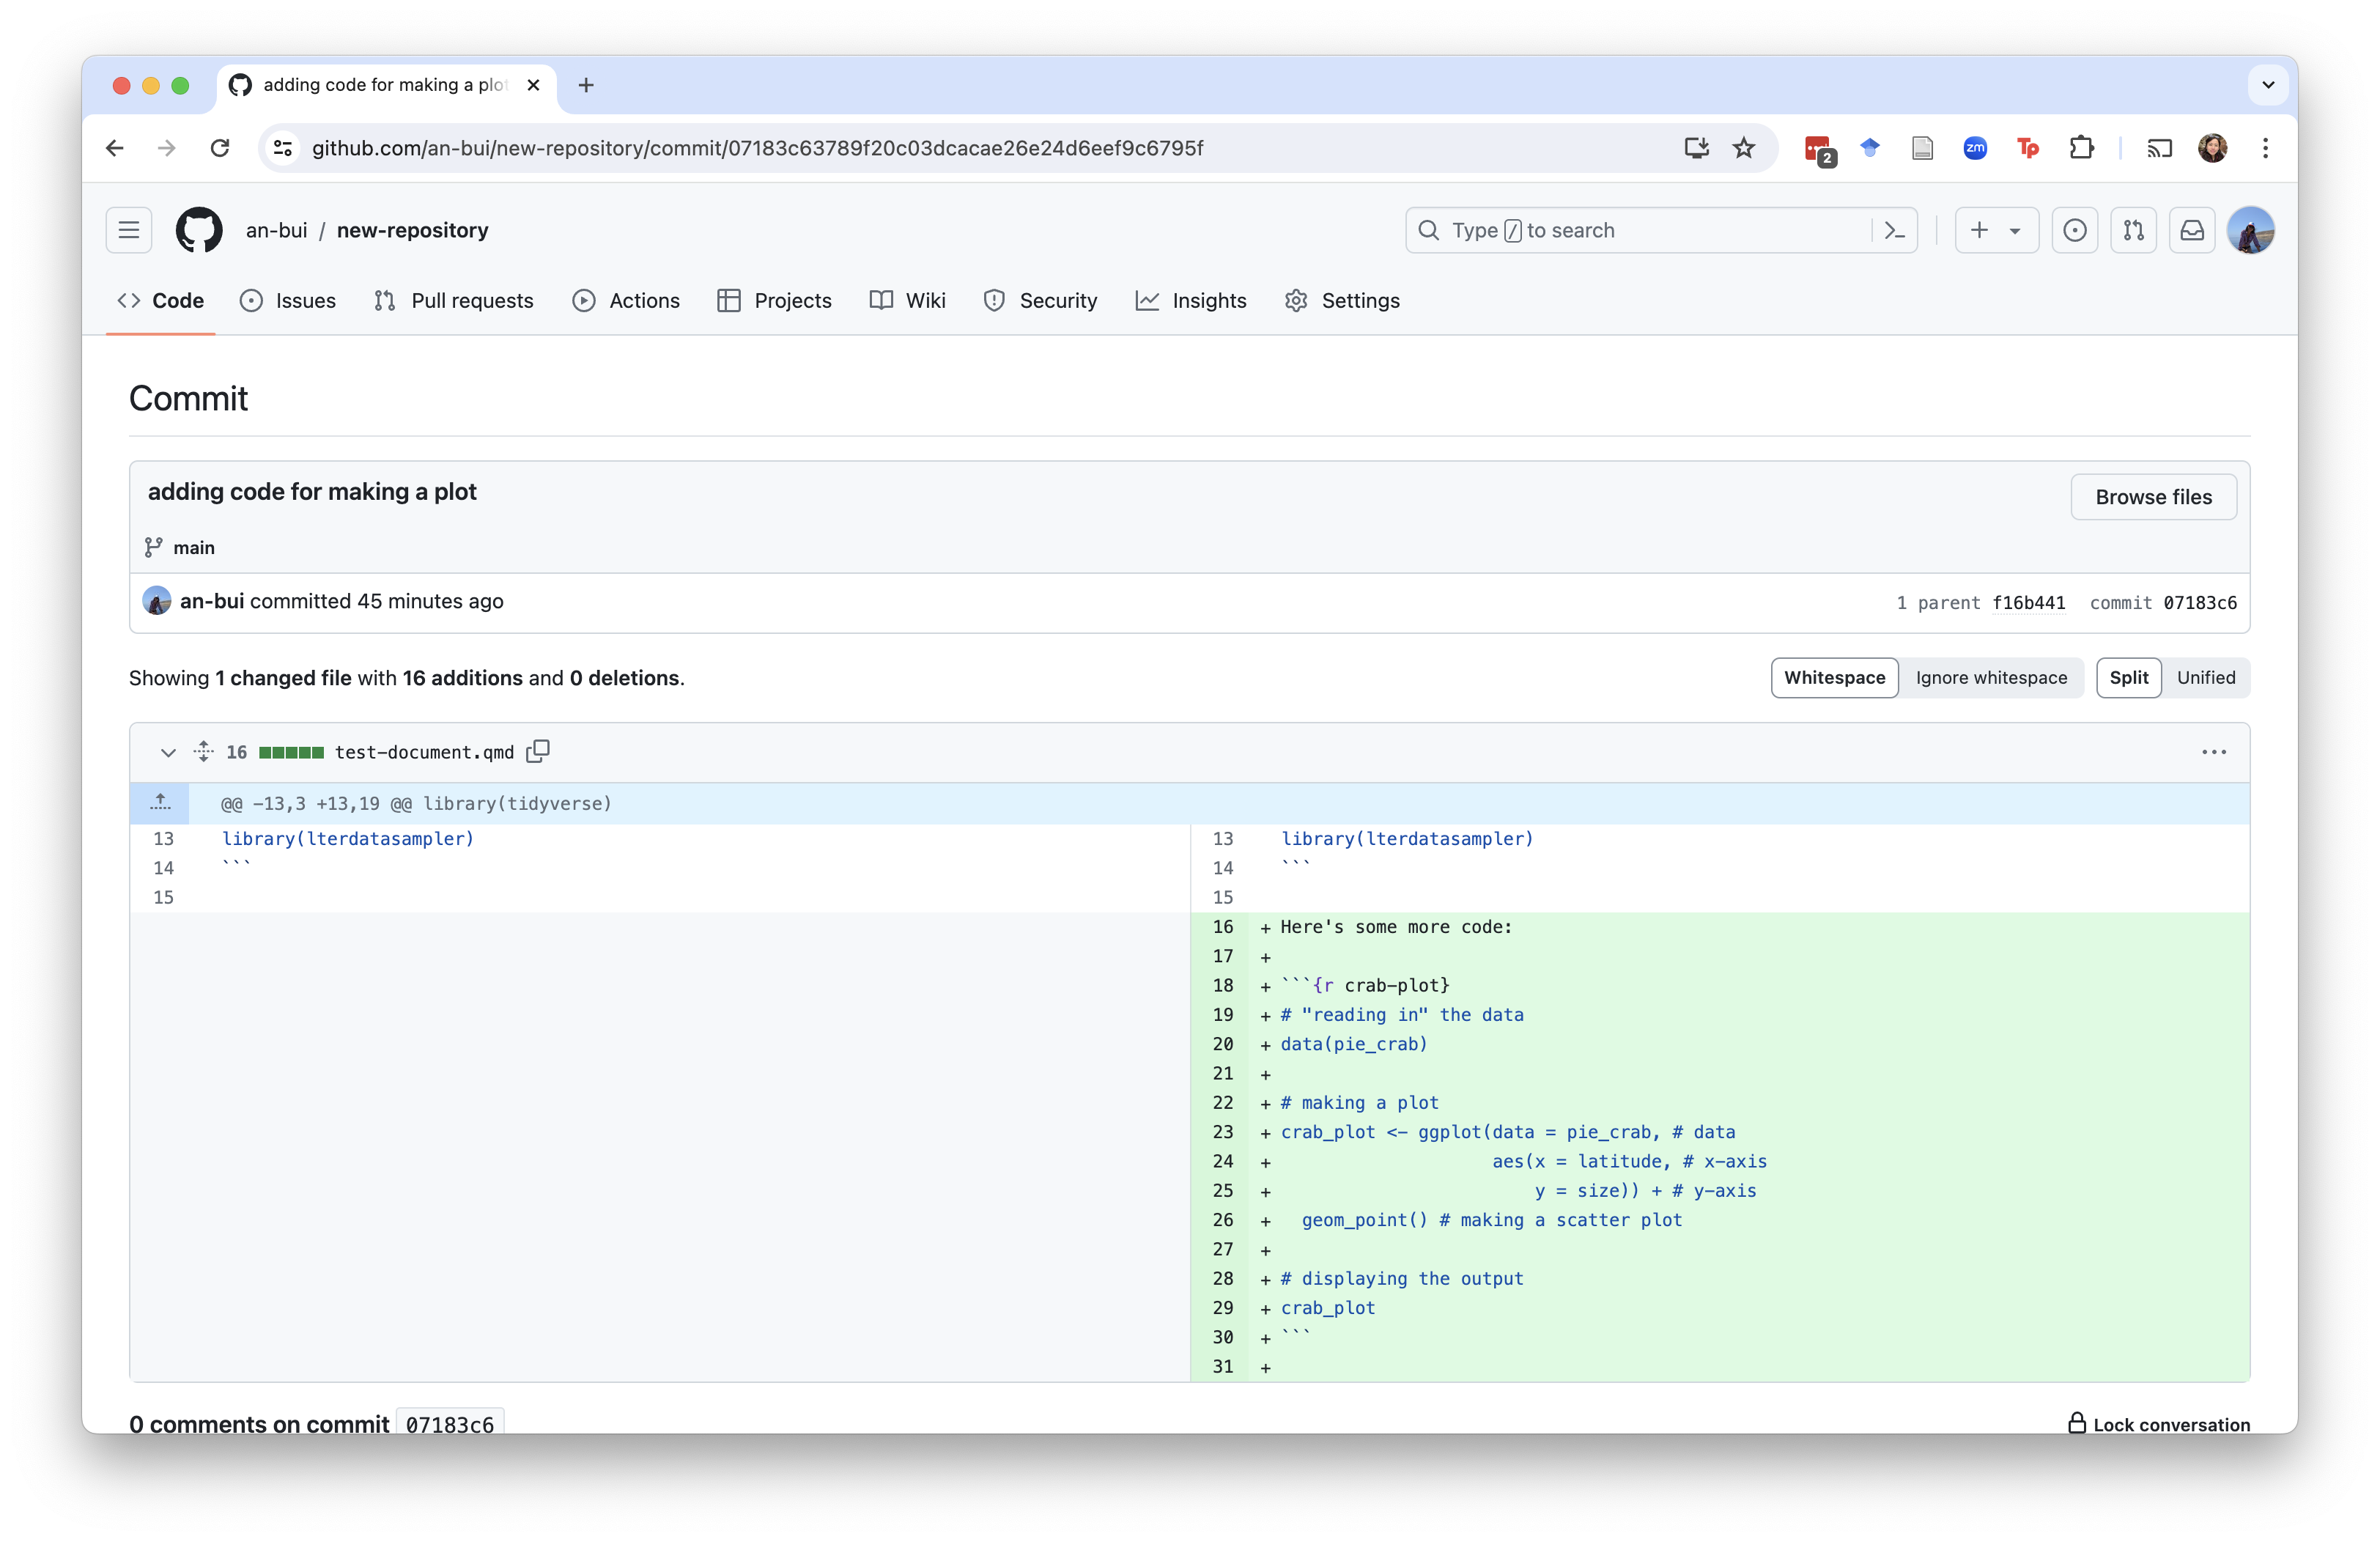
To see the details of a particular commit, click on the commit message.
This will lead you to a screen that displays the old verson on the left and what was added in that particular commit on the right.
3. Browse your repository
Back in the commit history, you have the option to browse your repository at the time of that commit (!!!).
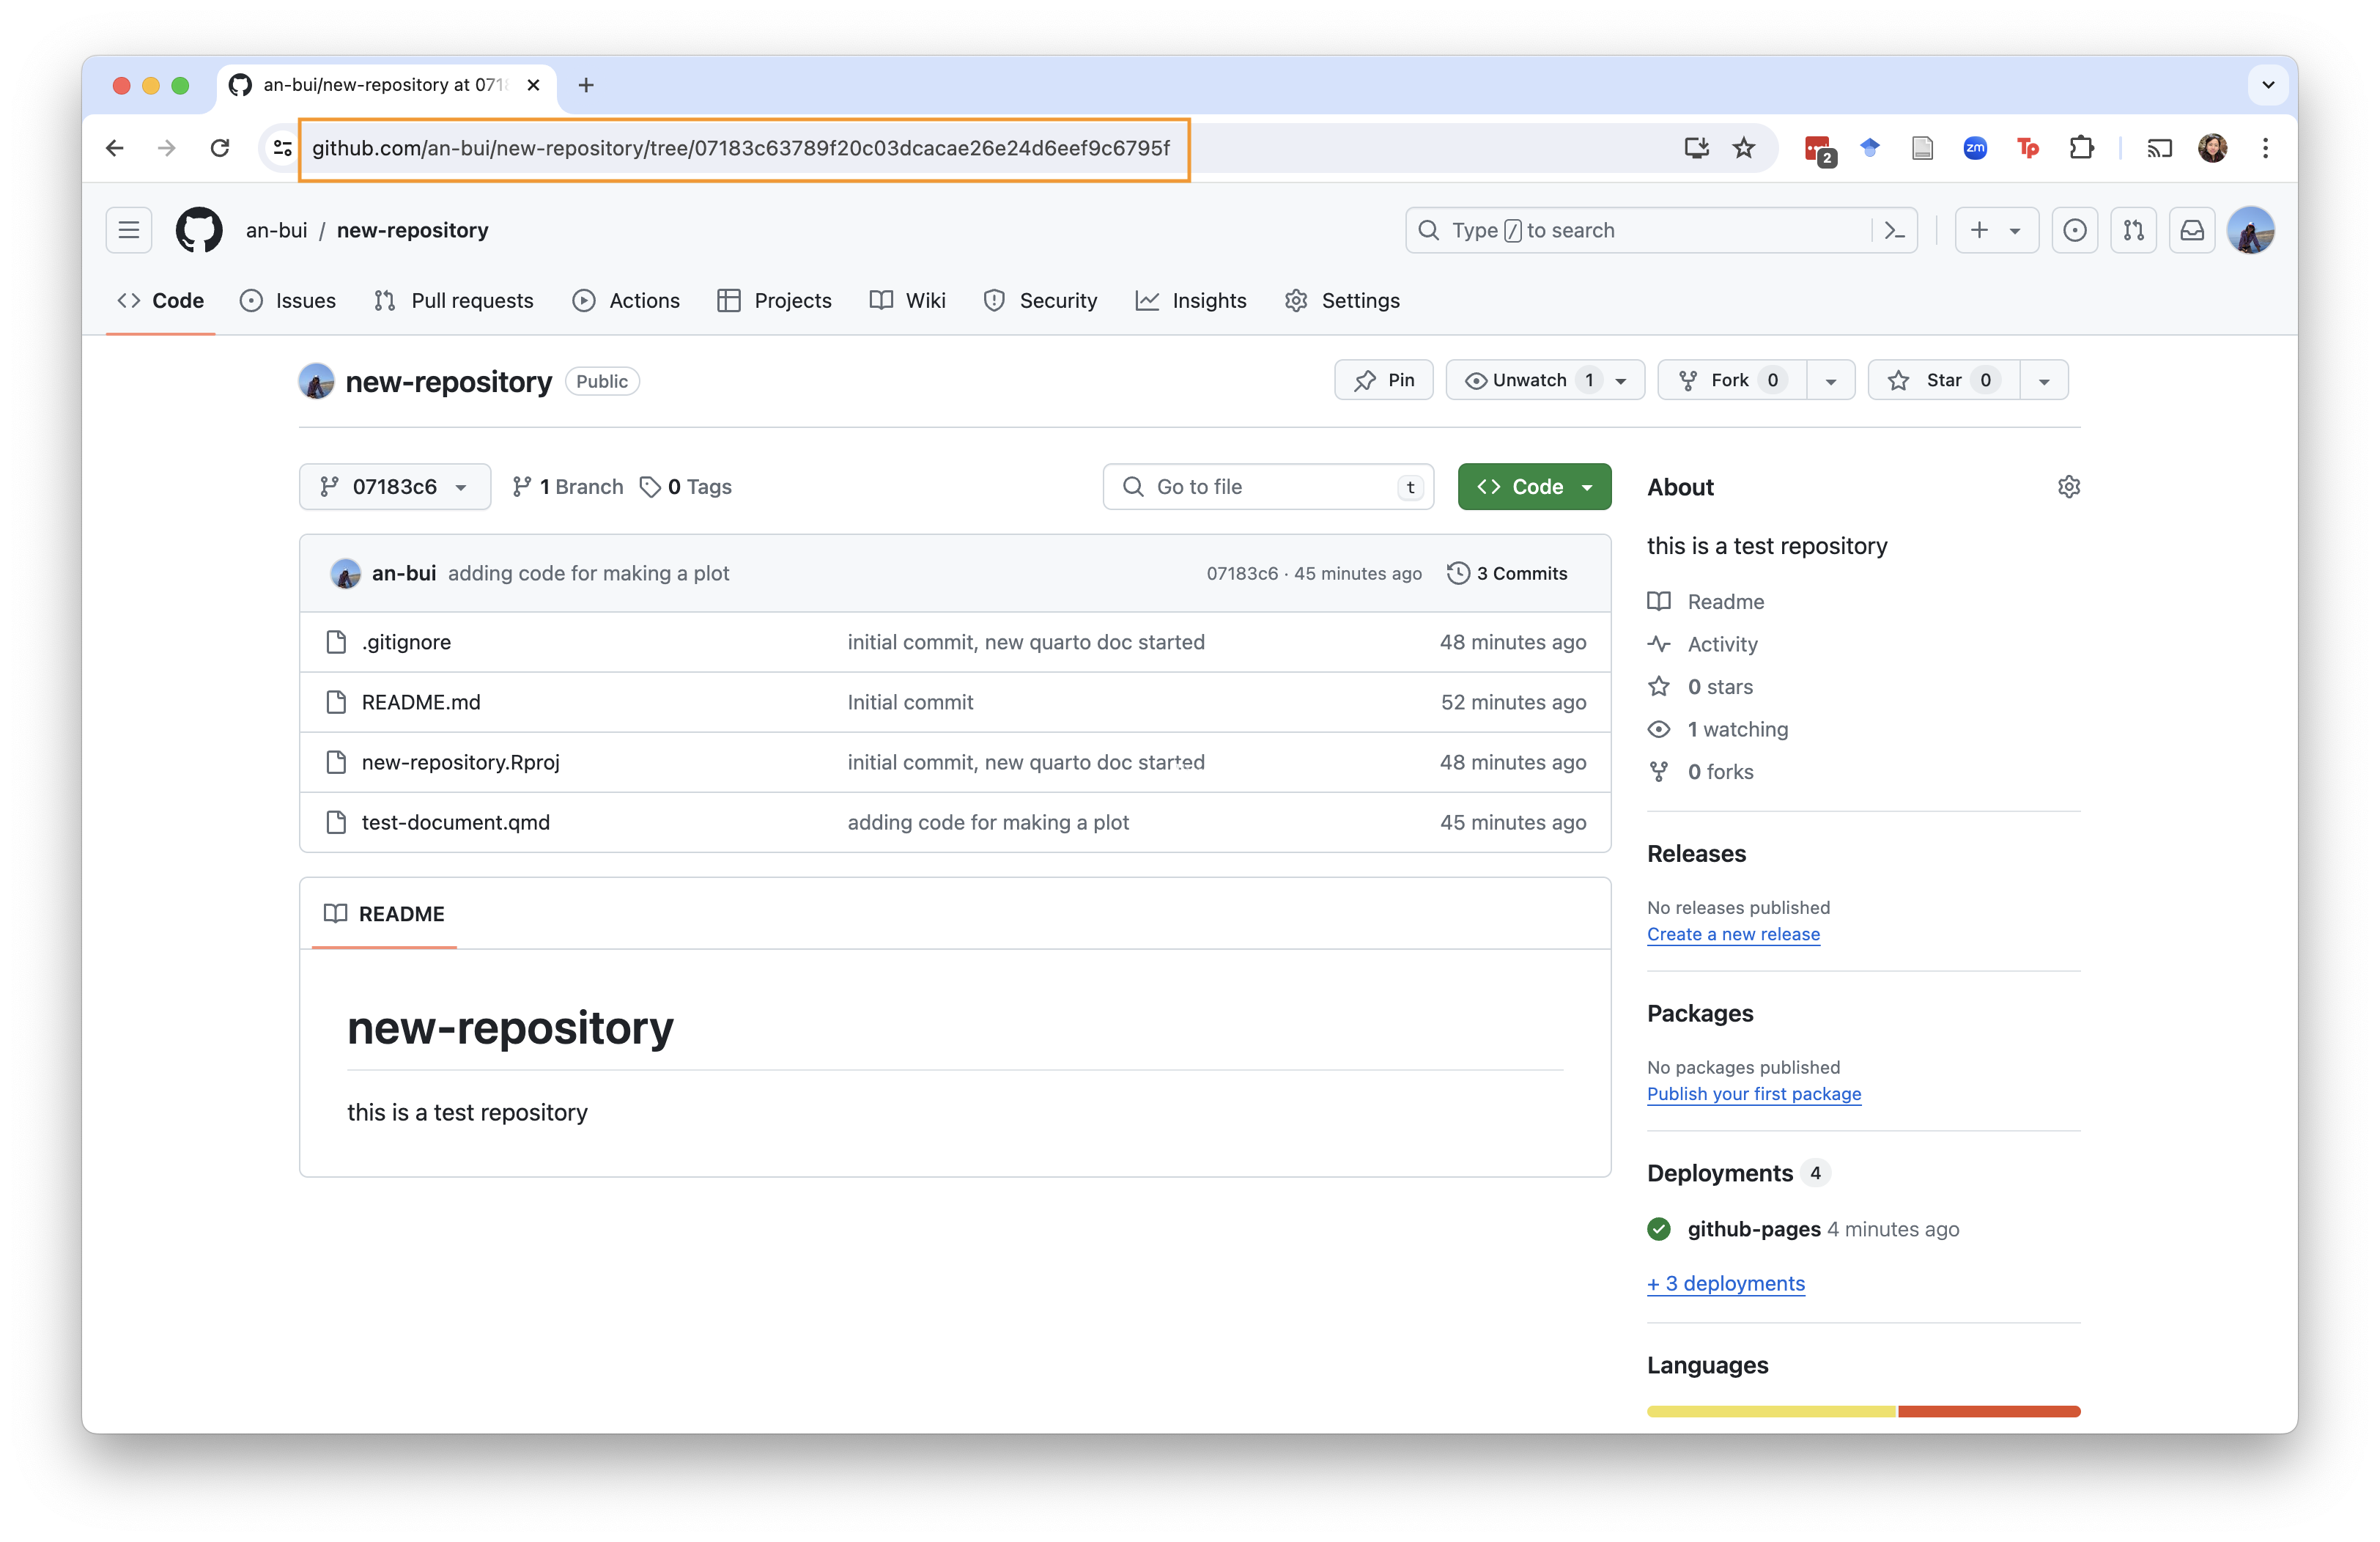
If you click the <> button, it will take you back to the repository at the time of that commit. You can navigate the same way you would in a regular repository.
The url with the long code at the end indicates that you are browsing an old version of your repo.
The time travel aspect of GitHub is one of the best reasons to use GitHub. If you are committing/pushing your changes regularly, you will have each version of your repository saved in the cloud. These versions are all easily browsable. If you’ve deleted something and you decide you want it back, then you can go back and get it. Nothing is gone forever, and that’s a good thing when you’re changing your code, working with others, and adding more to your work.
